EasyManua.ls Logo

MAAX Cyrene 300001 User Manual

MAAX Cyrene 300001
28 pages
To Next Page IconTo Next Page
Page #1 background imageLoading...
Page #1 background image
MODEL • MODÈLE • MODELO
INSTALLATION INSTRUCTIONS
GUIDE D’INSTALLATION
GUÍA DE INSTALACIÓN
FOR RIGHT AND LEFT SIDE DOOR INSTALLATION
(LEFT SIDE SHOWN)
POUR INSTALLATION DE PORTE CÔTÉ DROIT ET GAUCHE
(CÔTÉ GAUCHE ILLUSTRÉ)
PARA LA INSTALACIÓN DE LA PUERTA DEL LADO DERECHO E IZQUIERDO
(SE MUESTRA INSTALACIÓN AL LADO IZQUIERDO)
SAVE THIS GUIDE FOR FUTURE REFERENCE.
CONSERVER POUR UN USAGE ULTÉRIEUR.
CONSERVE ESTE MANUAL COMO REFERENCIA.
Read all instructions carefully before proceeding.
Lire toutes les instructions attentivement avant de commencer
l’installation.
Leer detenidamente todas las instrucciones antes de comenzar
la instalación.
Serial number Numéro de série Número de Serie
IMPORTANT Record the serial number
IMPORTANT Noter le numéro de série
IMPORTANTE Registre el número de serie
Before starting retain
the handle from the packaging (19)
Avant de commencer conserver
la poignée de l'emballage (19)
Antes de comenzar conservar
el tirador del empaque (19)
300001 300002 300004 300005
Question and Answer IconNeed help?

Do you have a question about the MAAX Cyrene 300001 and is the answer not in the manual?

MAAX Cyrene 300001 Specifications

General IconGeneral
Product TypeBathtub
ShapeRectangular
MaterialAcrylic
OverflowYes
ColorWhite
WarrantyLimited Lifetime

Summary

Before You Begin Preparation

Lumber Length Chart for Wall Installation

Chart detailing lumber lengths required for wall installation.

Two Person Installation Recommendation

Advises that a two-person installation is recommended for safety and ease.

Wall Preparation Steps

Double studs, level base, and place cardboard for protection.

Wall Reinforcements Installation

Step 1A: Start with longest vertical pieces

Fasten longest vertical wood pieces for shower contour, ensuring level.

Step 1B: Install remaining reinforcement pieces

Install additional wooden reinforcement pieces as illustrated.

Step 1C: Determine faucet location

Determine faucet placement, considering clearance with shower components.

Step 1D: Ensure plumbing installation is complete

Verify plumbing installation is finished before proceeding to next steps.

Drain Assembly

Step 2A: Perform partial drain assembly

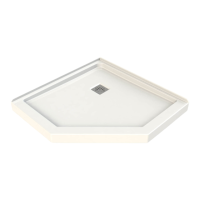
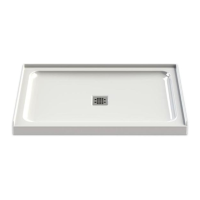
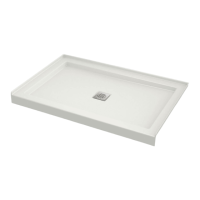
Partially assemble drain with shower base; final assembly during shower installation.

Wall Assembly

Step 3A: Align walls on flat surface

Align wall panels on a flat surface, drill holes, and use vise-grip if needed.

Step 3B: Remove plastic wrap

Remove protective plastic wrap from wall panels.

Step 3C: Apply silicone bead inside flanges

Apply silicone caulking inside wall flanges for sealing.

Step 3D: Assemble walls with screws and nuts

Secure wall panels using provided screws, washers, and nuts.

Wall Base Assembly

Step 4A: Align assembled walls with base

Align assembled walls with the shower base and drill holes.

Step 4B: Remove plastic wrap from base/walls

Remove protective plastic wrap from the base and bottom of walls.

Step 4C: Apply silicone to base interior

Apply silicone caulking inside the base near the holes.

Step 4D: Assemble walls to base with screws

Secure walls to the base using self-tapping screws, ensuring alignment.

Dry-Fit and Mark Wall Position

Step 5A: Complete drain assembly

Complete the drain assembly as per Step 2.

Step 5B: Slide shower into location, ensure leveling

Slide shower into place, ensuring the base is level and supported.

Step 5C: Mark unit position and remove

Mark the unit's position on walls and remove it.

Marking Plumbing Holes

Step 6A: Measure and transfer fixture locations

Measure fixture positions on the wall and transfer them to the unit.

Step 6B: Drill faucet holes using hole saw

Drill holes for faucets at marked positions using appropriate drill bits.

Wall Base Installation

Step 7A: Slide shower into location, ensure leveling

Slide shower into place, ensuring base is level and supported by framing.

Step 7B: Drill holes through wall upper lip

Drill holes through the upper lip of the walls aligned with imprints.

Step 7C: Fasten top of walls with screws

Secure the top of the walls to the frame using stainless steel screws.

Frame Assembly

Step 8A: Secure tracks to panel uprights

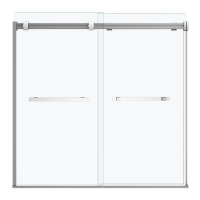
Attach tracks to panel uprights using screws, ensuring glass slots face inward.

Step 8B: Insert panel uprights into wall jambs

Insert panel uprights into wall jambs, aligning holes.

Wall Jambs Dry Fit Adjustment

Step 9A: Lift frame and place onto base

Lift frame assembly and place onto base, centering it.

Step 9B: Plumb jambs and mark wall position

Use a level to plumb wall jambs and mark their positions on the wall.

Wall Jamb Installation

Step 10A: Place jamb, mark holes

Place wall jamb in position, align inner edge, and mark mounting holes.

Step 10B: Drill holes and apply caulking

Drill mounting holes in the jamb and apply caulking.

Step 10C: Secure jamb to wall

Reinstall the wall jamb and secure it to the wall with screws.

Step 10D: Repeat for opposite jamb

Repeat the installation process for the wall jamb on the opposite side.

Rollers and Handle Installation

Step 11A: Install top and bottom rollers

Install top and bottom rollers onto the sliding door glass.

Step 11B: Open roller assembly, slide onto door

Open roller assembly, slide onto door glass, insert screw.

Step 11C: Disassemble and install handle

Disassemble handle components and install the handle onto the door.

Fixed Panel Installation

Step 12A: Place panel inside shower on cardboard

Gently place the fixed panel inside the shower on cardboard for easier handling.

Step 12B: Insert frame into wall jambs

Lift and maneuver the frame to insert it into the wall jambs.

Fixed Panel Installation

Step 13C: Insert panel bottom first

Insert the bottom of the fixed glass panel into the opposite upright.

Step 13D: Level glass with setting block

Level the glass by inserting a setting block between the panel and rail.

Step 13E: Secure panel with clips and screws

Secure the fixed glass panel using clips and screws.

Fixing the Frame

Step 14A: Drill panel uprights in wall jambs

Drill uprights in wall jambs using a 3/32" bit, adjusting frame position.

Step 14B: Secure shower to wall channels

Secure the shower enclosure to the wall channels using screws.

Gasket and Bumper Installation

Step 15A: Insert gasket between upright and panel

Insert gasket between the panel upright and fixed panel using handle.

Step 15B: Install bumpers in frame corners

Install bumpers in the frame corners using screws.

Doors Installation

Step 16A: Insert door catch

Insert door catch aligned with holes on the track corners.

Step 16B: Lift and tilt door assembly to insert

Lift and tilt door assembly to insert into roller groove and bottom track.

Step 16C: Adjust bottom rollers for height

Adjust bottom rollers using screw to prevent derailment and set door height.

Gaskets Installation

Step 17A: Install door gasket

Install door gasket on each side of the door with flaps facing outward.

Step 17B: Insert panel upright gasket

Insert panel upright gasket on the panel upright with flaps facing inward.

Step 17C: Install outer gasket

Install outer gasket on the fixed panel with flaps facing inward.

Application of the Silicone

Step 18A: Apply silicone between jambs, track, and base

Apply silicone caulking between wall jambs, walls, tracks, and base.

Step 18B: Apply 100mm silicone lines at bottom/corners

Apply 100mm silicone lines at the bottom between jambs/uprights and in corners.
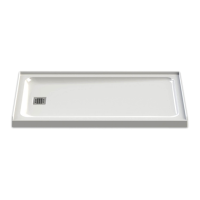
Limited Warranty - United States

Limited Warranty - Canada

Related product manuals