Do you have a question about the Makita BO4558 and is the answer not in the manual?
Instructions for fitting and removing abrasive paper for sanding.
Details on how to operate the power switch of the sander.
Steps to attach the paper dust bag to the sander's dust collection system.
Guide on performing sanding operations with the finishing sander.
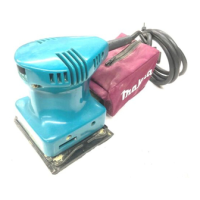
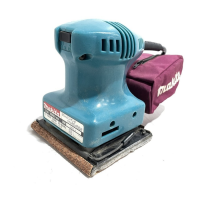
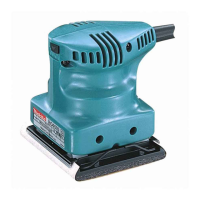
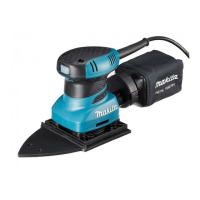
This document serves as an instruction manual for Makita Finishing Sanders, specifically models BO4555, BO4556, BO4557, and BO4558. It provides essential information regarding the safe operation, assembly, and maintenance of these power tools.
The finishing sander is designed for sanding large surfaces of wood, plastic, and metal materials, as well as painted surfaces. It operates on a single-phase AC power supply, and its double-insulated construction allows for use with sockets without an earth wire.
Before operating the tool, users must read and understand all safety warnings, instructions, illustrations, and specifications provided in this manual. Failure to comply with these instructions may result in electric shock, fire, and/or serious injury. All warnings and instructions should be saved for future reference. The term "power tool" refers to both mains-operated (corded) and battery-operated (cordless) tools.
The work area must be kept clean and well lit to prevent accidents. Power tools should not be operated in explosive atmospheres, such as in the presence of flammable liquids, gases, or dust, as sparks generated by the tool can ignite these substances. Children and bystanders must be kept away from the work area to avoid distractions and loss of control.
Power tool plugs must always match the outlet, and plugs should never be modified. Adapter plugs should not be used with earthed (grounded) power tools. Users should avoid body contact with earthed or grounded surfaces like pipes, radiators, ranges, and refrigerators to reduce the risk of electric shock. Power tools must not be exposed to rain or wet conditions. The power cord should not be abused; it should not be used for carrying, pulling, or unplugging the tool. It must be kept away from heat, oil, sharp edges, or moving parts. If operating outdoors, an extension cord suitable for outdoor use must be used. In damp locations, a residual current device (RCD) protected supply is recommended. A power supply via an RCD with a rated residual current of 30 mA or less is always recommended. Users with pacemakers or similar medical devices should consult their doctor before operating the tool due to electromagnetic fields (EMF). The power plug should not be touched with wet hands. If the cord is damaged, it must be replaced by the manufacturer or an authorized agent to prevent safety hazards.
Users must remain alert, watch what they are doing, and use common sense while operating the tool. The tool should not be used when tired, or under the influence of drugs, alcohol, or medication. Personal protective equipment, including eye protection, dust masks, non-skid safety shoes, hard hats, and hearing protection, must always be worn. Unintentional starting must be prevented by ensuring the switch is in the off-position before connecting to a power source, picking up, or carrying the tool. Any adjusting keys or wrenches must be removed before turning on the power tool. Users should avoid overreaching and maintain proper footing and balance. Loose clothing, jewelry, or long hair should be avoided as they can get caught in moving parts. If dust extraction and collection facilities are provided, they must be connected and properly used to reduce dust-related hazards. Familiarity gained from frequent use should not lead to complacency regarding tool safety principles. Protective goggles that comply with ANSI Z87.1 (USA), EN 166 (Europe), or AS/NZS 1336 (Australia/New Zealand) must always be worn. In Australia/New Zealand, a face shield is also legally required. Employers are responsible for enforcing the use of appropriate safety protective equipment by tool operators and others in the immediate working area.
The correct power tool for the application should be used, and the tool should not be forced. If the switch does not turn the tool on and off, it is dangerous and must be repaired. Before making adjustments, changing accessories, or storing the tool, the plug must be disconnected from the power source and/or the battery pack removed. Idle power tools should be stored out of the reach of children and should not be operated by unfamiliar persons. Power tools and accessories must be maintained properly, checking for misalignment, binding of moving parts, breakage, and other conditions that may affect operation. Damaged tools must be repaired before use. Cutting tools should be kept sharp and clean. The power tool, accessories, and tool bits must be used in accordance with these instructions, considering working conditions and the work to be performed. Handles and grasping surfaces must be kept dry, clean, and free from oil and grease. Cloth work gloves should not be worn when using the tool, as they may become entangled in moving parts.
Safety glasses or goggles must always be used; ordinary eye or sun glasses are not sufficient. The tool must be held firmly and operated only when hand-held. This tool is not waterproofed and should not be used with water on the workpiece surface. The work area must be adequately ventilated during sanding operations. Some materials contain toxic chemicals, so caution must be taken to prevent dust inhalation and skin contact, following material supplier safety data. Using this tool to sand certain products, paints, and wood can expose users to hazardous substances, requiring appropriate respiratory protection. Before use, ensure there are no cracks or breakage on the pad, as this can cause personal injury.
Before any work on the tool, ensure it is switched off and unplugged.
To install abrasive paper, open the paper clamp by raising the lever to release it from the locking port. Insert the paper end into the clamping part, aligning the paper edges evenly and parallel with the sides of the base. Bending the paper beforehand can make attachment easier. Once the paper is in place, return the lever to its original position. Repeat this process for the other end of the base, maintaining proper paper tension. After inserting the paper, ensure the clamping part holds it securely to prevent slippage and uneven sanding.
For model BO4555, which uses Makita hook-and-loop sandpaper, set the tool upside down with the pad on top. Position the sandpaper to fit the shape of the base, ensuring the holes on the sandpaper align with the holes on the pad for dust suction. Press the paper firmly over the pad. To remove the sandpaper, set the tool upside down, grasp one corner of the sandpaper, and peel it from the pad. If the sandpaper is in good condition, it can be saved for future use.
The dust bag facilitates clean and easy dust collection. To attach it, fit the bag's entry port onto the dust spout on the tool, ensuring the hole in the bag's entry port is directly over the pimple-like protrusion on the dust spout. For optimal results, empty the dust bag when it is approximately half full, tapping it lightly to remove as much dust as possible.
Place the paper dust bag on the paper dust bag holder with its front side upward. Insert the front fixing cardboard of the paper dust bag into the groove of the paper dust bag holder. Then, press the upper part of the front fixing cardboard in the arrow direction to hook it onto the claws. Insert the notch of the paper dust bag into the guide of the paper dust bag holder. Then, install the paper dust bag holder set on the tool.
Ensure the logo on the cardboard lip and the logo on the dust box are on the same side. Install the paper filter bag by fitting the cardboard lip into the groove of each holding tab. Then, install the dust nozzle on the dust box. To remove the dust nozzle, push the two latches. Remove the paper filter bag by pinching the logo side of its cardboard lip and pulling the cardboard lip downwards to move it out of the holding tab of the dust box.
Before adjusting or checking the tool's function, ensure it is switched off and unplugged.
Before plugging in the tool, always check that the tool is switched off. To start the tool, press the "I" side of the switch. To stop the tool, press the "O" side of the switch.
Never run the tool without abrasive paper, as this can seriously damage the pad. Do not force the tool; excessive pressure can decrease sanding efficiency, damage the abrasive paper, and/or shorten tool life. Hold the tool firmly, turn it on, and wait until it reaches full speed. Then, gently place the tool on the workpiece surface. A finishing sander is generally used to remove only a small amount of material at a time. Since surface quality is more important than the amount of stock removed, do not bear down on the tool. Keep the base flush with the workpiece at all times.
Before attempting any inspection or maintenance, ensure the tool is switched off and unplugged. Never use gasoline, benzine, thinner, alcohol, or similar substances, as they can cause discoloration, deformation, or cracks. To maintain product safety and reliability, repairs, carbon brush inspection and replacement, and any other maintenance or adjustment should be performed by Makita Authorized Service Centers, using only Makita replacement parts.
These accessories or attachments are recommended for use with your Makita tool as specified in this manual. Using any other accessories or attachments may present a risk of injury. Only use accessories or attachments for their stated purpose. If assistance or more details are needed regarding these accessories, contact your local Makita Service Center. Optional accessories include abrasive paper (without pre-punched holes), paper dust bag, paper dust bag holder, punch plate, dust bag, dust box, and paper filter bag. Note that some items may be included in the tool package as standard accessories and may differ by country.
| Type | Finishing Sander |
|---|---|
| Voltage | 120V |
| Dust Collection | Yes |
| Power Source | Corded Electric |
| Orbit Diameter | 1/8 inch |
| Abrasive Paper Size | 4-1/2 inch x 5-1/2 inch |
| Length | 9.0" |
| Overall Length | 9.0" |