EasyManua.ls Logo

Makita DBO480 - User Manual

Makita DBO480
16 pages
Print Icon
To Next Page IconTo Next Page
Loading...
INSTRUCTION MANUAL
Cordless Finishing Sander
DBO480
DBO481
DBO482
ENGLISH: Original instructions
Read before use.
Question and Answer IconNeed help?

Do you have a question about the Makita DBO480 and is the answer not in the manual?

Summary

Specifications

Applicable Battery Cartridge and Charger

Lists compatible batteries and chargers for the tool.

Symbols

Explains the meaning of various symbols used in the manual.

Intended Use

Describes the tool's primary purpose and applications.

Noise Information

Details the noise emission levels for different models.

Safety Warnings

General Power Tool Safety

Core safety guidelines applicable to all power tools.

Work Area Safety

Essential safety practices for the operating environment.

Electrical Safety

Precautions related to electrical hazards and connections.

Personal Safety

Guidelines for operator protection and awareness during use.

Vibration

EC Declaration of Conformity

Power Tool Use and Care

Proper Tool Operation

Guidelines for using the tool correctly and safely.

Tool Condition Checks

Importance of checking tool functionality and safety.

Battery Tool Use and Care

Battery Charging and Storage

Instructions for charging and storing battery packs.

Battery Safety Precautions

Critical safety measures for handling battery cartridges.

Service and Maintenance

Professional Servicing

Emphasizes professional servicing and genuine replacement parts.

Battery Pack Servicing

Guidelines for servicing damaged battery packs.

Sander Safety Warnings

Specific Operational Safety

Key safety practices specific to operating the sander.

Important Battery Cartridge Safety

Handling and Precautions for Batteries

Critical safety instructions for handling and preventing battery issues.

Tips for Maintaining Maximum Battery Life

Functional Description

Installing or Removing Battery Cartridge

Step-by-step guide for inserting and removing the battery.

Indicating Remaining Battery Capacity

Tool; Battery Protection System

Overload Protection

How the tool stops automatically under heavy load.

Overheat Protection

Mechanism for stopping the tool when it overheats.

Overdischarge Protection

How the tool stops when battery capacity is low.

Protections Against Other Causes

Other protective stops and troubleshooting steps.

Switch Action

Turning the Tool On and Off

Instructions for operating the power and stop buttons.

Changing the Tool Speed

Assembly

Installing and Removing Abrasive Paper

Steps for attaching and detaching abrasive paper securely.

Using Abrasive Paper Without Dust-Suction Hole

Using Abrasive Paper With Dust-Suction Hole

Using Hook-and-Loop Abrasive Paper

For DBO480

Specific instructions for attaching hook-and-loop paper on DBO480.

Replacing Pads for Hook-and-Loop Paper

For DBO481

Steps to replace pad for hook-and-loop paper on DBO481.

For DBO482

Steps to replace pad for hook-and-loop paper on DBO482.

Replacing Pads for Hook-and-Loop Paper (Continued)

For DBO480, DBO481

Steps to replace pad for hook-and-loop paper on DBO480/481.

For DBO482

Steps to replace pad for hook-and-loop paper on DBO482.

Using Triangular;Rectangular Abrasive Paper

Replacing Pads for Triangular;Rectangular Paper

Steps to replace pad for triangular/rectangular paper.

Installing and Removing Dust Bag

Installing and Removing Dust Box

Replacing Paper Filter

Instructions for removing and replacing the paper filter in the dust box.

Connecting with Vacuum Cleaner

Operation

Sanding Operation

Guidelines for performing effective sanding operations.

Maintenance

Optional Accessories

Overview

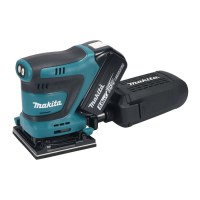
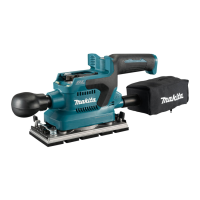
This document is an instruction manual for the Makita Cordless Finishing Sander models DBO480, DBO481, and DBO482. It provides comprehensive information on the tool's intended use, safety warnings, functional description, assembly, operation, and maintenance.

Function Description

The Makita Cordless Finishing Sander is designed for sanding large surfaces of wood, plastic, metal materials, and painted surfaces. It operates on a battery system, offering cordless convenience. The tool features a power/speed select button to control its orbital speed, allowing users to switch between high and low modes depending on the application and workload.

The sander incorporates a tool/battery protection system that automatically cuts off power to the motor to extend tool and battery life. This system provides:

  • Overload protection: The tool stops if it draws an abnormally high current. To restart, turn the tool off, stop the overloading application, and then turn it back on.
  • Overheat protection: The tool stops if it or the battery overheats. Allow both to cool before restarting.
  • Overdischarge protection: The tool stops if the battery capacity is insufficient. Remove and charge the battery.
  • Protections against other causes: The system also addresses other issues that could damage the tool, causing it to stop. To clear these, users should turn the tool off and on, charge or replace batteries, or allow the tool and battery to cool. If issues persist, contact a Makita Service Center.

The battery cartridge features indicator lamps and a check button to display the remaining battery capacity. This allows users to monitor battery levels and plan their work accordingly.

Usage Features

The sander offers versatility in abrasive paper installation, accommodating both papers without dust-suction holes and those with dust-suction holes, as well as hook-and-loop abrasive papers. It also supports the use of triangular/rectangular abrasive papers, which are optional accessories.

Installing and Removing Abrasive Paper (without dust-suction hole):

  1. Cut the abrasive paper to the appropriate size.
  2. Release the clamp lever on one end of the pad by sliding it away from the stopper.
  3. Pull the clamp lever outwards to create space for the paper.
  4. Slip one end of the abrasive paper into the space.
  5. Reposition the paper to lie flat on the pad surface.
  6. Set the clamp lever back to clamp the paper securely.
  7. Repeat for the other end, ensuring proper tension.
  8. Use a punch plate to create dust-suction holes if needed, aligning stoppers with the pad and sanding base.
  9. To remove, release clamps on both ends and peel off the paper.

Installing and Removing Abrasive Paper (with dust-suction hole):

  1. Release the clamp lever on one end.
  2. Pull the clamp lever outwards to create space.
  3. Place the abrasive paper over the pad, aligning its dust-suction holes with those on the pad.
  4. Slip one end of the paper into the space.
  5. Set the clamp lever back to clamp the paper securely.
  6. Repeat for the other end.

Using Hook-and-Loop Abrasive Paper:

  1. Clean the hook-and-loop pad.
  2. Attach the hook-and-loop abrasive paper to the pad, aligning dust-suction holes.
  3. To remove, peel off the paper from the edge.

Using Triangular/Rectangular Abrasive Paper (Optional Accessory):

  1. Loosen and remove the four screws securing the standard pad to the sanding base.
  2. Replace the standard pad with an optional hook-and-loop triangular/rectangular pad.
  3. Re-tighten the screws firmly.
  4. Clean the triangular/rectangular pad.
  5. Attach the hook-and-loop abrasive paper to the pad, aligning dust-suction holes.
  6. To remove, peel off the paper from the edge.

Dust Collection: The sander can be used with an optional dust bag or dust box for clean sanding operations.

  • Dust Bag: Attach the dust bag over the tapered dust spout at the back of the motor housing. Ensure it's pushed on as far as possible to prevent it from coming off. Empty the dust bag when it's approximately half full by removing it from the tool, detaching the nozzle, and gently shaking or tapping it.
  • Dust Box: Attach the dust box over the tapered dust spout, ensuring it's pushed on as far as possible. Empty the dust box when it's approximately half full by removing it from the tool, detaching the nozzle (by pressing locking latches), and gently shaking or tapping it.

Connecting with a Vacuum Cleaner (Optional Accessory): For enhanced dust collection, a Makita vacuum cleaner can be connected to the tool using an optional hose (28 mm) or a combination of a front cuff (22 mm) and the cleaner's hose.

Operation:

  1. Secure the workpiece firmly.
  2. Hold the tool firmly.
  3. Turn the tool on and wait for it to reach full speed.
  4. Gently place the tool on the workpiece surface.
  5. Apply light pressure; avoid forcing the tool.
  6. Keep the base flush with the workpiece.
  7. When using triangular/rectangular pads, the upper and lower sides of the pad can be used for sanding, which is convenient for objects like louvers.

Maintenance Features

Regular maintenance is crucial for the safety and reliability of the tool.

  • Always ensure the tool is switched off and the battery cartridge is removed before inspection or maintenance.
  • Do not use gasoline, benzine, thinner, alcohol, or similar substances, as they can cause discoloration, deformation, or cracks.
  • Repairs and other maintenance should be performed by Makita Authorized or Factory Service Centers using genuine Makita replacement parts.
  • After use, wipe the tool with a dry cloth or a cloth slightly moistened with soapy water at regular intervals.

Replacing Paper Filter (for Dust Box):

  1. Remove the dust box from the tool.
  2. Detach the dust nozzle from the box by pressing and holding the locking latches.
  3. Hold the inner top edge of the cardboard opening and pull it off downwards to disengage it from the upper hooking tab of the dust box.
  4. Take the paper filter out by pulling the outer bottom edge of the cardboard opening free from the lower hooking tab.
  5. Replace the paper filter by engaging the bottom edge of the cardboard opening in the lower hooking tab and pushing the top edge inwards until it clips into the upper hooking tab.
  6. Snap the dust nozzle into place, pressing and holding the locking latches on both sides of the dust box.
  • Ensure logos on the dust box, paper filter, and dust nozzle are aligned consistently during reassembly.

Battery Cartridge Maintenance:

  • Charge the battery cartridge before it's completely discharged.
  • Do not recharge a fully charged battery cartridge to avoid shortening its service life.
  • Charge the battery cartridge at room temperature (10 °C - 40 °C).
  • Allow a hot battery cartridge to cool down before charging.
  • Remove the battery cartridge from the tool or charger when not in use.
  • Charge the battery cartridge if it won't be used for a long period (more than six months).

Makita DBO480 Specifications

General IconGeneral
Power SourceBattery
Battery Voltage18V
Dust ExtractionYes
Pad Size112 mm x 102 mm
Paper Size114 mm x 140 mm

Related product manuals