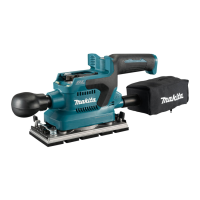
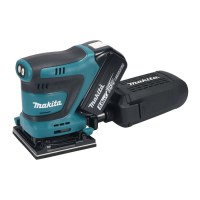
The Makita Cordless Finishing Sander, available in models DBO380 and DBO381, is a versatile power tool designed for sanding large surfaces of wood, plastic, metal, and painted materials. This instruction manual provides comprehensive details on its operation, maintenance, and safety features, including the unique wireless activation function available on the DBO381 model.
Function Description
The Cordless Finishing Sander is equipped with an electronic function for easy operation and constant speed control, which helps achieve a fine finish. The tool's orbital speed can be adjusted across three modes—high, medium, and low—to suit various applications and workloads. This allows for precise control over the sanding process, preventing overheating and melting of the workpiece, especially when sanding at high orbital speeds.
The DBO381 model features a wireless activation function, enabling clean and comfortable operation when connected to a supported Makita vacuum cleaner. This function allows the vacuum cleaner to automatically start and stop in sync with the sander's switch operation, significantly reducing dust and improving the working environment.
Important Technical Specifications
Both DBO380 and DBO381 models share several core specifications:
- Pad size: 92 mm x 185 mm
- Abrasive paper size: 93 mm x 228 mm
- Rated voltage: D.C. 18 V
- Overall length (with front grip): 336 mm
- Net weight: 1.9 - 2.2 kg (may vary depending on battery cartridge and attachments)
The orbital speeds per minute are adjustable:
- High: 12,000 min⁻¹
- Medium: 8,000 min⁻¹
- Low: 4,000 min⁻¹
The tool is compatible with Makita 18V LXT battery cartridges (BL1815N, BL1820B, BL1830B, BL1840B, BL1850B, BL1860B) and various Makita chargers (DC18RC, DC18RD, DC18RE, DC18SD, DC18SE, DC18SF, DC18SH).
Noise levels are specified as:
- Sound pressure level (LPA): 72 dB(A)
- Uncertainty (K): 3 dB(A)
- The noise level during actual working may exceed 80 dB(A), necessitating ear protection.
Vibration emission values (sanding metal plate):
- Vibration emission (ah): 3.6 m/s²
- Uncertainty (K): 1.5 m/s²
Usage Features
- Battery Cartridge Installation/Removal: Always switch off the tool before installing or removing the battery. Hold both the tool and battery cartridge firmly to prevent accidental slippage and injury. The battery cartridge slides into a groove until it clicks into place, with a red indicator showing if it's not fully locked.
- Remaining Battery Capacity Indication: For battery cartridges with an indicator, pressing the check button illuminates lamps for a few seconds, showing the remaining capacity (75-100%, 50-75%, 25-50%, 0-25%, or charge battery). A blinking first lamp indicates the battery protection system is active.
- Tool/Battery Protection System: The tool features overload, overheat, and overdischarge protection systems. If any of these conditions occur, the tool automatically stops to prevent damage. Users must turn off the tool, address the issue (e.g., cool down, charge battery), and then restart.
- Switch Action: The tool is turned on by pressing the power/speed select button on the main handle, starting at its highest orbital speed. The stop button pauses or ceases operation.
- Changing Tool Speed: Pressing the power/speed select button cycles through high, medium, and low speed modes. Continuous operation at low speeds for extended periods can overload the motor.
- Abrasive Paper Installation (Supplied Type): The abrasive paper is secured by clamp levers on both ends of the sanding base. To install, release the clamp lever, pull it outwards to create a space, slip one end of the paper into the space, secure the clamp, then repeat for the other end, ensuring proper tension and alignment of dust-suction holes.
- Abrasive Paper Installation (Market Available Type): For non-pre-punched paper, users must cut it to size and use a punch plate (optional accessory) to create dust-suction holes after securing the paper to the pad.
- Hook-and-Loop Abrasive Paper (Optional Accessory): For hook-and-loop type paper, the standard pad must be replaced with an optional hook-and-loop pad. Ensure the O-ring is correctly placed in the circular grooves before installing the new pad.
- Dust Collection: The tool can be fitted with either an optional dust bag or a dust box. Both attach to the tapered dust spout at the back of the motor housing. For optimal dust collection, the dust bag/box should be emptied when approximately half full.
- Front Grip Removal/Installation: The detachable front grip allows for sanding in tight, confined, and hard-to-reach areas. To remove, push and hold the grip towards the motor housing, rotate 90 degrees, and pull it apart. Installation is the reverse process, ensuring the grip is fully inserted and rotated into position.
- Sanding Operation: Always use abrasive paper to prevent pad damage. Hold the tool firmly with both hands, turn it on, and wait for full speed before gently placing it on the workpiece. Maintain an even, level pressure. For confined areas, detach the front grip and use one hand, moving the tool along curves, wall faces, and corners as needed.
- Wireless Activation Function (DBO381 only): This feature requires a wireless unit (optional accessory) and a compatible Makita vacuum cleaner.
- Wireless Unit Installation: The wireless unit is inserted into a dedicated slot on the tool. Ensure the unit is clean, inserted in the correct direction, and the lid is securely closed.
- Tool Registration for Vacuum Cleaner: This links the sander to the vacuum cleaner. Install batteries in the vacuum cleaner, set its stand-by switch to "AUTO," then press the wireless activation button on both the vacuum cleaner (for 3 seconds until it blinks green) and the tool (in the same way). Successful registration is indicated by lamps lighting green for 2 seconds and then blinking blue.
- Starting Wireless Activation: After registration, briefly push the wireless activation button on the tool (it will blink blue). Pulling the tool's switch trigger will then activate the vacuum cleaner automatically.
- Cancelling Tool Registration: To cancel, set the vacuum cleaner's stand-by switch to "AUTO," then press the wireless activation button on both the vacuum cleaner (for 6 seconds until it blinks green then red) and the tool (in the same way). Successful cancellation is indicated by lamps lighting red for 2 seconds and then blinking blue.
- Wireless Activation Lamp Status: The lamp indicates various states, including standby (blue, turns off after 2 hours of no operation), tool running (blue blinking), ready for registration/cancellation (green/red blinking), registration/cancellation finished (green/red for 2 seconds then blue blinking), and unit starting up (red for 3 seconds).
Maintenance Features
- General Maintenance: Always ensure the tool is switched off and the battery cartridge is removed before any inspection or maintenance.
- Cleaning: Wipe the tool with a dry cloth or a cloth slightly moistened with soapy water at regular intervals. Never use gasoline, benzine, thinner, alcohol, or similar substances, as they can cause discoloration, deformation, or cracks.
- Dust Bag/Box Cleaning: For optimal dust collection, empty the dust bag/box when it is approximately half full. Remove it from the tool, pull out the fastener, and gently shake or tap to empty.
- Filter Replacement (Dust Box): To replace the filter in the dust box, remove the dust box from the tool, detach the dust nozzle by pressing locking latches, then pull the inner top edge of the cardboard opening downwards to disengage it from the upper hooking tab. Replace the filter by engaging the bottom edge of the cardboard opening in the lower hooking tab and pushing the top edge inwards until it clips into the upper hooking tab. Ensure logos on all components (dust box, filter, dust nozzle) are aligned during reassembly.
- Professional Service: For product safety and reliability, all repairs, maintenance, or adjustments should be performed by Makita Authorized or Factory Service Centers, using genuine Makita replacement parts.
- Battery Care: Charge the battery cartridge before it's completely discharged. Avoid overcharging. Charge at room temperature (10 °C - 40 °C). If the battery is hot, let it cool down before charging. Remove the battery from the tool or charger when not in use for extended periods, and charge it every six months if stored.
Optional Accessories
Makita offers several optional accessories to enhance the sander's functionality:
- Abrasive paper (with pre-punched holes)
- Hook-and-loop type of abrasive paper
- Punch plate
- Backing pad (for hook-and-loop type abrasive paper)
- Backing pad (for conventional type abrasive paper)
- Dust bag
- Dust box
- Filter
- Hose (for vacuum cleaner connection)
- Wireless unit (for model DBO381)
- Battery protector
- Makita genuine battery and charger
The manual emphasizes using only genuine Makita accessories and parts to ensure safety and maintain the warranty. Some listed items may be included as standard accessories depending on the region.