Do you have a question about the Makita DRT50ZJ and is the answer not in the manual?
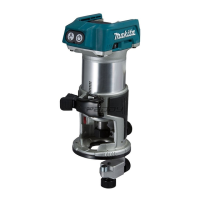
Details tool model, capacity, speed, voltage, and weight.
Explains tool symbols and its purpose for trimming wood and plastic.
Essential safety rules for operating power tools to prevent electric shock, fire, or injury.
Covers work area, electrical, personal safety, and tool handling precautions.
Instructions for installing, removing, checking capacity, and maintaining battery cartridges.
Explains switch actions, protection systems, front lamp, and speed adjustment.
How to adjust the tool's cutting depth precisely.
Details on constant speed control and soft start for enhanced operation.
Step-by-step guide for installing and removing trimmer bits using the collet cone.
Instructions for attaching trimmer, tilt, and offset bases to the tool.
How to install plunge and parallel ruler bases for specific tasks.
How to use the straight guide for linear and circular cutting.
Instructions for using templet and trimmer guides for precise shaping.
Specific operation tips for offset and plunge bases and grips.
Guidelines for inspecting and maintaining the tool's condition.
A list of recommended accessories for the tool.
Detailed specifications and diagrams for various trimmer bits.
This document provides an instruction manual for the Makita DRT50 Cordless Trimmer, covering its functional description, usage features, and maintenance.
The DRT50 Cordless Trimmer is designed for flush trimming and profiling of wood, plastic, and similar materials. It operates on an 18V DC battery and features several electronic functions for enhanced usability and protection.
To install the battery cartridge, align the tongue on the cartridge with the groove in the housing and slide it in until it clicks into place. Ensure the red indicator on the upper side of the button is not visible, indicating a secure lock. To remove, slide the button on the front of the cartridge while pulling it out. Always ensure the tool is switched off and the battery cartridge is removed before any adjustments or checks.
The tool is equipped with a battery protection system that automatically cuts off power to the motor to extend tool and battery life. This system activates under overload conditions (abnormally high current) or when the battery capacity is low (overdischarge protection). If the tool or battery overheats, the tool stops automatically, and the lamp blinks; allow them to cool before restarting. To maintain maximum battery life, charge the cartridge before it's completely discharged and avoid overcharging. Charge at room temperature (10 °C - 40 °C / 50 °F - 104 °F) and allow hot cartridges to cool down before charging. If not used for a long period, charge the battery cartridge every six months.
To turn on the tool, press the lock/unlock button to enter standby mode. To start operation, press the start/stop button. To stop, press the start/stop button again to return to standby mode. To turn off the tool, press the lock/unlock button from standby mode. If left idle for 10 seconds in standby mode, the tool automatically turns off. The front lamp can be turned on or off by pressing the lock/unlock button. If the tool overheats, the lamp will flicker.
The rotation speed can be adjusted by turning the speed adjusting dial, offering multiple settings from 10,000 min⁻¹ to 30,000 min⁻¹. When changing the speed from "5" to "1", turn the dial counterclockwise to avoid damage. Continuous operation at low speed can overload the motor.
The DRT50 includes:
To adjust the cutting depth with the plunge base, open the lock lever, then move the tool base up or down by turning the adjusting screw. Securely close the lock lever after adjustment. For fine adjustment, push the tool down until the trimmer bit touches the flat surface, secure it with the fixing lever, and then press the stopper pole down until it contacts the stopper screw. Slide the depth pointer to "0" on the scale. Turn the dial on the stopper pole to "0", then turn the head of the stopper pole counterclockwise to increase depth or clockwise to decrease depth, and finally tighten the stopper pole fixing nut.
The DRT50 offers versatility with various bases and guides for different applications.
Insert the trimmer bit all the way into the collet cone. Press the shaft lock and tighten the collet nut with the wrench. To remove, reverse the procedure. Do not tighten the collet nut without a bit inserted, as this may break the collet cone.
Open the lock lever of the trimmer base, align the groove on the tool with the protrusion on the base, and insert the tool. Close the lock lever. For dust collection, attach the dust nozzle to the trimmer base and tighten the thumb screw.
Open the lock lever of the tilt base, align the groove on the tool with the protrusion on the base, and insert the tool. Close the lock lever.
Press the shaft lock and loosen the collet nut. Remove the collet nut and collet cone. Install the pulley by pressing the shaft lock and tightening it with a wrench. Loosen screws on the base plate and remove it. Open the lock lever of the offset base and insert the tool. Mount the belt to the pulley by rotating it manually. Close the lock lever. Insert the collet cone and trimmer bit into the offset base, then tighten the collet nut with a hex wrench.
Open the lock lever of the plunge base, align the groove on the tool with the protrusion on the base, and insert the tool. Close the lock lever.
Insert the dust nozzle into the plunge base so its protrusion fits the notch, then tighten the thumb screw.
Insert the guide bars into the holes in the plunge base and tighten the wing bolts.
Place the tool on the workpiece without the bit touching. Turn on the tool, wait for full speed, then move it forward, keeping the base flush. When cutting edges, keep the workpiece surface on the left side of the trimmer bit in the feed direction. Make sample cuts before working on actual pieces to determine proper feed speed. Avoid moving too fast (poor cut quality, bit/motor damage) or too slow (burning/marring).
Assemble the straight guide with the bolt and wing nut. Attach it to the trimmer base with the clamp screw. Adjust the distance between the bit and the guide by loosening the wing nut, then tighten it. Move the tool with the straight guide flush with the workpiece side. For grooves, the depth of cut should not exceed 3 mm per pass; make multiple passes for deeper cuts. If the workpiece side is not straight or the distance is too wide, clamp a straight board to the workpiece and use it as a guide.
Assemble the straight guide as shown. For circles between 70 mm and 221 mm radius, align the center hole with the center of the circle to be cut. Drive a nail (less than 6 mm diameter) into the center hole to secure the guide. Pivot the tool clockwise around the nail.
Loosen screws on the base plate, remove it, place the templet guide on the base, and reattach the base plate by tightening screws. Place the tool on the templet and move it with the templet guide sliding along the templet side. Note that the actual cut size will differ from the templet due to the distance (X) between the trimmer bit and the outside of the templet guide.
Loosen the clamp screw, install the trimmer guide on the trimmer base, and tighten the clamp screw. Adjust the distance between the trimmer bit and the guide by turning the adjusting screw (1 mm per turn). Tighten the clamp screw. Move the tool with the guide roller riding the workpiece side.
This base is convenient for working in tight areas or corners.
Loosen screws on the base plate and remove it from the offset base. Attach the offset base plate to the trimmer base by tightening screws. Attach the grip attachment and bar type grip to the offset base plate by tightening screws for more stability.
This base is convenient for chamfering. Loosen wing screws, tilt the tool to the desired angle, and tighten the wing screws. Clamp a straight board to the workpiece and use it as a guide against the tilt base. Feed the tool in the direction of the arrow.
Remove the base plate from the tilt base and attach it to the trimmer base.
Always hold the grips firmly with both hands during operation. Operate the tool similarly to the trimmer base.
Install the straight guide to the guide holder by tightening the wing nut. Insert the guide holder into the holes in the plunge base and tighten the wing bolts. Loosen the wing nut on the straight guide and adjust the distance between the bit and the guide. Tighten the wing nut. Operate the tool similarly to the straight guide for the trimmer base.
Loosen screws on the base and remove them. Place the templet guide on the base and tighten the screws. Operate the tool similarly to the templet guide for the trimmer base. If the workpiece side is not straight or the distance is too wide for the parallel ruler, clamp a straight board to the workpiece and use it as a guide.
To install the bar type grip on the plunge base, loosen the screw of the knob type grip, remove it, and then install the bar type grip by tightening its screw.
The parallel ruler is effective for straight cuts, chamfering, or grooving. Adjust the distance between the bit and the parallel ruler, then tighten the wing bolts. Move the tool with the parallel ruler flush with the workpiece side.
Regular maintenance ensures the safety and reliability of the tool.
Always ensure the tool is switched off and the battery cartridge is removed before inspection or maintenance. Do not use gasoline, benzine, thinner, alcohol, or similar substances, as they can cause discoloration, deformation, or cracks. Repairs, maintenance, or adjustments should be performed by Makita Authorized or Factory Service Centers using genuine Makita replacement parts.
Never service damaged battery packs; this should only be done by the manufacturer or authorized service providers. Follow instructions for lubricating and changing accessories.
Handle trimmer bits carefully. Check them for cracks or damage before operation and replace immediately if found. Avoid cutting nails; inspect the workpiece and remove any nails. Ensure the trimmer bit is not contacting the workpiece before turning on the switch. After operation, do not touch the bit immediately as it may be extremely hot. Do not smear the tool base with thinner, gasoline, or oil, as this may cause cracks. Use trimmer bits of the correct shank diameter suitable for the tool's speed.
Some materials contain toxic chemicals; take caution to prevent dust inhalation and skin contact. Follow material supplier safety data. Always use the correct dust mask/respirator for the material and application. If devices for dust extraction and collection are provided, ensure they are connected and properly used to reduce dust-related hazards.
| Type | Cordless Trimmer |
|---|---|
| Voltage | 18V |
| No Load Speed | 10, 000 - 30, 000 RPM |
| Battery Type | Lithium-ion |
| Plunge Capacity (Trimmer) | 0 - 40 mm |
| Variable Speed Control | Yes |
| Soft Start | Yes |
| LED Job Light | Yes |
| Collet Size/Capacity | 6.35 mm (1/4") |