P 10 /14
<11> Disassembling/reassembling Piston
<11>-1. Disassembling Piston
<11>-2. Reassembling Piston
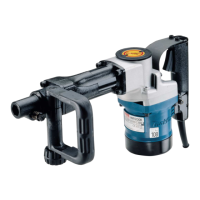
(1) Separate crank cap from crank housing complete by removing M5x20 pan head screws (4 pcs.) with
screwdriver. (Fig. 24)
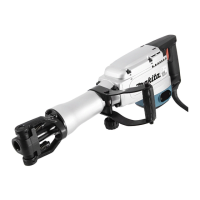
(2) Set the Crank shaft complete to the position of the nearest to cylinder, then Piston and Connecting rod can be
removed. (Fig. 25)
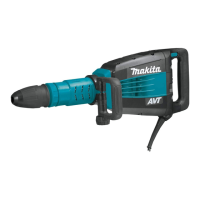
(3) Take O-ring 26 out, and remove Pin 28 from Piston.
(1) Insert Pin 28 into Piston and Connecting rod, and then set O-ring 26 onto the groove of Piston.
Fig. 24
Fig. 25
M5x20 pan head screws (4 pcs.)
Crank cap
Bit side
Bit side
Bit side
Crank housing complete
Crank shaft complete
Connecting rodPiston
Fig. 26
Crank shaft complete
Connecting rod
Pin 28O-ring 26
O-ring 24
Piston
(4) Take O-ring 24 out from Piston.
(2) Set O-ring 24 into the another groove (close to Bit side) of Piston.
(3) Once moving crank shaft complete to the position as Fig. 26, install the assembled Piston portion.

 Loading...