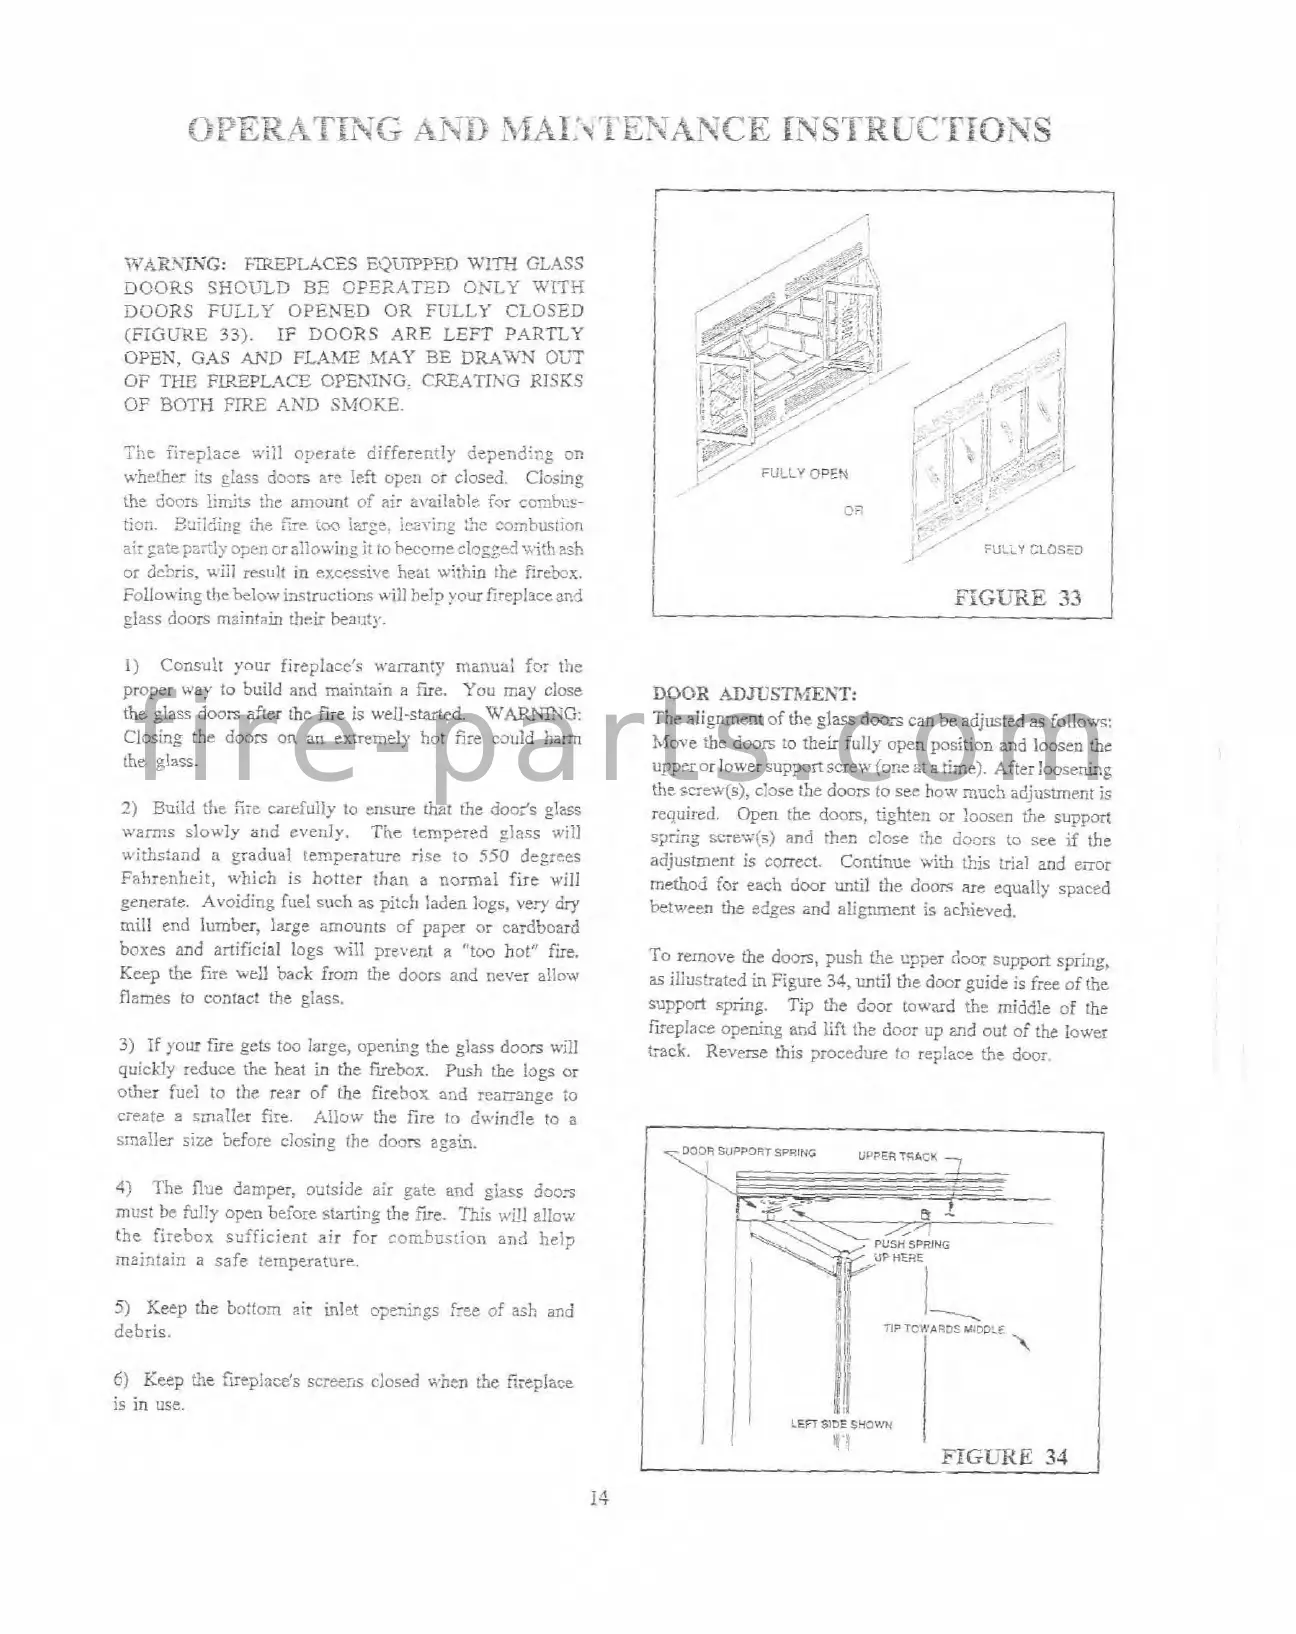
G:
FaEpLACSS
E'C?LjiPPF.D
RITH
GLASS
DOORS
SHOULD
RE
CFEXATED
CXLY
WITH
DOORS FULLY OPENED
OR
FULLY
CLOSED
(FIGURE
33).
IF
DOORS
ARE
LEFT
PARTLY
OPEN,
G.4S
AND
FLAME
MAY
BE
DRAWX
OiT
OF
THE
FIREPL.4CF OPEXNG;
CRFCRF.4'CING
RlSKS
OF
BOTH
FIRE
AND
SMOKE.
T.
~ne
fi~eplace will operate differently d;?ending
m
wkthei its ?lacs
doors
s.7:
!eft ope11
or
closed. Closins
the doors limit7
Cqle
anto.ant of
air
a\,ai!able
For
ccz>bws-
. .
?:a:;.
Suiidlr.: the
Fm
too
i?zg?;
~CZT-IXS
::I^
coinbustian
air
fz:ep~elj.
oprn
or a!iouing
it
io hecorne
clogge3
a-i:l! ash
or dekis, wili
rcsuli
in excessive hr.at wi!hin the i;.re5i,x.
Following !!ie
beloiv
instructions will
hclp
your fireplaccznd
glass doors maintain
tkir
beam:].
1)
Consult your fireplace's wanant? manual fnr tlre
proper way to build and maintain a fire.
You may close
the glass
doow after the fire is well-started. WARhmG:
Closing the doors on an extremely hot fire could ham
the glsss.
2)
Su'ld the iiie carefully to ensure that the door's glzss
warns slou,ly arid
evenly.
The
!em?p-red :lass will
withstand a gradual temperature rise to
550
degrces
Fahrenheit, which
is
hotter :han a normal fire will
generate. Avoiding fuel such as
pi:cb laden logs,
very
dry
mill end lumber,
large amounts of paper
or
cardboard
boxes and artificial logs will prevent
a
"too hot" Fie.
Keep the
fire
well back from the doors and never allow
flames to contact
ihe.
glass.
3)
If
your fire
gets
too large, opening the glass doors will
quickly reduce the heat
in
the fiebox. Push the Isgs or
other fuel to the rear of the firebox and
rcamnge to
c7eate
e
smaller Ere. -4ilow the fire to dvindle to
a
smaller size before closing the doos
2g2k
4)
'I3e
3u:
damper, oukide air gate and
giass
do03
must
be
fully o?en
hehe
s'ding the
fire.
This
*,ill zllow
the firebox sufficient air
for
conbus:ion and help
mairtain a safe temperature.
5)
Keep the bo:fom
air
inlet o>nixgs f~ee of ash and
debris.
6)
Keep
fie
inep!aze's scrrers ciosed when
the
5;epIace
is in use.
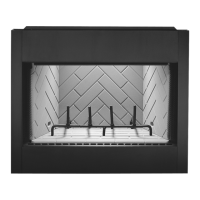
DOOR
ADJUSTMEST:
Tne
alignment
of
the glass dears
can
be
adjusted
as
follows:
Move
the doors to their fully open position and loose~i the
upper or lower supporissrev {ose
8:
z
time). After !oose&?g
the sce-.v(s), close iTe doors ro see how m3ch adjustmezt is
required. Open the doors, tighte3 or 1oo;t.n
ihe
supp;?rt
sprk: sciewis)
and
then close the donis
to
see
if the
adjustment
is correct. Continue with this 3ia1
md
eiror
method fo: each door until the doors me equally spaced
between
%e
elges and alignment is achieved.
To remove the
doors,
push
the
npye
door support spring,
as
ili.as:rzted
in
Figure
34,
until
the door guide is free of the
wppon sping. Ti?
t?e
door towwd the middle
of
the
Fveplacs opening and
lift
ihe door up
snd
oot of the iower
track. Revme this pocedure to rep!ae the door
f i r e - p a r t s . c o m