CV620-TBI/TWI User Manual
www.marshall-usa.com24 25
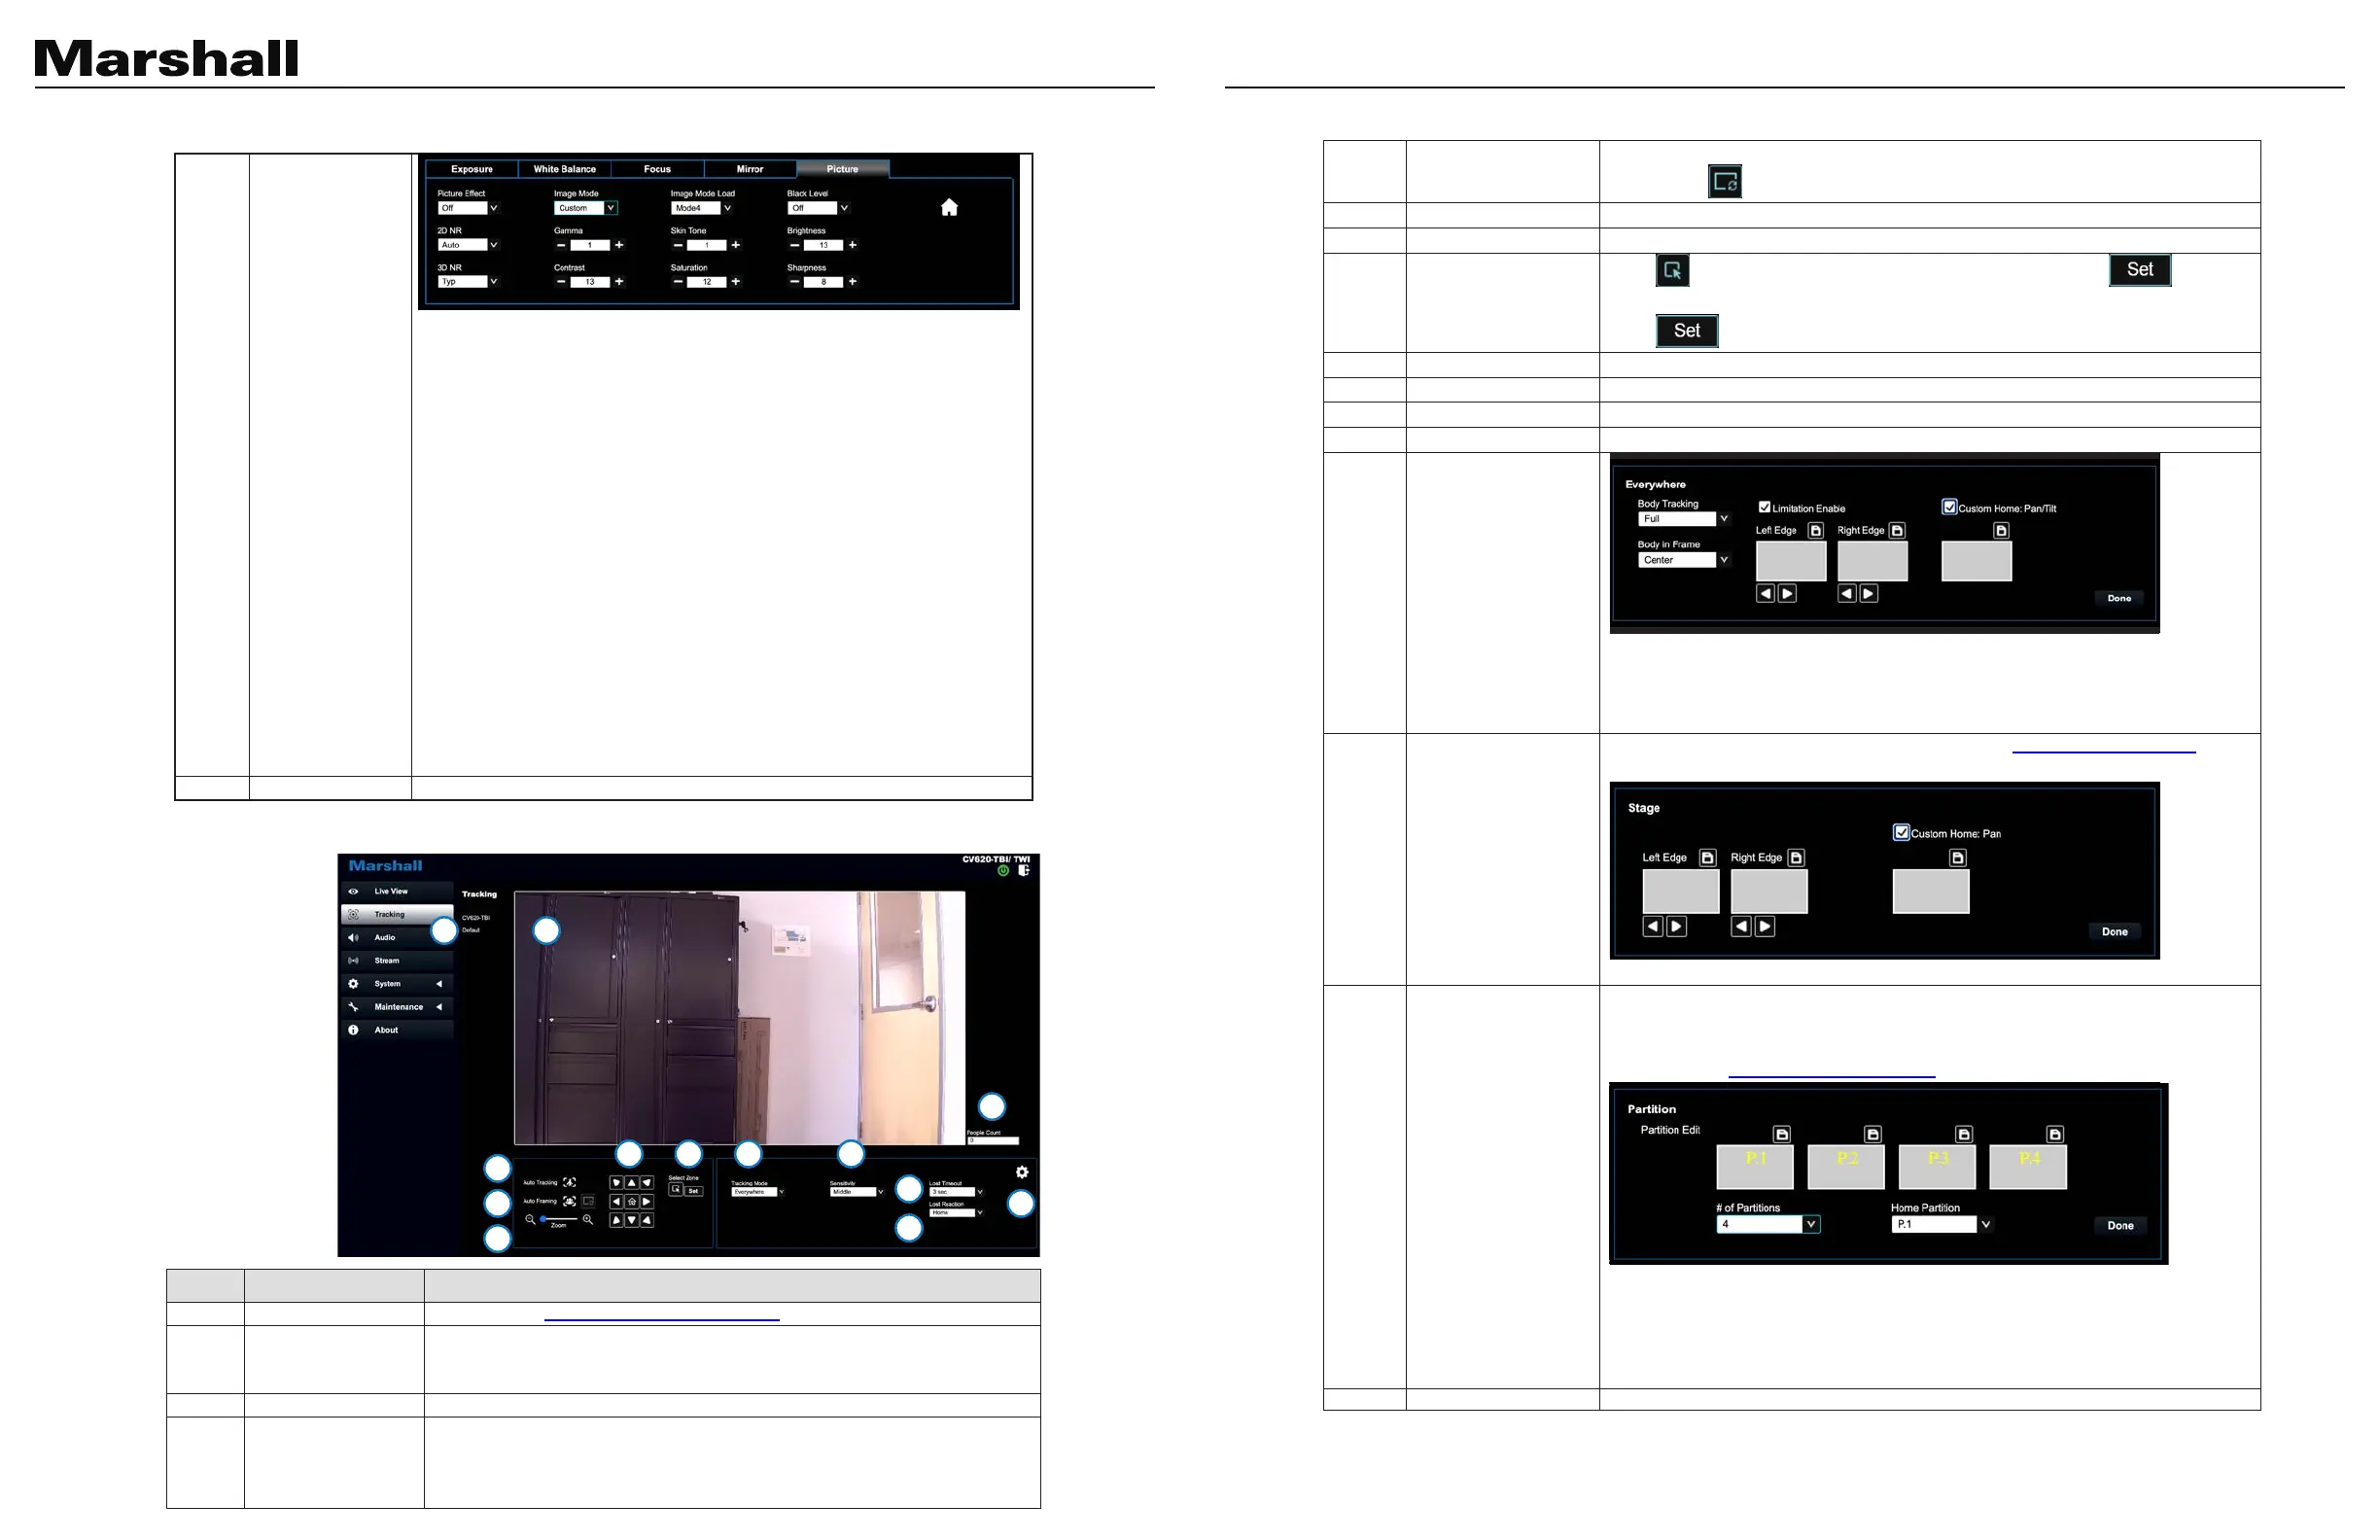
<Remark> If the image is not zoomed according to the actual number of people,
please click to perform viewfinder correction.
Adjust the Pan/Tilt position of the camera screen
Select Zone
Click and drag the mouse to select an area and then click , the
screen will be enlarged to the selected zone
Click again to cancel enlarging the selected zone
Set the Tracking Mode (Everywhere/Stage/Partition/Viewfinder)
Set a delay for taking action after a tracking object is lost
Set the action after a tracking object is lost
12.1
Settings - Everywhere
tracking
Border Limitation Enable:
Everywhere Body Tracking: Set Full/Half Body
Body in Frame: Set the position of the person in the screen (Center/Left/Right)
Custom Home: Pan/Tilt
12.2
Settings - Stage
Tracking
Set the left/right border of the stage. Please refer to 5.2.3.1 Stage Tracking for the
setting steps
Custom Home: Horizontal:
12.3
Settings - Partition
Tracking
Set Partition Tracking. Up to 4 zones can be set.
When a person enters the zone of a partition, the camera switches to the partition.
Tracking is not performed in the zone, but everywhere outside the partition
Please refer to 5.2.3.2 Partition Tracking for the setting steps
Partition Settings: Edit, save partition positions and preview the partition image.
Click to enlarge the partition image, and then click the enlarge icon to cancel the
preview.
Number of Partitions: Set the number of partitions
Initiate Partition: Set the initiate partition position
Display the number of people in the screen automatically calculated by the system
5 Photo
Image Effect: Set picture effect, Off/Neg/Black and White
Image Mode: The user may customize his/her desired image mode
Image Mode Load: Adjustable when the Image mode is set to Custom. After
selected, the corresponding Image mode parameters will be read and applied to
Custom
2D noise reduction: 2D noise reduction settings
3D noise reduction: 3D noise reduction settings
Gamma: Gamma Level adjustment (Adjustable when the image mode is set to
Custom)
Black Level: Black Level adjustment (Adjustable when the image mode is set to
Custom)
Skin Tone: Skin Tone adjustment (Adjustable when the image mode is set to
Custom)
Brightness: Brightness adjustment of the image (Adjustable when the image
mode is set to Custom)
Contrast: Contrast adjustment (Adjustable when the image mode is set to
Custom)
Saturation: Saturation adjustment of the image (Adjustable when the image
mode is set to Custom)
Sharpness: Adjust the sharpness of the image
Go back to PTZ Control page
No Item Function Descriptions
Please refer to 5.2.6 System Settings - Device to display camera ID/location
2 Preview window
Display the screen currently captured by the camera
<Remark> Left-click the detected person in the screen to switch the tracking
object. The tracking object is depicted with a green bounding box
4 Smart viewfinder
Start/Stop Smart viewfinder
The camera will automatically detect the locations of people, and automatically
adjust the zoom to the most appropriate size to accommodate all the participants
according to change of the number of people in conference
5 Photo
Image Effect: Set picture effect, Off/Neg/Black and White
Image Mode: The user may customize his/her desired image mode
Image Mode Load: Adjustable when the Image mode is set to Custom. After
selected, the corresponding Image mode parameters will be read and applied to
Custom
2D noise reduction: 2D noise reduction settings
3D noise reduction: 3D noise reduction settings
Gamma: Gamma Level adjustment (Adjustable when the image mode is set to
Custom)
Black Level: Black Level adjustment (Adjustable when the image mode is set to
Custom)
Skin Tone: Skin Tone adjustment (Adjustable when the image mode is set to
Custom)
Brightness: Brightness adjustment of the image (Adjustable when the image
mode is set to Custom)
Contrast: Contrast adjustment (Adjustable when the image mode is set to
Custom)
Saturation: Saturation adjustment of the image (Adjustable when the image
mode is set to Custom)
Sharpness: Adjust the sharpness of the image
Go back to PTZ Control page
5.2.3 Tracking
No Item Function Descriptions
Please refer to 5.2.6 System Settings - Device to display camera ID/location
Display the screen currently captured by the camera
<Remark> Left-click the detected person in the screen to switch the tracking
object. The tracking object is depicted with a green bounding box
Start/Stop Smart viewfinder
The camera will automatically detect the locations of people, and automatically
adjust the zoom to the most appropriate size to accommodate all the participants
according to change of the number of people in conference
5.2.3 Tracking
1 2
3
4
5
6 7 8 9
10
11
12
13
 Loading...