Do you have a question about the Marshall Amplification CV620-IP and is the answer not in the manual?
General safety precautions for operating the camera in its intended environment.
Safety guidelines and considerations for securely installing the camera.
Precautions for safely storing the camera when not in use.
Guidelines for safely cleaning the camera equipment.
Safety advice related to the use and battery handling of the remote control.
Warnings regarding electrical shock, fire risks, and proper handling to prevent hazards.
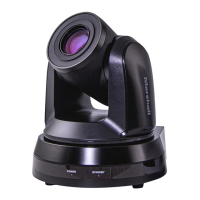
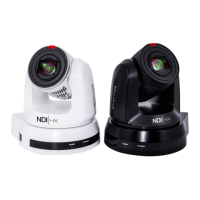
Identifies and labels the various components of the camera from different views.
Explains the meaning of different LED indicator lights for operational status.
Steps and checks required before commencing the camera installation process.
Detailed instructions and precautions for mounting the camera on a desk.
Comprehensive guide for installing the camera on a ceiling mount.
Provides detailed dimensional drawings for the ceiling mounting plate (Metal Plate B).
Provides detailed dimensional drawings for the camera mounting plate (Metal Plate A).
Important safety and placement considerations for ceiling installations.
Step-by-step process for attaching the camera using mounting plates for ceiling installation.
Instructions on how to safely detach and remove the camera from its installation.
Guides for connecting the camera for video output to PCs and monitors.
Detailed steps for connecting the camera to an HDTV or computer monitor via HDMI.
Instructions on establishing a network connection for internet access and remote operation.
How to connect external microphones or audio mixers to the camera's audio input.
Connecting the camera to a computer using RS-232 for control and multi-camera setups.
Connecting the camera to a computer using RS-422 for control and multi-camera setups.
Initial setup procedures for using the camera with an internet connection.
Steps to access and operate the camera remotely via the internet.
Explains the functions of various buttons on the remote control for camera operation.
Provides access to detailed camera settings via the OSD menu.
Instructions on how to select between different CV620-IPW cameras using the remote.
Steps to save the current camera's lens position using presets and ID.
Instructions to clear previously saved camera lens position data.
How to activate or deactivate the back light compensation feature.
Guides on adjusting the camera's tilt and pan angles, including resetting.
Instructions for adjusting image zoom and focal length.
How to set image mode, freeze, rotate, change direction, and display status.
Procedure to reset the camera's settings back to their factory default values.
Specifies the required web browser for accessing the camera's web interface.
Describes methods for connecting the camera to the internet and using its web interface.
Details how to use RTSP players like VLC for camera stream connection.
Information on establishing an RTMP connection for streaming.
Provides an overview of the camera's web interface functions.
Describes the elements and actions on the camera's login screen.
Explains the live preview screen layout and its interactive elements.
Details how to add, edit, or delete user accounts and manage permissions.
Configuration options for video stream settings, including codec and resolution.
Advanced video configuration options like IP Ratio, Force I Frame, and Encode Preset.
Interface for adjusting camera parameters like exposure, white balance, focus, and mirror.
In-depth camera settings including exposure, gain, iris, WDR, and shutter speed.
Options for picture effects, noise reduction, image mode, brightness, contrast, and sharpness.
Configuration for audio input, encoding type, sample rate, and volume.
Procedures for setting the camera's date and time, either manually or automatically.
Configuration of network parameters like IP address, DHCP, RTMP, RTSP, SNTP, and ports.
Explains the functionality of the DIP switches for output mode and IR select.
Details the DIP switch settings for various video output resolutions and frame rates.
Describes the DIP switch settings for IR selection.
Information on setting the camera's address using DIP switches or selectors.
Explains the DIP switch settings for RS-232/RS-422, infrared signal, and baud rate.
Details the function of each pin on the RS-422 connector.
Step-by-step instructions on how to connect the RS-422 connector to the camera.
Troubleshooting steps for when the camera fails to power on or show a signal.
Solutions for issues where the camera does not produce any video output.
Troubleshooting steps for severe image delay or lag experienced with the camera.
Resolving issues that occur after changing DIP switch settings.
Troubleshooting problems preventing the camera from being controlled by the remote.
Diagnosing and resolving problems with controlling the camera via codec.
Troubleshooting issues related to controlling the camera via RS-232 or RS-422 interfaces.
Steps to diagnose and resolve issues with using the camera over the internet.
| Image Sensor | 1/2.7" CMOS |
|---|---|
| Frame Rate | Up to 30fps |
| Audio Input | Built-in Microphone |
| Weather Resistance | IP66 |
| Lens | 4mm |
| Power | 12V DC |
| Operating Temperature | -4°F to 140°F |
| Power Supply | DC12V |
| Resolution | 1920 x 1080 (1080p) |