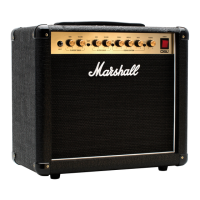
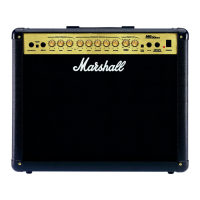
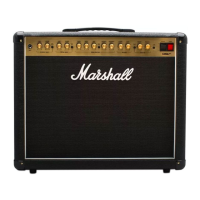
FRONT PANEL FUNCTIONS
1. INPUT
Input jack socket for your guitar cable.
Use a good quality screened/shielded
guitar cable to help prevent noise
interference.
CLASSIC GAIN CHANNEL
2. GAIN
Controls the gain level for the classic gain
channel. As the amount of gain increases,
so will the distoron level in your sound.
3. MODE STATUS LED
This LED lights green to indicate that
clean mode is selected and red to indicate
crunch mode is selected.
4. VOLUME
Controls the volume level of the classic
gain channel.
5. CLEAN/CRUNCH
Press to select clean or crunch mode.
The classic gain channel’s two modes
take your sound from clean to overdriven
tones.
ULTRA GAIN CHANNEL
6. GAIN
Controls the gain level for the ultra gain
channel. As the amount of gain increases,
so will the distoron level in your sound.
7. MODE STATUS LED
This LED lights green to indicate that
OD1 mode is selected and red to indicate
OD2 mode is selected.
8. VOLUME
Controls the volume level of the ultra gain
channel.
9. OD1/OD2
Press to select OD1 or OD2 mode.
The ultra gain channel’s two modes go
from an open, high gain overdrive to a
mid-boosted tone with even higher gain
possibilies.
NOTES ON USING CHANNELS AND MODES:
The channel is automacally selected
when a mode switch is pressed: Clean/
Crunch or OD1/OD2.
When you select a channel its previous
mode, FX loop and master volume
sengs will be recalled.
The channel can also be selected using
the supplied 2-way footswitch. When
the 2-way footswitch is connected, the
front panel mode switch (Clean/Crunch
or OD1/OD2) will be acve only on the
selected channel.
Use the oponal 6-way footswitch (PEDL-
91016) to switch between channels,
modes and more – see the footswitching
secon in the user manual for further info.
EQUALISATION SECTION
10. TREBLE
Controls the higher frequency content
of your sound. Turning clockwise will
increase the highs making the sound
brighter and more crisp.
11. MIDDLE
Controls the middle frequency of your
sound. Turning clockwise adds girth.
Turning anclockwise reduces the middle
frequencies ‘scooping’ your sound – this
is accentuated when used in conjuncon
with tone shi.
12. BASS
Controls the amount of lower frequency,
or boom-end, in your sound. Turning
clockwise will increase the boom-end
making the sound fuller.
13. TONE SHIFT
Tone Shi recongures the preamp EQ
network adding a new dimension to tonal
shaping.
14. PRESENCE
Controls the amount of higher
frequencies of your sound. Turn clockwise
to add crispness and bite for a more
cung tone. Presence is a power-stage
funcon and acts independently of the
preamp EQ controls.
15. RESONANCE
Controls the amount of lower frequencies
in your sound. Turning this control
1
2
3
4
5
6
7
8
9
10
11
12
13
14
15
16
17
18
1920
2122
2425
23
12DSL100HR service manual
BOOK-80016-01 | M3390.070
 Loading...