2 3
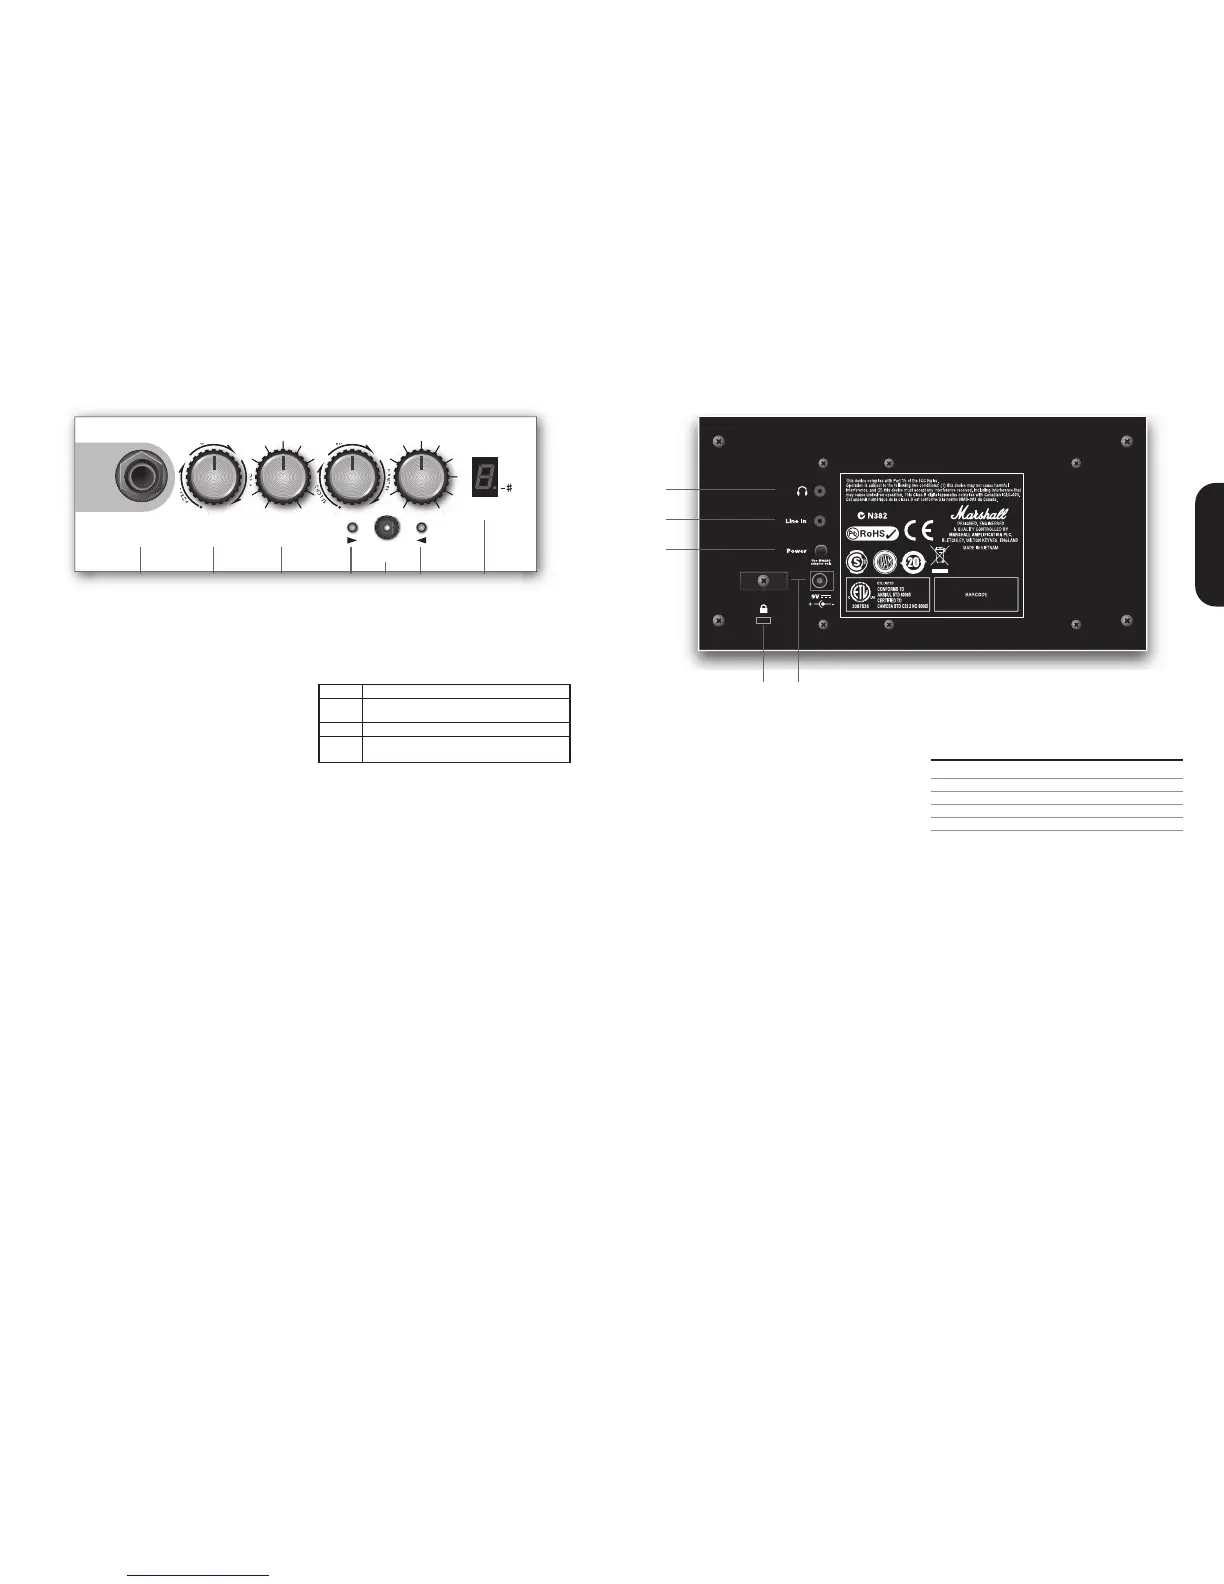
1. Headphones
3.5mm Headphone socket allows the connection a
pair of headphones. When a jack is inserted into the
headphones socket, the unit’s speaker is muted.
2. Line In
The 3.5mm Line In socket allows the connection of an
external audio source e.g. MP3 or CD player.
3. Power Switch
Turns the amplifier on and off.
All ‘shift’ functions will be stored on power off.
4. Lock
Point to attach security lock. Visit
www.kensington.com for more info.
5. Power Socket & Cord Anchor
Socket for the supplied 9V PSU.
Battery Replacement
The MG2CFX can be powered via 6 C type batteries
for portable operation.
1. To replace the battery, remove the lower panel on
the rear of the unit by gently pulling via the cut out.
The panel is attached using velcro and detaches
from the unit.
2. Use 6 C type or equivalent batteries. Use alkaline
batteries only.
3. Always ensure that the batteries are removed
when the MG2CFX is not in use for long periods.
1
2
3
5
4
MG2CFX
Power (RMS) 2W
Channels 10 Modes
Speaker 1 x 6½"
Current Draw 280mA
Weight (kg) 3.1
Size (mm) W, H, D 260 x 263 x 175
Technical Specifications
MG2CFX rear panel
Each control has a secondary function that can be
accessed by holding the Tap/Shift switch (5) and
turning the control. All ‘Shift’ function settings are
stored by the amplifier and will be remembered after
power off.
1. Input Jack Socket
Jack input for your guitar. Use a good quality guitar
cable (i.e. one that’s screened/shielded) to help
prevent noise, interference and unwanted feedback.
2. Mode/Bass
Mode
Selects one of the 10 modes (channels). The selected
Mode number (0-9) is briefly displayed in the display (7).
0: Clean -This is the cleanest of all the modes, punchy
but retaining a pleasant warmth.
1-3: Crunch - In modes 1-3 the amplifier adds a little
more gain, delivering a light break-up to the sound
and creating a classic crunch tone. As the modes
increase so does the amount of mid range pushing
through, achieving that typical Marshall crunch tone
perfect for blues and rock style playing.
4-6: OD-1 - In these modes the overall sound is further
broken up creating a traditional hard rock sound
which doesn’t blur the overall tone. As the modes
move forward the sound increases in warmth and bite
until you achieve a fully saturated Marshall rhythm
tone in mode 6.
7-9: OD-2 - For more aggressive and modern sounds
OD-2 offers an increasing amount of high gain, ideal
for lead and metal tones. As the setting is increased it
lifts the sound further until that distinctive modern
Marshall lead sound is reached.
Bass
Turning up the Bass control will add warmth and low-
end depth to your sound. The display (7) will show “b”
as the control is turned.
3. Gain : Treble
Gain
Controls the amount of signal entering the pre-amp
and the amount of distortion created in the selected
Mode.
Treble
Increasing the Treble will make your sounds brighter
and more cutting, turning it down will decrease your
tone’s edge and make it sound softer as a result. The
display (7) will show “t” as the control is turned.
4. FX/Reverb
FX
Selects and adjusts one of three modulation effects
Chorus, Phaser & Flanger. The FX control (4) is split into
three segments and selects the type of modulation
effects and adjusts its associated settings. When the
control is set to ‘0’ the modulation effects are
switched off.
Reverb
Controls the amount of signal sent to the reverb.
When set to ‘0’ the reverb is turned off. The display (7)
will show “r” as the control is turned.
5. Tap/Shift (Hold Tuner)
Tap
Matches the delay FX time to the time between two
pushes. The LED flashes at selected delay time.
Shift
Hold the switch while turning a control to access its
secondary ‘Shift’ function.
(Hold Tuner)
Hold the switch for over 3 seconds without touching
another control to access the tuner.
Tuning
• The display(7)will show the closest note being played.
• The dot in the lower right hand corner will light when
the closest note is # (sharp)
• The Tap switch (5) will light if the note is is in tune.
• If the note is flat the LED to the left of the Tap switch
(5) will light.
• If the note is sharp the LED to the right of the Tap
switch (5) will light.
6. Volume/Delay
Volume
Controls the overall volume of the amplifier.
Delay
Controls the amount of signal sent to the delay effect.
When set to ‘0’ the delay is turned off. The display (7)
will show “d” as the control is turned.
7. Preset/Tuner - Display
7 Segment LED display.
1
2 3 4 5 6 7
0
Chorus
Phaser
Flanger
Modulation Off
Speed increases and depth is reduced
as knob is adjusted
Speed increases as knob is adjusted
Speed increases, feedback and depth
are reduced as knob is adjusted
MG2CFX front panel
ENGLISH

 Loading...