8
583152 - Masport Lawnmower Owner’s Manual - March ‘17 PANTONE 648C
THIS LEVER SHOULD BE MOVED ONLY
WHILE THE ENGINE IS RUNNING.
[If it is inadvertently moved back when the en-
gine is stationary the drive belt will slacken and
slip. To regain traction, move the lever forward
with the drive disengaged and the engine run-
ning.]
Speed changes can be made whether the
mower is moving or not.
CONTRACTOR COMMERCIAL MODELS
Self-propelled 3 Speed models.
The three speed gearbox can be changed to
1st 2nd or 3rd while the engine is running or not
with three distinct positions in the gearbox.
THE GRASS CATCHER
CATCHER ASSEMBLY
There are three catcher types:
A. Bag Catcher
B. Moulded Plastic Catcher
C. Aero Catcher (moulded plastic top sections
with fabric side panels.)
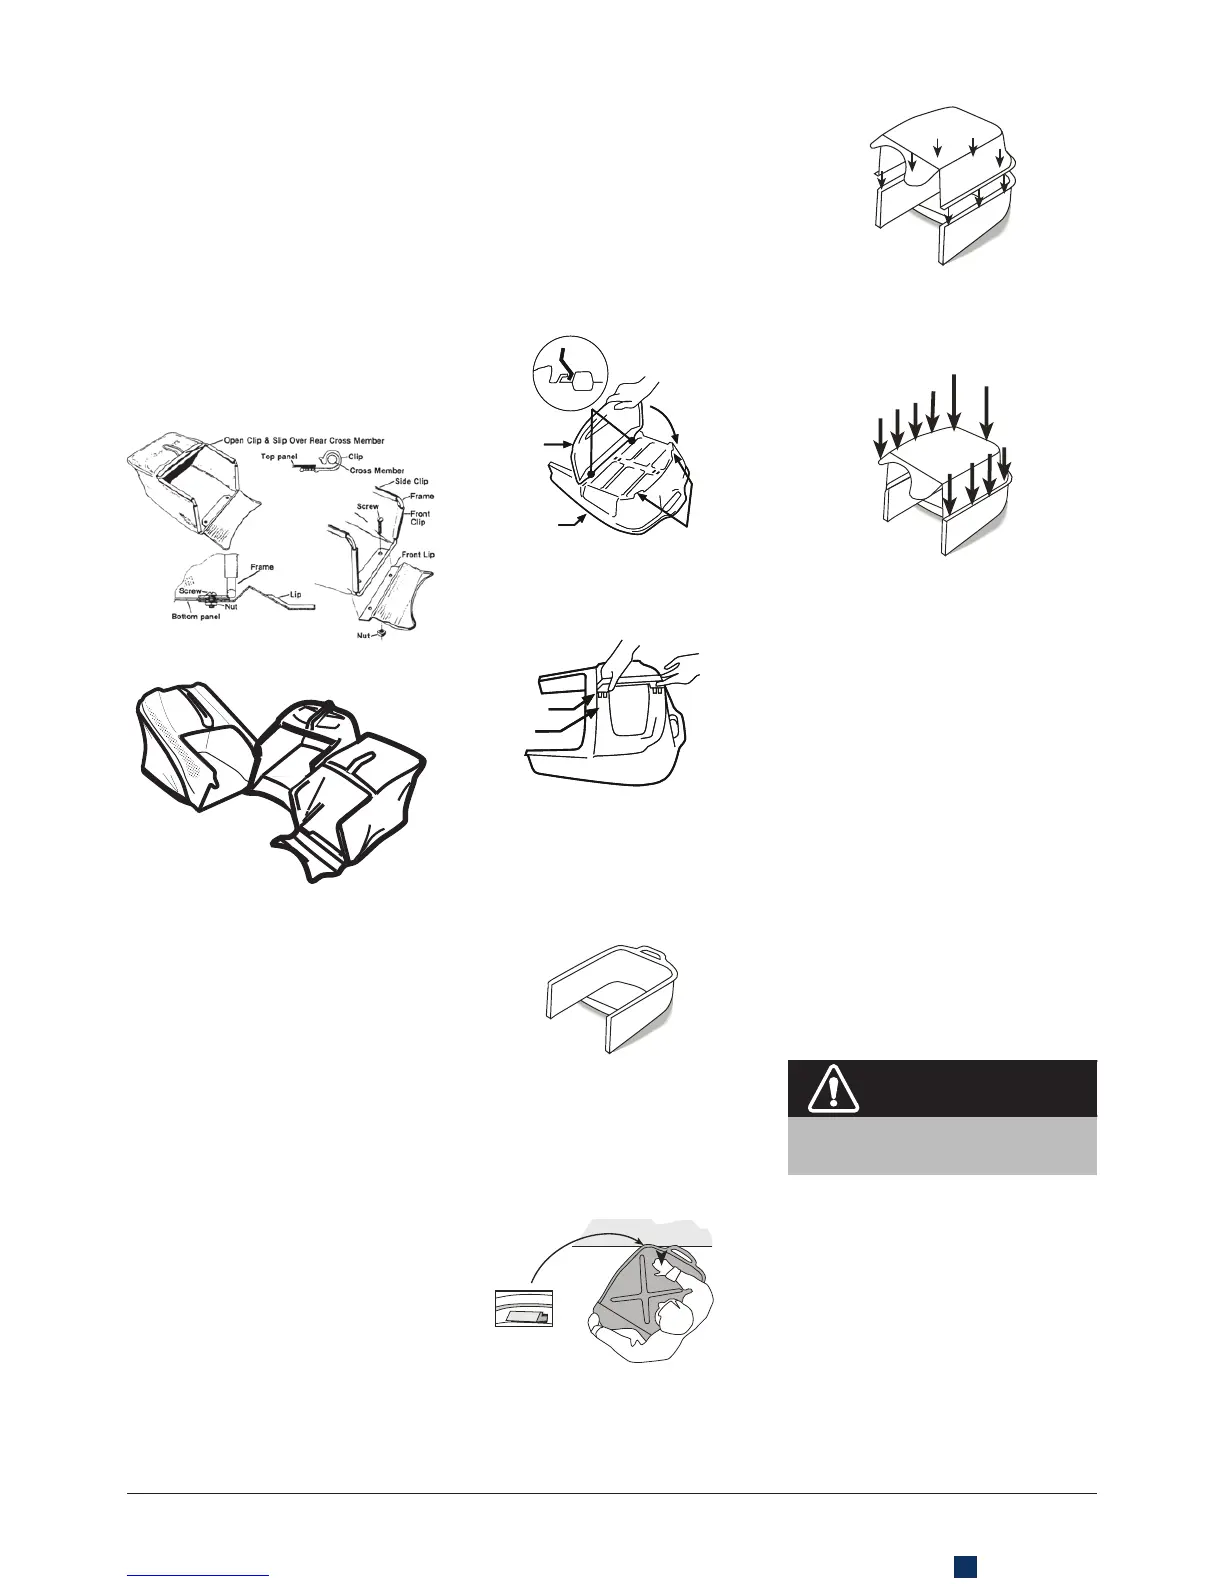
A. BAG CATCHER
1. Slide the bag over the wire frame. Fit the
plastic clip up under the frame crossmem-
ber (the one which is formed into a handle)
and hook the clip onto the wire cross-
member. You may need a lever such as a
screwdriver to open one end of the clip to
get it started over the wire.
Pass the side and front clips inside the
frame and hook them onto the wire in a
similar way.
2. Fasten the metal front lip to the catcher
assembly by bolting it to the plate on the
bottom of the frame. The bottom panel of
the catcher should be fitted between the
plate and the lip as shown. Fit the screws
from the top with the nuts under the lip, and
tighten them securely.
B. MOULDED PLASTIC CATCHER
There are two types. One has the top cover
and handle already fitted to the top shell of the
catcher, while the other requires these parts to
be assembled.
If your catcher has these parts already as-
sembled, start at step 4.
1. Place the top of the catcher shell (A) on a
firm level surface with its mesh upwards.
2. Holding the top cover (B) with its concave
side facing the mesh, lift its rear end and
engage the front clips with the hooks
on the catcher top shell. Keeping them
engaged, swing the rear of the cover down-
wards and press it down until the barbs on
the cover engage with the slots in the shell.
‘A’
‘B’
‘A’
‘B’
3. Look for the “F” on the handle and ensure
that it will be adjacent to the “F” on the
catcher shell. Fit the handle by pressing
it firmly into the square recesses in the
catcher top.
‘F’
‘F’
‘F’
‘F’
Turn the assembly over to confirm that the
barbs on the handle are fully home, and
push the tabs on the shell back into posi-
tion to retain the handle.
4. Place the top shell on a solid work bench,
open side up. Don’t use a table which may
be damaged by scratching.
5. Position the bottom shell, upside down,
over the top shell, carefully aligning the two
parts and ensuring the barbed clips are
aligned with their corresponding slots and
squeeze the rear handles together.
6. Keeping the catcher upside down, move
the assembly so the lip and rear handle is
supported by the edge of the bench (see
diagram) and catcher is trapped between
your body and the bench.
7. Strike the top of the assembly with an open
hand above the part supported by the
bench. You should hear the barb click into
place in its slot - if not, check the alignment
and strike again with a little more force.
8. Working from left to right, and starting by
the rear handle, move around the catcher,
supporting each fastener in turn on the
edge of the bench, as it is pushed into
engagement.
1
2
3
6
10
4
5
9
8
7
9. Finally inspect carefully to ensure that all
clips are fully engaged.
C. AERO CATCHER
The bag and moulded plastic catchers have lips
at the front which fit the top of the crossbar on
the base of the discharge tunnel, while the Series
18 Rotarola catcher has two lugs that fit into the
hooks of the handle brackets.
Aero catchers have two plates under the front
crossbar which hook into the support channel
at the rear of the mower near the ground. Keep
the rear of the Aero catcher near the ground until
the plates are engages with teh support channel,
then pivot the catcher up into position. The chute
or flap can be release as it swings up since the
hooks on the front of the catcher will automati-
cally engage on the mower, allowing the chute
or flap to drop into the lockedposition on the
catcher.
For all types of catcher, make sure that rear edge
of the chute of flap is fully engaged with the
catcher to hold it in place securely.
FITTING THE CATCHER
THE CATCHER SHOULD BE FITTED TO AND
REMOVED FROM THE MOWER ONLY WHEN
THE ENGINE HAS STOPPED.
WARNING
Standing to the right of the mower, reach down
with your right hand and pull back and up on the
handle of the safety flap or Smart Chute and
lift it until it is parallel with the handle. Pick up
the catcher with your left hand and swing it into
position at the rear of the mower.
The catcher lip of the fabric and plastic catchers
fits on top of the crossbar or the base of the tun-
nel, while the two hooks at the top of the Aero
catcher mouth sit on top of the brackets inside
the discharge outlet of the mower. The Series 18
Rotarola catcher has two lugs which fit on the
hooks near the handle brackets of the mower.
 Loading...