Repair
Reassemble Reassemble
Reassemble
the the
the
Center Center
Center
Section Section
Section
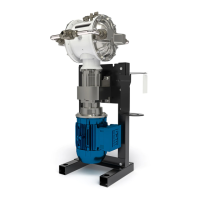
1.Cleananddrythecenterhousing(101),the
centerofthepiston(105)andthedriveshaft
(109).
2.Inspectthepistonforexcessivewearandreplace
ifneeded.Greasethepistonasshownandinstall
itinthecentersectionwiththegrooveinlinewith
thealignmentmarkingsonthecentersection.
3.Installtheo-ring(113)andthebearingbolt(114).
Applymedium-strength(blue)threadlockerand
torquetheboltto15–25ft-lb(20–34N•m).Be
surethatthebearing(112)isinthegrooveon
thepiston,asshown.Besurethatthepiston
movesfreely.
4.Installthedriveshaft:
a.Besurethesealingsurfaceofthedriveshaft
(109)isclean.Installthesealcartridgeand
radialseal(107)onthedriveshaft.Thelips
ontheradialseal(107)mustfaceIN IN
IN
toward
thecenter.
b.Installo-ring(108)tothecenterhousing
(101).
c.Applyanti-seizelubricantonthemating
edgesofthedriveshaft,asshowninthe
illustration,page18.
d.Centerthepistoninthehousingandinstall
thedriveshaftassembly(109)intothecenter
housing(101)withthegroovefacingup.
e.Inspecttheshaftcoupler(115)forwearand
replaceifneeded.Installonthedriveshaft.
5.Besurethegearboxcoupler(11x)isaligned
properly.Turnbyhandifneeded.Connectthe
pumptothegearboxassembly,engagingthe
couplers.
6.Applymedium-strength(blue)threadlockerand
installthehousingscrews(111).Tightenabout
5turnsatatime,inacrisscrosspattern,tofully
engagethecoupler.Torqueto130–160in-lb
(15–18N•m).
7.InstallCO
2
inletttings.
8.SeeReassembletheDiaphragms,page10,and
CheckValveRepair,page8.
12
3A7034A
 Loading...