13
headline bars
continuation tabs
notes
warnings
headline bars
continuation tabs
notes
warnings
model no. 058-9852-2 | contact us 1-800-689-9928
12
OPERATING INSTRUCTIONS
To Inflate:
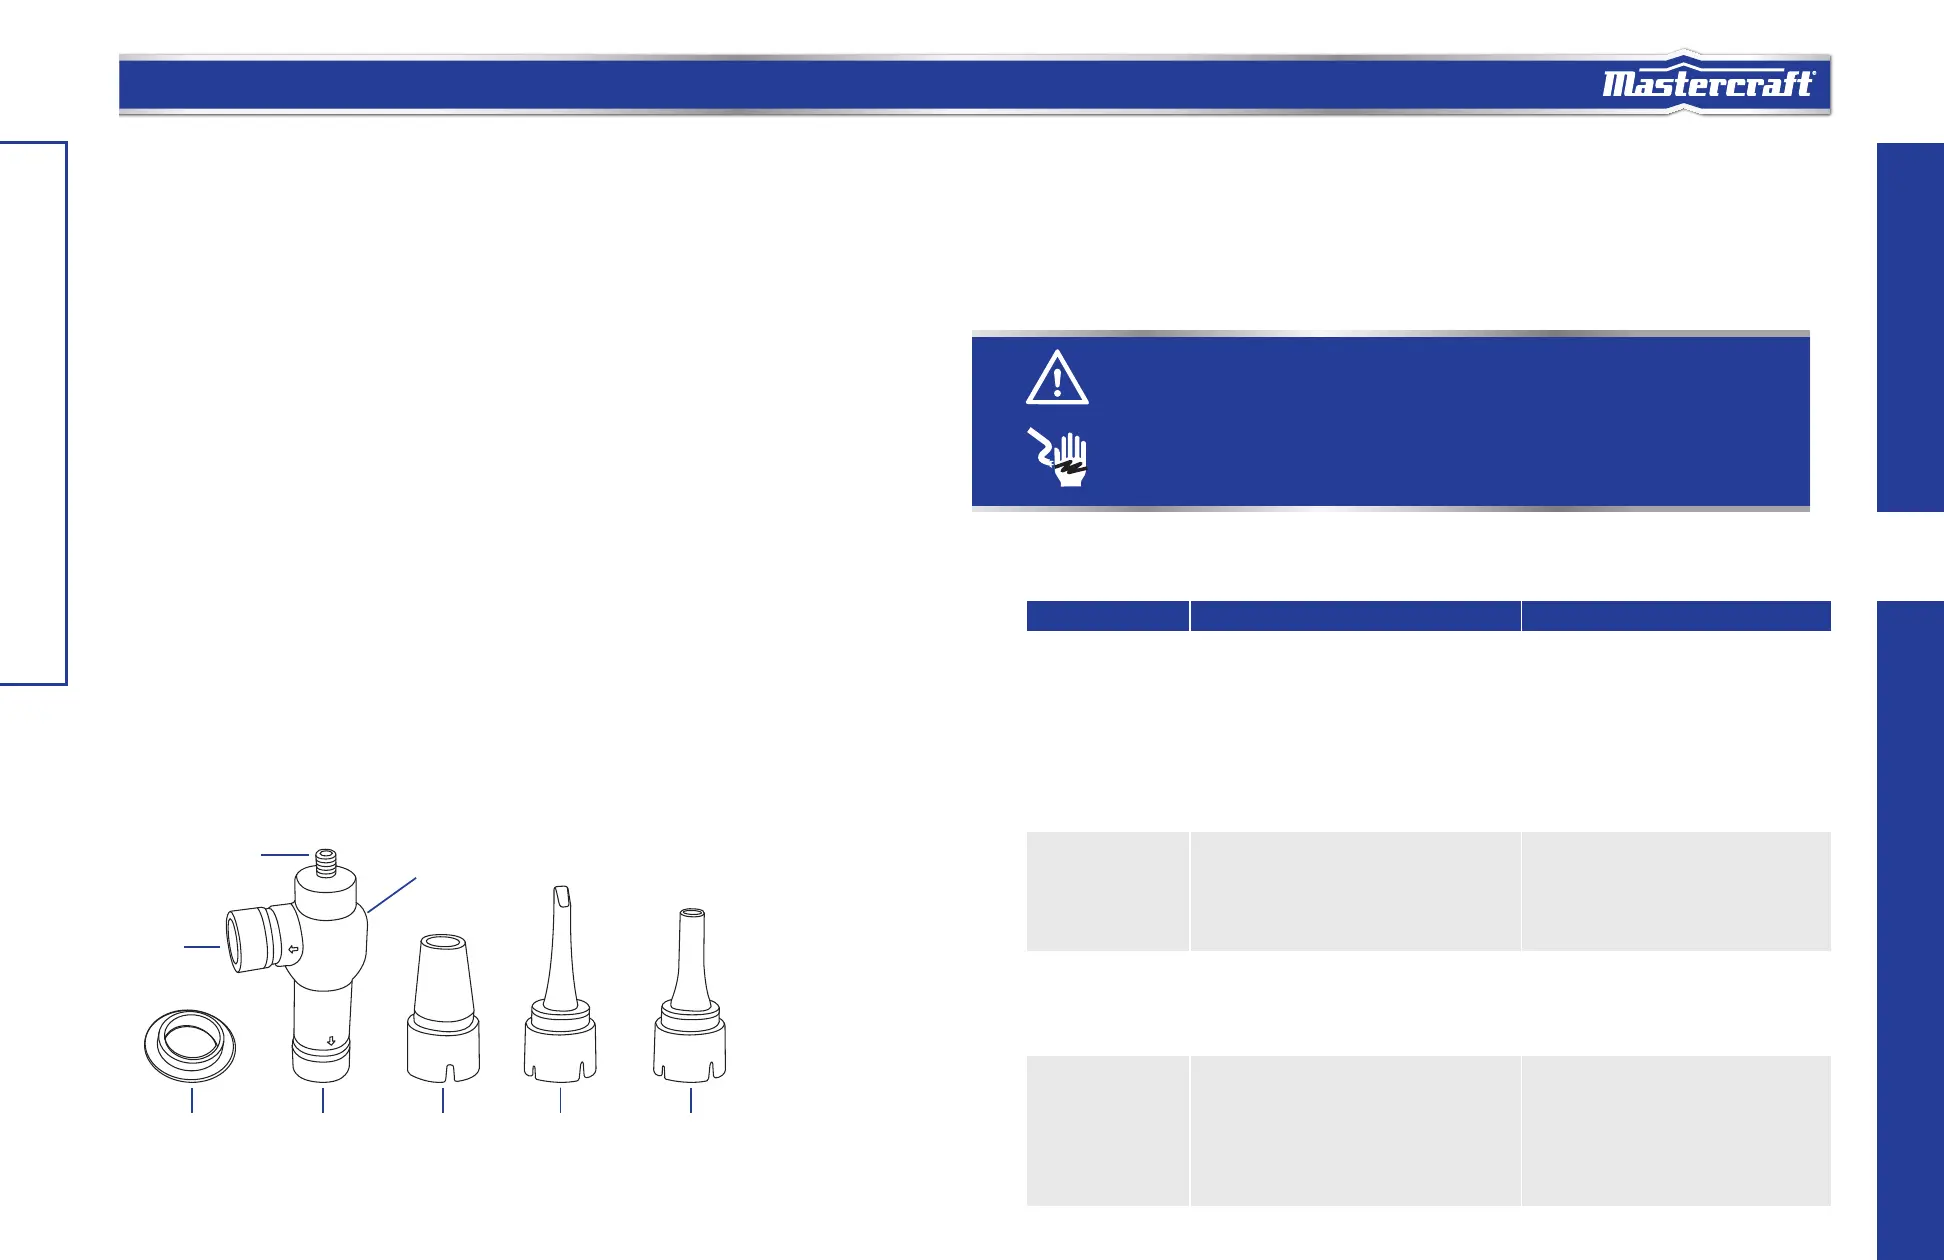
1. Select the best fitting nozzle for your inflatable and install it on the end of the air accelerator body. Use
theenlargementcollarwiththelargestnozzlewhentheairinletoftheinflatableisextra-large.
2. The air accelerator body can be used without any of the accessory nozzles if the valve in the inflatable is
large enough.
3. Attach the tire chuck (J) from the inflator onto the threaded side inlet nipple of the air accelerator body.
Theoutlettubesontheairacceleratorbodyaremarked“INFLATE”and“DEFLATE”.Ifyouwishto
INFLATE, simply attach the correct size nozzle (small, medium, or large one) onto the inflation outlet and
put the other end of the nozzle into the valve of the inflatable to be inflated.
IMPORTANT: Many inflatables, especially air mattresses, have an internal flap that prevents air loss. Unless
this flap is displaced by the nozzle or end of the air accelerator body, the air mattress will not inflate or
deflate. Push the nozzle or end firmly into the valve to ensure that you push this flap out of the way to allow
proper airflow.
IMPORTANT: If you cannot get your inflatable firm enough to suit your needs, place your thumb directly over
the deflection outlet. This will allow more air to go directly into the inflatable. When inflating items such as
largerubberboats,etc.,itwillsometimesbenecessaryto“topoff”yourinflatablewithafootpumporlarge
volume hand pump.
To Deflate:
If you wish to DEFLATE, follow the same procedure as above using the deflation outlet which is marked
“DEFLATE”.
IMPORTANT: If you are purchasing an inflatable, keep in mind that the larger hole it has, the faster it can be
inflated and deflated.
MAINTENANCE
MAINTENANCE
1. Before each use, inspect the general condition of the inflator. Check for loose hardware, misalignment
or binding of moving parts, cracked or broken parts, damaged electrical wiring, and any other condition
that may affect its safe operation.
2. After use, wipe external surfaces of the inflator with a clean cloth.
3. Store the inflator in a clean, dry, safe location out of reach of children and other unauthorized people.
WARNING!
• Proceduresnotspecificallyexplainedinthismanualmustbeperformedonlybyaqualifiedtechnician.
• Topreventseriousinjuryfrominflatorfailure,donotusedamagedequipment.Ifabnormalnoiseorvibrationoccurs,have
the problem corrected before further use.
• Topreventseriousinjuryfromaccidentaloperation,turnthepowerswitchoffandunplugtheinflatorfromitselectrical
outlet before performing any inspection, maintenance, or cleaning procedures.
• Ifthesupplycordofthiscompressorisdamaged,itmustbereplacedonlybyaqualifiedservicetechnician.
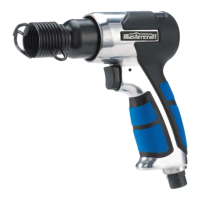
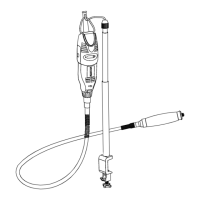
Enlargement
Collar
Inflation Outlet Medium
Adaptor Nozzle
Small
Adaptor Nozzle
Large
Adaptor Nozzle
Deflation
Outlet
Air Accelerator
Body
Side Inlet Nipple
INFLATION
DEFLATION
HIGH FLOW AIR ACCELERATOR KIT DIAGRAM
TROUBLESHOOTING
Problem Possible Causes Likely Solutions
The motor does
not work.
1. No electrical power.
2. Damaged power cord.
3. Electrical wiring within the unit is
defective.
4. Power switch is defective.
1. Plug the power cord into a working,
120V~, grounded, electrical outlet.
2.Haveaqualifiedservicetechnician
replace the power cord.
3.Haveaqualifiedservicetechnician
replace electric wiring.
4.Haveaqualifiedservicetechnician
replace power switch.
The motor runs,
but it makes
irregular noises or
a knocking noise.
1. Bearing is loose or damaged.
2. Screws in the connection rod are loose.
1.Haveaqualifiedservicetechnician
replace the bearing.
2. Tighten the screws, or replace them
if necessary.
Not enough
pressure.
1. Loose air connection(s).
2. Air hose is damaged.
3. Screws on cylinder cover are loose.
1. Check all air connections, and tighten
them if necessary
2. Replace air hose.
3. Tighten screws.
Motor runs
properly, but no air
pressure or lack
of air delivery.
1. Valve plate is loose or out of place.
2. Retainer ring is damaged after
excessive use at high pressure.
1. Open the front cover and make
sure the valve plate is in the proper
position. Tighten the screws if
necessary.
2.Haveaqualifiedservicetechnician
replace the retainer ring.
TROUBLESHOOTING
 Loading...