4
PACKAGING AND RECYCLING
The materials used for this appliance’s packaging can be
reused, recycled and disposed of through specific waste
streams.
REUSE: Keep packaging to safely store or transport your
appliance, preventing damage.
RECYCLE: Look for the recycling symbols on packaging
components to identify if they are recyclable. Check with your
local authority to find out what materials are accepted for
recycling in your area.
DISPOSE: Look for symbols on packaging components
and dispose.
OPERATING YOUR APPLIANCE
HOW TO USE THE CONTROL PANEL
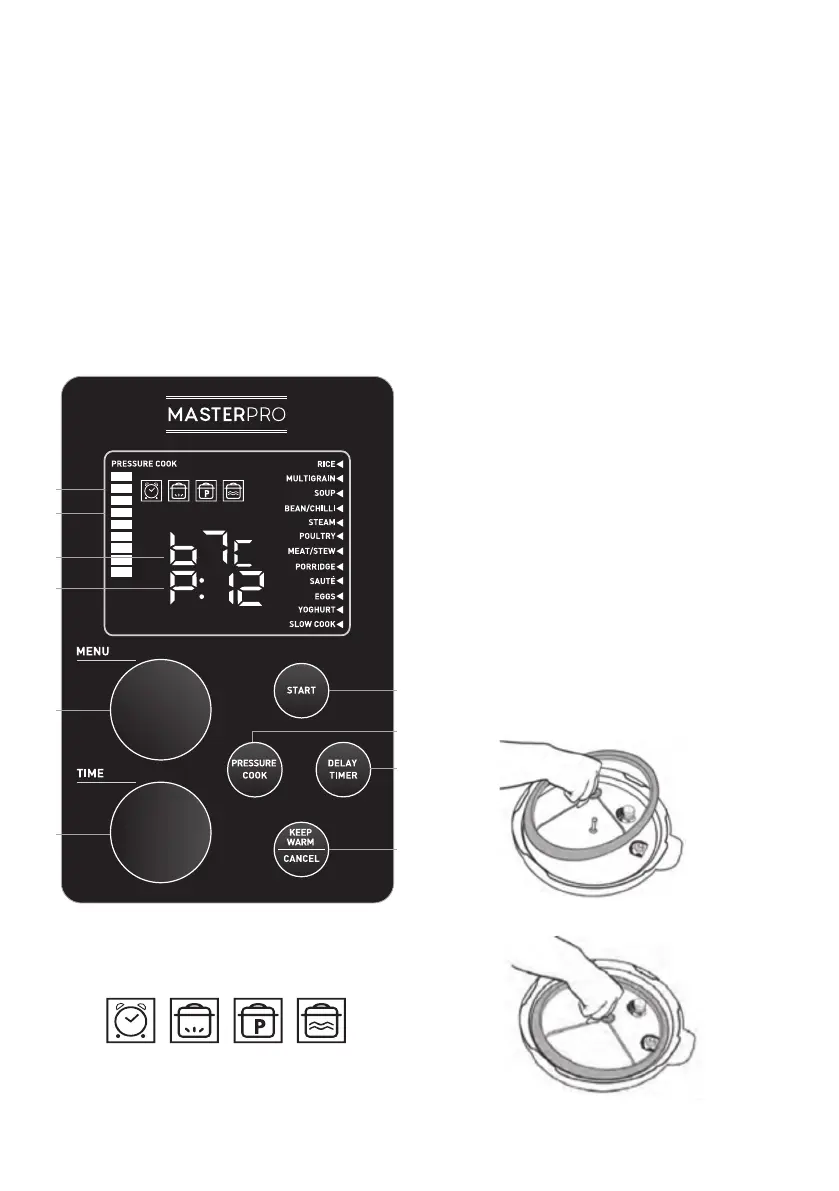
A. LED DISPLAY: The LED display shows the MENU functions,
cooking indicator icons, cooking indicator bars, internal
temperature and countdown timer.
B. COOKING INDICATOR BARS: The cooking indicator bars will
scroll vertically during the heating process and turn solid
when the optimal temperature is reached.
C. INTERNAL TEMPERATURE DISPLAY: The internal
temperature of the appliance in °C. It will fluctuate up and
down as the temperature changes.
D. TIMER DISPLAY: This shows both the programmed delay
time as well as the programed appliance time.
E. MENU DIAL: Use to scroll through MENU functions, use
TIMER dial to adjust time if needed, press the START button
to begin cooking.
F. TIMER DIAL: Use to set a custom Pressure Cook Time. First,
press the PRESSURE COOK button then turn the TIMER dial
to set a custom cook time. Each turn of this dial increases
cook time by 1 minute increments. Press the START button
to begin cooking.
G. START BUTTON: Press this button when you have selected a
MENU Function or Pressure Cook Time to begin the cooking
process.
H. PRESSURE COOK BUTTON: Press this button then use the
TIMER dial to set a custom cook time.
I. DELAY TIMER BUTTON: Use to program the appliance
to begin cooking at a later time. This button is used in
combination with the MENU functions and custom Pressure
Cook Time function.
J. KEEP WARM/CANCEL BUTTON: Use this button to set the
appliance to Keep Warm. The appliance will automatically
set itself to Keep Warm after cooking. Also, press this button
to cancel ANY function at ANY time.
SILICONE SEAL RING ASSEMBLY
Always ensure the Silicone Seal Ring is securely fitted onto the
metal Y-shaped ring in the interior of the Lid. Make sure the
crease in the Silicone Seal Ring meets with the outside of the
Y-Ring all the way around. Then place the Y-Ring and Silicone
Seal Ring back into the Lid, making sure the hole in the centre
of the Y-Ring’s cross-section is lined up with the metal pin
in the centre of the Lid. Press down firmly until the Y-Ring is
secured onto the Lid. (Figures 1-2)
A
B
C
D
E
G
H
I
J
F
21 3 4
1. Delay Timer Icon
2. Heating Icon
3. Pressurised Icon
4. Keep Warm Icon
Figure 1
Figure 2
 Loading...