1. To seal properly, open end of bag should be resting entirely inside
vacuum channel area.
2. Check sealing strip and gasket beneath the lid for debris and position.
Wipe clean and smooth them back into place.
3. Bag may have a hole. To test, seal the bag with some air in it,
submerge in water, and apply pressure. If there are bubbles present,
it does indicate a leak and a new bag should be used.
4. To check if lid is completely latched into place.
Vacuum sealer bag loses vacuum after being sealed.
1. Wrinkles, crumbs, grease or liquids may cause leaks along the seal.
Reopen bag, wipe the top inside of the bag and smooth it out along
the sealing strip before resealing.
2. To check if there have moisture or juices from the food present within
the bag, if yes, you may need to cut open the bag and reseal it, or use
an entirely new bag. Foods with excess liquids should be frozen
before vacuum sealing.
3. If items with sharp edges, they may have punctured the bag, and
released the vacuum. Cushion sharp edges in the contents of the bag
with paper towels.
Vacuum sealer not sealing bag properly
1. If sealing strip over heat and melt the bag, it’s necessary to lift the lid
and allow sealing strip to cool for a few minutes.
2. Before re-pressing the “seal only” key, allow the unit to resume for 15
seconds.
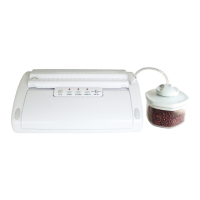
The canister will not vacuum:
Ensure that rubber gasket ring on is free from food content.
Gently turn the canister lid knob if can automatically return its place.
Make sure accessory hose is securely into accessory port on appliance
and the vacuum suck tray complete cover lid knob.
If the upper lid of appliance are already lock into unit base.
 Loading...