EasyManua.ls Logo

Maytag mer6770 - User Manual

Maytag mer6770
16 pages
Print Icon
To Next Page IconTo Next Page
Loading...
MAYTAGG_-.MIHI'"' It.LEL, I nit,., n_,,_,,
MER6870, MER6770, MER6551
i '
i
,'ffrL
'_FE'"_ ]Y
_ ! Pages 1-2
i! __i_ " _ ...............
_! _ACE COOKING
; _i .Pages 3-4
Installer:Pleaseleavethismanualwith ......
,_, ,,_, thisappliance.
Consumer:Pleasereadandkeepthis
' _. COOKING
manualforfuturereference.Keepsales _:, U
receiptand/orcancelledcheckasproofof '_' ....... Pages 5-10
_ purchase.
" ModelNumbe_ "_E &CLEANING
r_ _ ..... Pages 11-13
i::, _ SerialNumber _E_E
' OREvn,CALL
.-,._. .vv ........ Page l Z
i ,_ DateofPurchase
i!:
_ _ARflANTY
Page1
_ ......... ...........
Inourcontinuingefforttoimprove
_; thequalityandperformanceof
ourcook,ogproducts,,trna_be _UIDEDEL'UTILISATEURPage 1necessaryto makechangesto ...... . . .
i theappliancewithoutrevisingthis
,_;' guide,
_ _ DELUSUARIO
Ifyouhavequestions,call: ....... Page 3
1-888-4MAYTAG(1-888-462-9824)
;_ 1-800-688-2080(U.S.TTYfor
i hearingorspeechimpaired)
,- (Mon.-FrL,8am-8pmEasternTime
J Internet:http://www.maytag.com
Forserviceinformation,seepage15.
Form No.A/03/O0 Pert No.8113P257-60 ...... http://www.maytag.com 74005366 Utho U.S,
Question and Answer IconNeed help?

Do you have a question about the Maytag mer6770 and is the answer not in the manual?

Summary

Safety

Important Safety Instructions

Essential safety guidelines for preventing fire, shock, injury, and damage to the appliance.

Child Safety

Precautions to protect children from appliance hazards and misuse.

Surface Cooking

Cooktop

Instructions and warnings specific to the cooktop surface elements.

Coil Element Surface

Information on coil elements, including lift-up cooktop and drip bowls.

Oven Cooking

Oven Cooking

Detailed instructions for operating the oven control panel and functions.

Oven Control Pads

Explanation of the oven control pads and their functions.

Cook Time;Stop Time Pads

How to program automatic start and stop times for oven cooking.

Care & Cleaning

Clean Pad

Instructions for initiating and managing the self-cleaning cycle.

Glass-Ceramic Cooktop

Specific cleaning methods for glass-ceramic cooktops.

Before You Call

Before You Call for Service

Troubleshooting tips to resolve common issues before calling for service.

Part or All of Appliance Does Not Work

Checks for common reasons why the appliance may not be functioning.

F Plus a Number and the Message: Call an Authorized Servicer or 888-462-9824

How to interpret and respond to fault codes displayed by the oven.

Warranty

Maytag Range Warranty

Details of the Maytag range warranty coverage and terms.

If You Need Service

Instructions on how to obtain service and what information to provide.

Overview

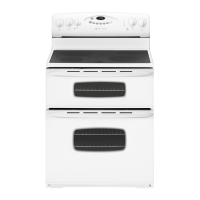
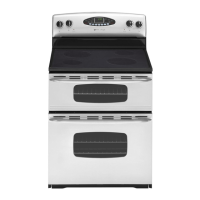
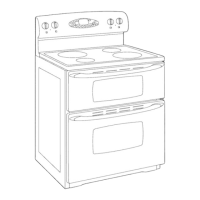
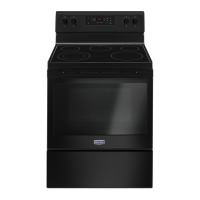
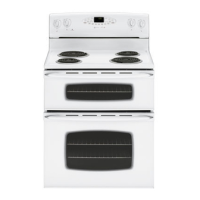
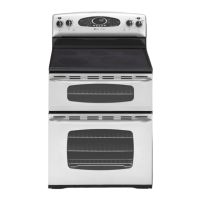
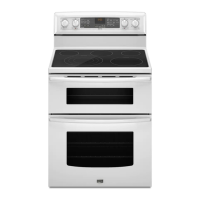
This document is a user's guide for Maytag Gemini™ electric ranges, specifically models MER6870, MER6770, and MER6550. It provides comprehensive information on safety, operation, maintenance, and troubleshooting.

Function Description

The Maytag Gemini™ electric range is a cooking appliance featuring both surface cooking elements and dual ovens (upper and lower). It is designed for baking, broiling, roasting, toasting, and keeping food warm. The dual oven configuration allows for cooking multiple dishes at different temperatures simultaneously, enhancing cooking flexibility. Some models include a convection bake feature in the lower oven and a glass-ceramic cooktop.

Important Technical Specifications

  • Model Numbers: MER6870, MER6770, MER6550.
  • Oven Temperature Range (Bake/Convect Bake): 100°F to 550°F.
  • Broil Temperature Range: 300°F to 550°F.
  • Toast Time Range: 10 seconds to 10 minutes (adjustable AUTO SET default of 4 minutes).
  • Keep Warm Temperature Range: 145°F to 190°F (AUTO SET default of 170°F).
  • Self-Clean Cycle Times: 2, 3, or 4 hours (adjustable AUTO SET default of 3 hours).
  • Timer Range: Up to 99 hours and 59 minutes (99:59).
  • Clock Controlled Cooking Time: Up to 11 hours and 59 minutes (11:59).
  • Oven Light Bulb: Halogen bulb, part number 74004458.
  • Power Requirement: Designed for electric current, voltage, and supply as specified in the installation instructions. Expect longer broil times and slightly lighter browning on a 208-volt circuit.
  • Canadian Models: Surface will not operate during self-clean cycle (glass-ceramic cooktop); two front elements will not operate during self-clean (coil element models). Convenience outlet is located on the lower left side of the backguard, with a circuit breaker that trips if plugged-in appliances exceed 10 amps.

Usage Features

  • Surface Cooking:
    • Infinite heat settings from LOW to HIGH.
    • Indicator lights for each pair of control knobs.
    • Dual element (select models) in the right front position for controlling large or small elements.
    • Glass-ceramic cooktops (select models) have permanent patterns for cooking areas and retain heat after being turned off, indicated by a HOT SURFACE light.
    • Coil elements (select models) cycle on and off to maintain heat and are self-cleaning. Drip bowls are removable for cleaning.
  • Oven Controls:
    • Electronic control with a display window showing time of day, timer, and oven functions.
    • Messages scroll to prompt programming steps.
    • Function pads for BAKE, BROIL, CLEAN, TOASTING, KEEP WARM, CONVECT BAKE (lower oven only, select models), COOK TIME, STOP TIME, TIMER 1, TIMER 2, and LIGHT.
    • AUTO SET pad for automatic temperature/time settings (e.g., 350°F bake, HI/LO broil, 3-hour clean, 4-minute toast, 170°F keep warm).
    • CANCEL pad to stop all programming except Clock and Timer.
    • Clock setting (12-hour format).
    • Oven Racks: Designed with a lock-stop edge. Upper oven has one rack and position. Lower oven (conventional) has one RollerGlide™ rack and one regular flat rack. Lower oven (convection, select models) has one RollerGlide™ rack and two regular flat racks. Multiple rack cooking is supported (e.g., positions 2 and 4 for two racks, 1, 3, and 5 for three racks in convection baking). A half-rack accessory is available for the lower oven to increase capacity.
  • Oven Control Options:
    • 12 HOUR OFF (1): Oven can turn off after 12 hours or stay on indefinitely (default: 12 hours).
    • TIMER BEEPS (2): Three choices for timer reminder signals (default: one beep followed by two beeps every 30 seconds for up to 5 minutes).
    • COOK TIME BEEPS (3): Three choices for clock-controlled cooking reminder signals (default: four short beeps followed by one beep every minute for up to 30 minutes).
    • CONTROL LOCK (4): Locks function pads for safety and cleaning; time of day remains displayed.
    • SCROLL SPEED (5): Adjusts message scroll speed (FAST, MEDIUM, SLOW; default: medium).
    • DISPLAY DIM (6): Adjusts control display intensity (default: highest).
    • TEMP C/F (7): Changes temperature scale to Centigrade or Fahrenheit (default: Fahrenheit).
    • LANGUAGE (8): (select models) Changes display language (English, French, Spanish).
    • DEFAULT (9): Resets control to factory settings.
    • DISPLAY ON/OFF (CLOCK): Turns time-of-day display off when oven is not in use.
  • Oven Temperature Adjustment: Allows adjustment of oven temperature by +/- 35°F in 5°F increments if the oven is consistently too hot or cold.
  • Oven Lights: Automatically turn on when the door is opened. Can be manually turned on/off with the LIGHT pad. Do not operate during a clean cycle.

Maintenance Features

  • Self-Cleaning Oven:
    • Only one oven can be cleaned at a time; both ovens lock.
    • Requires removal of broiler pan, oven racks, and other utensils.
    • Wipe up excessive spillovers, especially sugary/acidic foods, before cleaning.
    • Cleaning times are 2, 3, or 4 hours.
    • Oven door locks during the cycle and remains locked until the oven cools (approx. 1 hour).
    • Kitchen should be well ventilated during cleaning.
    • Bake element can be lifted slightly for ease of cleaning.
  • General Cleaning Procedures:
    • Broiler Pan and Insert: Wash with soapy water, scour stubborn soil, dishwasher safe.
    • Brushed Chrome (select models): Wash with soapy water, rinse, buff. For heavier soil, use mild abrasive cleaner (baking soda, Bon Ami*), rubbing with the grain. Use Stainless Steel Magic Spray* (Part #20000008) to restore luster.
    • Clock and Control Pad Area: Wipe with a damp cloth; glass cleaners can be used if sprayed on a cloth first (DO NOT spray directly on control pad).
    • Control Knobs: Remove by pulling forward, wash with soap and water.
    • Glass - Oven Windows & Doors: Wash with soap and water, rinse, dry. Glass cleaner can be used if sprayed on a cloth first. Avoid abrasive materials.
    • Glass-Ceramic Cooktop (select models):
      • Light Soil: Soap and water, clean cloth, or non-abrasive cleaner (Bon Ami*, Cooktop Cleaning Creme** Part No. 20000001).
      • Heavy Soils or Metal Marks: Gently scrub with Cooktop Cleaning Creme and a plastic scrubber.
      • Burned-on or Crusty Soils: Use a razor blade scraper at a 30° angle.
      • Melted Sugar or Plastic: Immediately turn element to LOW, scrape from hot surface to a cool area, then turn OFF and cool. Clean residue with razor blade scraper and Cooktop Cleaning Creme.
    • Oven Racks: Wash with soapy water. For stubborn soil, use cleansing powder or soap-filled scouring pad. Apply vegetable oil to rack edges and supports to restore ease of movement.
    • Plastic Finishes (Door Handles, Trim & End Caps): Wash with soap and water, rinse, dry. Use glass cleaner and a soft cloth. Avoid oven cleaners, abrasive, or caustic cleaners.
    • Porcelain Enamel (Backguard Area, Trim on Glass-Ceramic Surface, Cooktop on Coil Surface): Wash with soapy water, rinse, dry when cool. Wipe up acid or sugar spills immediately. Avoid oven cleaners, abrasive, or caustic cleaners.
  • Oven Door(s): Removable for cleaning. Open to broil stop position (about 4 inches), grasp at each side, and lift evenly. To replace, align slots with hinge arms and slide down.
  • Oven Light Bulb Replacement: Disconnect power. Allow oven to cool. Grasp edge of bulb cover, pull out. Pull old bulb straight out of ceramic base. Push new halogen bulb (part number 74004458) straight into small holes, avoiding touching with bare hands. Replace cover. Reconnect power and reset clock.
  • Leveling Legs: Plastic leveling legs at each corner of the range allow for leveling. Ensure the anti-tip bracket secures one of the rear leveling legs to the floor.

Maytag mer6770 Specifications

General IconGeneral
BrandMaytag
Modelmer6770
CategoryRanges
LanguageEnglish

Related product manuals