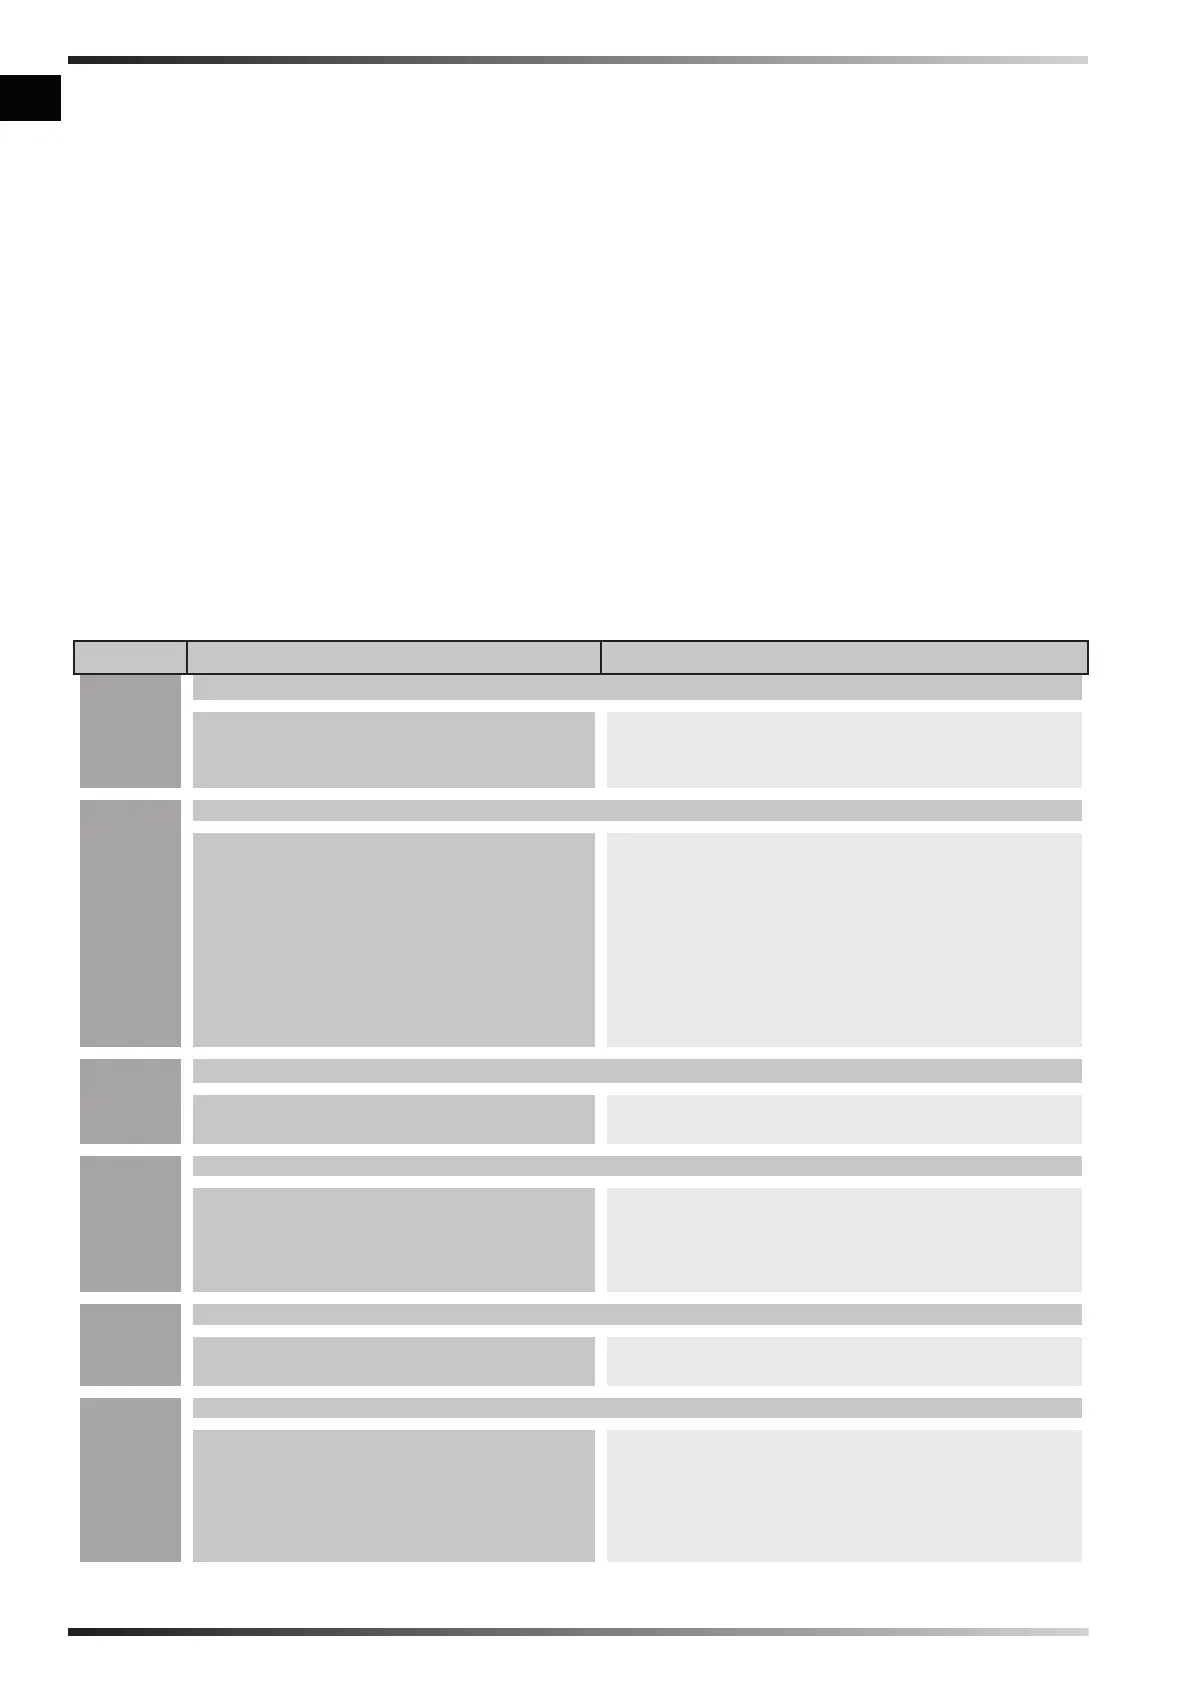
►►8. DISPLAY ERRORS
See B Fig. 3
ERROR CAUSE SOLUTION
F0
OPERATION ERROR
1. The “ON/OFF” switch is turned “ON”
(|) when the heater is plugged in
1. After disconnecting the heater, see that the
switch is in the “OFF” (0) position, plug the
heater in and turn the switch “ON” (|)
F1
PHOTOCELL ERROR
1. No fuel
2. Fuel is contaminated
3. Photocell is dirty or damaged
4. Fuel lter is dirty
5. Ignition error
1. Turn the switch “OFF” (0), rell the fuel tank
2. Turn the switch “OFF” (0) empty and rell
the fuel tank. Clean the lter using clean
fuel, do not damage the lter (SEE PARA.
6)
3. Contact the technical service center
4. SEE PARA. 6
5. Contact the technical service center
F2
TEMPERATURE CONTROL SENSOR ERROR
1. Interrupted cable
2. Sensor is damaged
1. Contact the technical service center
2. Contact the technical service center
F3
THERMOSTAT ERROR
1. Internal heater overheating
2. Antitilting sensor intervent
1. Turn the heater off, wait until it is cooled
down
2. Place the heater on a level and stable
surface
F4
INCORRECT VOLTAGE
1. Incorrect voltage 1. Check voltage of your electric supply
system
FF
NO SWITCH-ON AFTER THREE ATTEMPTS
1. No fuel
2. Dirty fuel lter
3. Dirty or defective photocell
4. Dirty or defective nozzle
5. Anti-tilting sensor trip
1. Contact the technical service center
2. Contact the technical service center
3. Contact the technical service center
4. Contact the technical service center
5. Contact the technical service center
en
it
de
es
fr
nl
pt
da
no
sv
pl
ru
cs
hu
sl
tr
hr
lt
lv
et
ro
sk
bg
uk
bs
el
zh
►►7.1. HANDLING:
See Fig. 7
The heater can be easily handled by the wheels
and handles. To handle the heater better:
►7.1.1. Release the handles from their closed
position (pull the locking pin outwards).
►7.1.2. Lock the handles in a handling position.
►7.1.3. Move the heater by lifting the handles
and making it slide on its wheels.
►7.1.4. Put the handles back into their closed
position.
►►7.2. TRANSPORT:
See Fig. 8
It is possible to lift and move the heater from the
specic anchoring points.
►►7.3. STORAGE:
IN ORDER TO KEEP THE HEATER IN
THE BEST POSSIBLE CONDITIONS,
WE RECOMMEND FOLLOWING THE
PROCEDURE BELOW:
►7.3.1. Empty the fuel from the tank by
removing the discharge plug at the bottom
of the tank. Dispose of the fuel appropriately
and in line with current standards.
►7.3.2. If you notice any residue, pour clean
fuel into the tank and rinse again.
►7.3.3. Close the drain plug and the tank plug.
►7.3.4. In order to keep the heater in the best
conditions possible, we recommend placing
it in a dry place away from potential external
damage.