EasyManua.ls Logo

MediaKind RX1 - User Manual

Default Icon
4 pages
Print Icon
To Next Page IconTo Next Page
Loading...
Quick Start Guide
RX1 - Quick Start Guide - P/N S16955 RC
1. Insert the 2 CAMs into the required slots in the common interface module of the unit .
CAUTION: The CAMs are labeled with the matching serial number of the un
it,
D
O NOT mix CAMs between units.
2. Quad Satellite input: connect the F-Type cable(s) to the rear of the unit :
Input 1: Feed for G15 (Vertical)
Input 2: Feed for G17 (Vertical)
Input 3: Feed for G15 (Horizontal)
Input 4: Feed for G17 (Horizontal)
3. ASI output: connect the ASI cable to the rear of the unit, on port 2 .
4. Management: connect the Ethernet cable to the rear of the unit on eth0 .
5. Quad 1 GbE output: connect the Ethernet cable(s) to the rear of the unit, (by default, eth2) .
6. Connect the power cord to the back of the unit . Plug the power cord into the grounded outlet, then po
wer
u
p the unit.
1
2
3
4
5
6
Step 1: Connections/Power
1. Launch a web browser:
HTTP://{IP-Address} where {IP-Address} is that set in Step 2.
2. Enter the username FoxReceivers and password Change2YourSite.
Step 3: Login
The Ethernet interfaces can be configured using the LCD panel:
1. Navigate to Network using the UP, DOWN, LEFT and RIGHT buttons.
2. Select Eth0 and use the UP, DOWN, LEFT and RIGHT buttons to adjust the valu
e.
3. Press ENT
ER to apply the new value.
Step 2: Configure the network interfaces
1. Record the receiver serial number starting with 4E as printed on the back of the unit.
2. Call Fox on 1-888-882-5295
Step 4: Get the receiver entitled
NOTE: See back panel connector locations on page 4.
Question and Answer IconNeed help?

Do you have a question about the MediaKind RX1 and is the answer not in the manual?

Summary

Connections and Power Setup

Insert CAMs into Slots

Insert the 2 CAMs into the required slots in the common interface module of the unit.

Connect Satellite Input Cables

Connect F-Type cable(s) to the rear of the unit for Quad Satellite input.

Connect ASI Output Cable

Connect the ASI cable to the rear of the unit on port 2.

Connect Management Ethernet

Connect the Ethernet cable to the rear of the unit on eth0 for management.

Connect GbE Output Ethernet

Connect Ethernet cable(s) to the rear of the unit on eth2 for Quad 1 GbE output.

Connect Power and Power On

Connect the power cord to the back of the unit and plug into a grounded outlet.

Network Interface Configuration

Configure Eth0 via LCD

Configure network interfaces (Eth0) using the LCD panel buttons and ENTER key.

System Login Procedure

Access Web Interface and Log In

Launch a web browser to the unit's IP address and log in with default credentials.

Receiver Entitlement Process

Record Serial Number

Record the receiver serial number starting with 4E as printed on the back of the unit.

Contact Support for Entitlement

Call Fox on 1-888-882-5295 to get the receiver entitled.

Check and Adjust Entitled Services

Select and Edit Services

Navigate to Services, then Solution Manager Transcode, and click the Edit icon.

Verify Entitlements

Check that the required services are entitled after confirmation from Fox representative.

Adjust Service Codec

Change the service codec from MPEG-2 Main to H.264 (AVC) if needed via Cog icon.

Save Service Configuration

Press Save and Continue to apply the service adjustments.

Configure Output MPTS

Set Output Multicast Details

Enter Total Bitrate, Stream Address (multicast/unicast), and Destination UDP port.

Apply Output Settings

Press Save and Exit or Save and Continue to apply the configured output settings.

Change User Password

Initiate Password Change

Click on the username 'FoxReceivers' in the top right corner and select 'Change password'.

Enter New Password

Enter the old password, then enter and confirm the new password to update.

Back Panel Overview

Identify Back Panel Components

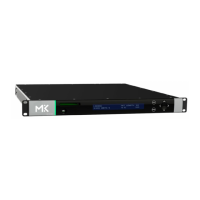
Illustration and labels for Dual Common Interface, Satellite Input, ASI Output, Ethernet ports, and Power Input.

CAM Handling Precautions

Note regarding keeping CAMs with their original unit and unplugging them for transport.

Overview

The MediaKind RX1 is a professional receiver designed for various broadcast and media applications, offering robust connectivity, flexible configuration, and secure operation.

Function Description:

The RX1 serves as a versatile media receiver capable of handling satellite inputs, processing Conditional Access Modules (CAMs), and outputting content via ASI and Gigabit Ethernet interfaces. It is designed to receive and transcode services, manage network interfaces, and provide secure access to its functionalities. The device integrates common interface modules for CAMs, quad satellite inputs for receiving multiple satellite feeds, ASI outputs for professional video transport, and multiple Gigabit Ethernet ports for management and multicast outputs. Its core function involves receiving encrypted satellite signals, decrypting them using CAMs, and then processing and outputting the content in various formats, including transcoded services.

Important Technical Specifications:

Connectivity:

  • Dual Common Interface (CI): Supports two CAMs for decryption of encrypted services. CAMs are unit-specific and labeled with the RX1's serial number.
  • Quad Satellite Input: F-Type connectors for four satellite feeds:
    • Input 1: G15 (Vertical)
    • Input 2: G17 (Vertical)
    • Input 3: G15 (Horizontal)
    • Input 4: G17 (Horizontal)
  • ASI Output: One ASI output port (port 2) for professional video transport.
  • Management Ethernet (eth0): One 1 GbE port dedicated for device management.
  • Quad 1 GbE Output (eth2): Multiple 1 GbE ports for multicast outputs, with eth2 being the default.
  • Power Input: Supports standard power cord connection to a grounded outlet.
  • Back Panel Components: All back panel components are SELV (Safety Extra Low Voltage) components.

Output Multicast Details:

  • Total Bitrate: Configurable to accommodate all services and PSI/SI table overhead.
  • Stream Address: Multicast or unicast address, with multicast ranges from 224.0.0.0 to 239.255.255.255.
  • Destination UDP Port: Configurable within the range of 0 to 65353, with ports 0 to 1023 considered "well-known ports" and reserved.

Transcoding Capabilities:

  • Default Codec: MPEG-2 Main for transcoded service output.
  • H.264 (AVC) Support: Option to select H.264 Main for transcoded services.

Usage Features:

Initial Setup and Connections:

  • CAM Insertion: Insert two CAMs into the common interface module slots. It is crucial not to mix CAMs between different RX1 units, as they are serial number matched. CAMs should be plugged in soon after unboxing and unplugged during transport to prevent damage.
  • Satellite Input: Connect F-Type cables to the quad satellite input ports according to the specified G15/G17 vertical/horizontal feeds.
  • ASI Output: Connect an ASI cable to the designated ASI output port.
  • Management & Output Ethernet: Connect Ethernet cables to the eth0 port for management and to the 1 GbE output ports for data transmission.
  • Power Connection: Connect the power cord to the unit and a grounded outlet, then power up the device.

Network Interface Configuration:

  • LCD Panel Navigation: Use the UP, DOWN, LEFT, and RIGHT buttons on the LCD panel to navigate to the "Network" settings.
  • Eth0 Configuration: Select "Eth0" and adjust its value using the navigation buttons.
  • Apply Settings: Press "ENTER" to apply the new network configuration.

Web Browser Login:

  • Access: Launch a web browser and enter the device's IP address (configured in Step 2) in the format HTTP://{IP-Address}.
  • Credentials: Log in using the default username "FoxReceivers" and password "Change2YourSite".

Service Entitlement and Adjustment:

  • Service Selection: Navigate to the "Services" section in the web interface.
  • Entitlement Check: Verify that the services requiring entitlement are correctly entitled, as confirmed by the Fox representative.
  • Transcode Service Adjustment: Go to "Solution Manager Transcode" and click the "Edit" icon.
  • Codec Configuration: For services requiring H.264 (AVC), click the "Cog" icon next to the service and select "H.264 Main" from the default "MPEG-2 Main" codec.
  • Save Changes: Press "Save and Continue" to apply the service adjustments.

Output MPTS Configuration:

  • Output Tab: Click on the "Output" tab within the "Solution Manager Transcode" section.
  • Multicast Details Entry: Enter the "Total Bitrate" (sufficient for all services and overhead), "Stream Address" (multicast or unicast), and "Destination UDP port" (within the valid range, avoiding reserved ports).
  • Apply Settings: Press "Save and Exit" or "Save and Continue" to apply the output multicast settings.

Password Management:

  • Access Change Password: On any page, click on the username "FoxReceivers" in the top right corner and select "Change password."
  • Password Entry: Enter the old password, then enter the new password twice for confirmation.
  • Apply Changes: Click "Change password" to update the user password. Note that the username cannot be changed, and new users cannot be added.

Maintenance Features:

CAM Handling:

  • Unit-Specific CAMs: CAMs are supplied with and matched to specific RX1 units by serial number. They should not be swapped between units.
  • Post-Unboxing Installation: It is recommended to plug CAMs into the CI slots soon after unboxing to ensure they remain with their designated RX1 unit.
  • Transport Precaution: Always unplug CAMs from the RX1 unit when it is being transported to prevent damage to the CAMs or the RX1 CI slots.

Documentation Access:

  • Electronic Copy: An electronic copy of the Quick Start Guide (P/N S16955 RC) is available for download at https://www.mediakind.com/rx1-quick-start-guide.
  • QR Code: A QR code is provided to quickly connect to the MediaKind website and access the Quick Start Guide.

Support:

  • Fox Support: For entitlement and other support, users can call Fox at 1-888-882-5295, providing the receiver serial number (starting with 4E) printed on the back of the unit.

MediaKind RX1 Specifications

General IconGeneral
BrandMediaKind
ModelRX1
CategoryMedia Converter
LanguageEnglish

Related product manuals