INTENDED USE AND GUIDELINES
Intended Use
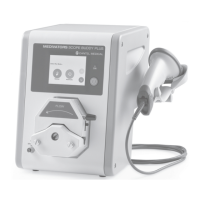
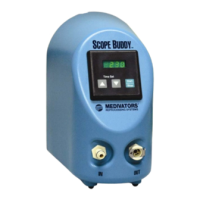
1. SCOPE BUDDY™ PLUS Endoscope Flushing Aid for channel ushing of exible immersible endoscopes during manual cleaning.
2. Operator Safety Overview - Appropriate PPE: mask, gown, gloves, eye protection
Guidelines for Reliable Disinfection
1. Endoscope manufacturers - Endoscope cleaning and disinfection manuals
2. SGNA guidelines and approved Reprocessing Steps: 1) Pre-cleaning, 2) Leak Testing, 3) Manual Cleaning, 4) Rinse after Cleaning,
5) Visual Inspection, 6) High Level Disinfection (HLD), 7) Rinse after HLD, 8) Drying and 9) Storage
3. ASGE, ASTM, APIC, AAMI, AORN, CSGNA, GENCA, BSG - Endoscope cleaning and disinfection guidelines
PRODUCT FAMILIARIZATION
Flushing Aid Components and their Functions
1. SCOPE BUDDY PLUS Endoscope Flushing Aid Front Panel: User Interface, Power Button, Pump Head Release Lever, Pump Head, Detergent Out Port
2. SCOPE BUDDY PLUS Endoscope Flushing Aid Side Panel: Barcode Reader USB Port, USB Ports, Power Cord Inlet,
Temperature Probe Inlet, Detergent In Port, Auxiliary Detergent Out Port
3. SCOPE BUDDY PLUS Endoscope Flushing Aid Rear Panel: Model Number, Serial Number, Safety Certications, Medivators 800 Number,
Wall-Mount bracket slots.
4. SCOPE BUDDY PLUS Endoscope Flushing Aid User Manual
Consumables/Accessories
1. Included: Barcode Reader, Barcode Reader Bracket, Temperature Probe, Wall Mounting Bracket, USB ashdrive with Installer for Dashboard,
Power Supply, Power Cord, Graduated Cylinder.
2. 24-Hour Multi-Use Tubing: Pump Tube, Hookup for OLYMPUS
®
, PENTAX
®
, FUJIFILM™ Endoscopes,
Universal Hookup, DSD Hookup Adapter. Auxiliary Detergent Out Tube
3. Detergent In Tube: change with every new detergent jug.
4. INTERCEPT™ Detergent and Wipes - Used during manual endoscope cleaning for effective bacterial biolm penetration, and biological and organic soil
removal. Use SCOPE BUDDY PLUS Endoscope Flushing Aid to dose INTERCEPT Detergent automatically to sink and clean container.
SCOPE BUDDY PLUS Flushing Aid Installation and Setup
1. System Installation: Flat, Level Surface within reach of Wall Outlet
2. Wall Mounting: SCOPE BUDDY PLUS Endoscope Flushing Aid located no higher than 0.6 meters (2 feet) above the top of uid solution in sink
3. Attach Power Cord and Power Supply, Ground Fault Interrupter
4. Barcode Reader (Scanner) and Bracket: Attach Bracket to right or left side of unit to hold Barcode Reader. Insert USB cable into Barcode Reader USB port.
FIRST TIME SETUP
1. Power Button: Depress until ON light illuminates.
2. Select Language
3. Select Automatic Run Mode
4. Set Date Format & Date; Set Time Format and time
5. Set Volume and Temperature Units
6. Select Fluid Source: Sink to dose only to sink; Clean Container to dose to both sink and clean container.
7. Enter Clean Container and Sink Volumes (in units selected)
8. Load New Detergent
9. Set Detergent Dilution: For INTERCEPT Detergent, use 0.35%; for MEDICLEAN EZ™ Detergent use 0.50%.
10. Cycle Sequence Prompts: Turn ON or OFF: Brushing Step, Aspiration Step, Patient ID Scan, Temperature Monitoring
11. Select OK to complete First Time Setup
12. Verify Temperature Range in Settings Menu is correct for detergent in use. If not, enter correct temperature range.
SYSTEM OPERATIONS - continued
Automatic Mode: Sink Only Pathway
1. Select Automatic Run Mode
2. Scan or manually enter User ID, Endoscope ID, Patient ID (optional)
3. Place both temperature sensors into sink
4. Dosing: Ensure sink is lled with correct volume and dose detergent into sink
5. Brushing: If brushing step is turned ON, set desired time and press PLAY.
6. Hookup:
- Install new 24-Hour Multi-Use Hookup for Endoscope, clamping off any unused section of tubing.
- If using DSD hookups, install 24-Hour Multi-Use DSD Hookup Adapter to both Pump Tube and DSD Hookup. NOTE: FUJIFILM™ Endoscopes cannot use
DSD Hookups with SCOPE BUDDY™ PLUS Endoscope Flushing Aid.
- If 24-Hour Multi-Use endoscope-specic hookup cannot be used, attach 24-Hour Multi-Use Universal Hookup to both endoscope and manufacturer’s
cleaning adapter(s), clamping off any unused tubing.
7. Aspiration: If using OLYMPUS
®
Endoscopes, setup endoscope for aspiration and press PLAY.
8. Flushing: Setup endoscope for ushing and press PLAY. Default time is 1:35 for all endoscopes.
9. Air Purge 1 of 2: Lift strainer out of uid, drain sink, press PLAY.
10. Rinsing: Setup endoscope for rinsing with clean water and press PLAY
11. Air Purge 2 of 2: Lift strainer out of uid, drain sink, press PLAY
Automatic Mode: Clean Container Pathways
1. Select Automatic Run Mode
2. Scan or manually enter User ID, Endoscope ID, Patient ID (optional)
3. Place temperature sensor labeled ‘Sink’ into sink; place sensor labeled ‘Container’ in clean container.
4. Dosing: Ensure sink and clean container are lled with correct volume and dose detergent
5. Brushing: If brushing step is turned ON, set desired time and press PLAY.
6. Hookup:
- Install new 24-Hour Multi-Use Hookup for Endoscope, clamping off any unused section of tubing.
- If using DSD hookups, install 24-Hour Multi-Use DSD Hookup Adapter to both Pump Tube and DSD Hookup. NOTE: FUJIFILM™ Endoscopes cannot use
DSD Hookups with SCOPE BUDDY™ PLUS Endoscope Flushing Aid.
- If 24-Hour Multi-Use cannot be used, attach 24-Hour Multi-Use Universal Hookup to both endoscope and manufacturer’s cleaning adapter(s), clamping
off any unused tubing.
7. Aspiration: If using OLYMPUS endoscopes, setup endoscope for aspiration and press PLAY.
8. Flushing: Setup endoscope for ushing with detergent and press PLAY. Default time is 1:35 for all endoscopes.
9. Air Purge 1 of 2: Lift strainer out of uid, drain sink, press PLAY.
10. Rinsing: Setup endoscope for rinsing with clean water and press PLAY
11. Air Purge 2 of 2: Lift strainer out of uid, drain sink, press PLAY
Manual Mode
1. Select Manual Run Mode
2. Scan or manually enter User ID, Endoscope ID, Patient ID (optional)
3. Depending on pathway, place temperature sensors in applicable places.
4. Dosing: Select Dosing. Fill sink and/or clean container with correct volume. Select Sink or Clean Container icon. Enter correct volume to be dosed using
INTERCEPT™ Detergent at 0.35% or 3.5 mL/liter (13 mL/gallon); MEDICLEAN EZ™ Detergent use 0.50% or 5.0 mL/liter (19 mL/gallon).
5. Hookup:
- Install new 24-Hour Multi-Use Hookup for Endoscope, clamping off any unused section of tubing.
- If using DSD hookups, install 24-Hour Multi-Use DSD Hookup Adapter to both Pump Tube and DSD Hookup. NOTE: FUJIFILM™ Endoscopes cannot use
DSD Hookups with SCOPE BUDDY™ PLUS Endoscope Flushing Aid.
- If 24-Hour Multi-Use endoscope-specic hookup cannot be used, attach 24-Hour Multi-Use Universal Hookup to both endoscope and manufacturer’s
cleaning adapter(s), clamping off any unused tubing.
6. Aspiration: Select Aspiration if using OLYMPUS endoscopes. Setup endoscope for aspiration and press PLAY.
7. Flushing: Select Flushing. Setup endoscope for ushing with detergent and press PLAY. Default time is 1:35 for all endoscopes.
8. Air Purge: Select Air Purge to purge detergent from endoscope channels. Lift strainer out of uid, drain sink, press PLAY.
9. Rinsing: Select Flushing. Setup endoscope for rinsing with water and press PLAY
10. Air Purge: Select Air Purge to purge water from endoscope channels. Lift strainer out of uid, drain sink, press PLAY
Continued on last page.
SYSTEM OPERATIONS
New Detergent Jug: Detergent In Tube Installation and Priming
1. With Pump Tube in place, install new Detergent In Tube.
2. Prime Detergent In Tube. Select Manual Run Mode, Scan ID’s. Select Dosing, select Sink icon. If 20 mL not displayed, press the keypad icon,
then backspace key to erase current value. Press 20, OK.
3. Select Play to prime Detergent In Tube.
Daily Service at the Start of Each Day
1. Power on device.
2. Install new Pump Tube. If using clean container, install Auxiliary Detergent Out Tube.
3. Ensure Temperature Probe and Detergent In Tube are connected.
4. Inspect all tubing for leaks and damage to plastic ttings. Discard and replace if damaged.
5. Perform Dosing Verication. If fails, perform Dosing Calibration and then repeat Verication. Document on SCOPE BUDDY PLUS Endoscope Flushing Aid
Verication & Calibration Log.
 Loading...