Do you have a question about the Melnor HydroLogic 65141AMZ and is the answer not in the manual?
Addresses continuous water flow during installation by turning water off, removing batteries, and reinserting them.
Instructions for periodic cleaning of the timer, including checking and cleaning the filter washer.
Guidance on storing the timer during freezing temperatures to prevent damage.
Recommendations for maximizing battery life, including using fresh alkaline batteries.
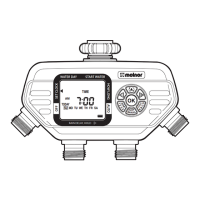
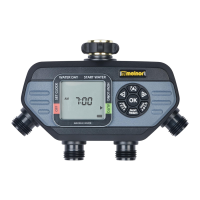
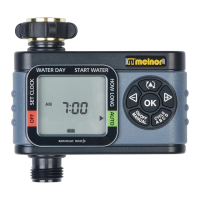
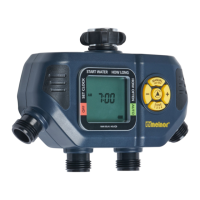
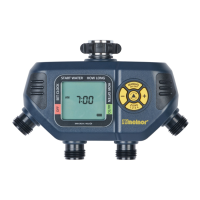
The Melnor HydroLogic 65141AMZ Advanced Four-Zone Electronic Water Timer is a sophisticated device designed to automate garden watering across up to four distinct zones from a single faucet. This timer offers extensive programming capabilities, allowing users to customize watering schedules to meet the specific needs of different plant types and areas.
The core function of the timer is to manage water distribution to multiple zones based on user-defined schedules. It features a clear LCD screen and a user-friendly button interface for easy navigation and programming. The timer operates on two AA alkaline batteries, which should be replaced when the battery indicator shows low power.
1. Zone Management: The timer supports up to four independent zones, each capable of having its own unique watering schedule. This allows for tailored watering for different areas, such as a lawn, flower beds, vegetable gardens, or potted plants, all from one water source.
2. Setting Current Time and Day: Before programming watering schedules, users must set the current time and day of the week. The timer defaults to a 12-hour (AM/PM) mode, but can be switched to a 24-hour (military time) mode by holding the OK button for 5 seconds. Changing the time mode will erase all existing programs, so it's important to do this first if desired. The interface guides the user to set the current day by highlighting the day of the week and then to set the current time using the +/- buttons.
3. Water Day Selection: Users can choose specific days of the week for watering or set an interval period (e.g., every 1 day, every 3 days, up to every 7 days). The interface allows for easy selection of multiple days, which are indicated by a square around them on the screen.
4. Start Water Time: Each zone can be programmed with up to four independent start times, labeled CYCLE A, B, C, and D. This flexibility allows for multiple watering sessions throughout the day, catering to plants with varying hydration needs or to avoid watering during peak evaporation times.
5. How Long (Watering Duration): For each watering cycle, users can specify the duration, from 1 minute up to 360 minutes (6 hours). The timer ensures that cycle lengths do not overlap with subsequent start times, preventing overwatering or scheduling conflicts.
6. Auto Mode: Once all desired zones and their respective watering schedules (Water Day, Start Water, How Long) are set, the timer can be put into AUTO mode. In this mode, the timer will automatically execute the programmed watering cycles. The screen will alternate between displaying the current time and the next scheduled watering cycle for each zone.
7. Rain Delay: The timer includes a rain delay feature, which allows users to temporarily suspend the watering program for a specified period (24, 48, or 72 hours) without losing the programmed schedule. This is useful when natural rainfall occurs, preventing unnecessary watering and conserving water.
8. Off Mode: For extended periods when watering is not needed, the timer can be set to OFF mode. This completely stops all watering programs for all zones. To reactivate watering, the user simply presses the +/- buttons to move the arrow back to AUTO.
9. Manual Watering: The timer offers a manual watering option, allowing users to initiate watering for a specific zone for a desired duration (from 1 minute to 360 minutes) outside of the programmed schedule. This is useful for spot watering or testing the system.
10. Reset Function: The timer can be reset to its original factory settings, which erases all programmed schedules and returns the time mode to 12-hour (AM/PM). This is done by holding the OK button for 5 seconds while the arrow is pointing to RESET.
1. Battery Installation and Replacement: The timer requires two AA alkaline batteries. Users should remove the battery holder from the back of the Timer Control Unit, insert the batteries as indicated, and securely replace the holder. It is recommended to replace batteries when the low battery indicator appears on the screen to ensure continuous operation.
2. Installation to Faucet: The timer attaches to an outside faucet. It is crucial to turn the water on very slowly and leave it on while the timer is attached for proper operation. The timer can be programmed before or after attachment. If water continuously flows through one or more valves during installation, it indicates an issue that needs to be addressed, potentially by tightening connections or checking for debris.
3. Cleaning Your Timer: Regular cleaning is recommended to prevent debris and sediments from accumulating in the filter washer, which can build up and affect performance. Users should periodically remove the filter washer from the faucet and clean it under running water.
4. Seasonal Storage: During colder months (when air temperature is below 40°F/4.5°C), the timer should be removed from the faucet, drained of all water, and stored in a dry, frost-protected location. This prevents damage from freezing temperatures.
5. Battery Care for Storage: If storing the timer for an extended period, it is advisable to remove the batteries to prevent corrosion. Using fresh alkaline batteries at the beginning of each watering season is also recommended for optimal performance.
6. Open Valves During Installation: If water continuously flows through one or more valves during installation, it indicates that the valves are open. This can often be resolved by tightening connections or checking for debris. If the problem persists, the user may need to open and close the valve manually three times to clear any obstructions.
| Product Type | Water Timer |
|---|---|
| Brand | Melnor |
| Model Number | 65141AMZ |
| Number of Zones | 4 |
| Power Source | Battery |
| Battery Type | AA |
| Number of Programs | 3 |
| Watering Frequency | Every 6 hours to once every 7 days |
| Number of Stations | 4 |
| Hose Connection Size | 3/4 inch |
| Material | Plastic |
| Weather Resistant | Yes |
| Watering Delay | Yes |
| Rain Delay | Yes |
| Manual Watering | Yes |
| Watering Duration | 1-240 minutes |