EasyManua.ls Logo

Mercury KVM800M Series User Manual

Mercury KVM800M Series
33 pages
To Next Page IconTo Next Page
Page #1 background imageLoading...
Page #1 background image
i
Motherboard User’s Guide
This publication, including photographs, illustrations and software, is under the
protection of international copyright laws, with all rights reserved. Neither this
manual, nor any of the material contained herein, may be reproduced without the
express written consent of the manufacturer.
The information in this document is subject to change without notice. The
manufacturer makes no representations or warranties with respect to the
contents hereof and specifically disclaims any implied warranties of merchant-
ability or fitness for any particular purpose. Further, the manufacturer reserves
the right to revise this publication and to make changes from time to time in the
content hereof without obligation of the manufacturer to notify any person of
such revision or changes.
Trademarks
IBM, VGA, and PS/2 are registered trademarks of International Business
Machines.
AMD, Athlon 64 Sempron are registered trademarks of Advanced Micro Devices
Inc.
Microsoft, MS-DOS and Windows 98/ME/NT/2000/XP are registered trade-
marks of Microsoft Corporation.
AMI is a registered trademark of American Megatrends Inc.
Other names used in this publication may be trademarks and are acknowledged.
Static Electricity Precautions
1. Don’t take this motherboard and components out of their original static-
proof package until you are ready to install them.
2. While installing, please wear a grounded wrist strap if possible. If you
don’t have a wrist strap, discharge static electricity by touching the bare
metal of the system chassis.
3. Carefully hold this motherboard by its edges. Do not touch those
components unless it is absolutely necessary. Put this motherboard on
the top of static-protection package with component side facing up
while installing.
Pre-Installation Inspection
1. Inspect this motherboard whether there are any damages to components
and connectors on the board.
2. If you suspect this motherboard has been damaged, do not connect
power to the system. Contact your mainboard vendor about those
damages.
Copyright © 2005
All Rights Reserved
KVM800M Series, V1.6A
January 2005
Question and Answer IconNeed help?

Do you have a question about the Mercury KVM800M Series and is the answer not in the manual?

Mercury KVM800M Series Specifications

General IconGeneral
BrandMercury
ModelKVM800M Series
CategoryMotherboard
LanguageEnglish

Summary

Chapter 1: Introduction

Key Features

Overview of the motherboard's main capabilities and specifications.

Chipset Details

Information on the VIA K8M800 Northbridge and VT8237 Southbridge.

Processor Support

Details on Socket-754 processors (AMD Athlon 64/Sempron).

Memory Support

Information on DDR SDRAM compatibility and capacity.

Expansion Slots

Types of expansion slots like AGP, CNR, and PCI.

Storage Interfaces

Details on IDE and Serial ATA connectors.

Onboard Audio and LAN

Information on AC'97 Codec and optional Fast Ethernet LAN.

USB 2.0 Features

Specifications and capabilities of the USB 2.0 ports.

BIOS Firmware Overview

Introduction to the AMI BIOS and its configurable features.

Chapter 2: Motherboard Installation

Motherboard Components Identification

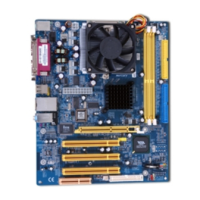
Visual guide to locate key components and connectors on the motherboard.

I/O Ports and Connections

Explanation of rear panel I/O ports and their usage.

CPU Installation Procedure

Step-by-step guide for safely installing the CPU.

Memory Module Installation

Instructions for installing DDR SDRAM modules into DIMM sockets.

Jumper Settings and CMOS Clear

Configuration of jumpers, including how to clear CMOS.

Installing Motherboard in Chassis

Guidance on physically mounting the motherboard in a computer case.

Power Connector Installation

Connecting the ATX power supply to the motherboard.

Connecting Optional Devices

How to connect front panel audio, USB, and speaker headers.

Installing Storage Devices

Connecting floppy, IDE, and Serial ATA drives.

Expansion Card Installation

Procedure for installing cards into AGP, CNR, and PCI slots.

Chapter 3: BIOS Setup Utility

BIOS Setup Introduction

Understanding the purpose and importance of BIOS settings.

Navigating BIOS Setup

How to enter and use the BIOS setup interface.

Standard CMOS Settings

Configuring system date, time, and IDE device parameters.

Advanced Setup Options

Fine-tuning system performance and boot behavior.

Features Setup Configuration

Enabling/disabling onboard devices like Floppy, COM, Parallel, IDE, Audio, LAN, USB.

Power Management Settings

Configuring ACPI and APM power saving modes.

PCI & Plug and Play Configuration

Managing PCI bus resources and Plug and Play devices.

BIOS Security Features

Setting up supervisor and user passwords for system security.

CPU PnP and Overclocking

Configuring CPU settings, frequency, and voltage.

Hardware Monitor Display

Viewing system temperatures, fan speeds, and voltages.

Loading BIOS Defaults

Options to restore optimal or default BIOS settings.

Chapter 4: Software & Applications

Support CD Introduction

Overview of the drivers and utilities included on the CD.

Support Software Installation

Guide to installing drivers and utilities from the support CD.

Automated OS Installation

Steps for auto-installing software on Windows 2000/XP.

Manual Software Installation

Procedure for installing software manually or on Windows NT.

Bundled Software Selection

Process for installing specific bundled applications.

Related product manuals