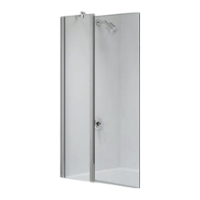
This document outlines the installation and features of the MB3B Two Panel Bath Screen, a device designed to enclose a bath for showering purposes.
Function Description:
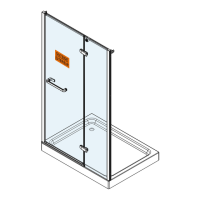
The MB3B Two Panel Bath Screen serves as a shower enclosure for bathtubs, preventing water from splashing out during use. It consists of two main panels: a fixed panel and a moving panel, which allows for entry and exit. The screen is designed to be installed on the edge of a bathtub, creating a sealed area for showering. The moving panel can pivot, offering flexibility in opening directions (left or right). The system includes various components for secure mounting, sealing, and smooth operation of the moving panel.
Important Technical Specifications:
The bath screen is supplied with a comprehensive set of components for installation. Key parts include:
- Wall profile cover (SP0MOBY002L/R): Used to secure the screen to the wall.
- Moving Glass Panel (A): The movable part of the screen, allowing access.
- Fixed Glass Panel (B): The stationary part of the screen.
- Bracket Top Leakfree (SP0LF01) and Bottom Bracket Leakfree (SP0LF02): These brackets secure the fixed panel to the bath edge and provide stability.
- Stabilising Bar (BSYS023): Connects the fixed panel to the wall for additional support.
- Screws (A2403001, A2402001, A2401201) and Wall Plugs (2SP12): For mounting the wall profile and other components.
- Screw Cover Caps (ZSS008, ZSS009): To conceal screws for a cleaner finish.
- Foam Plastics (LP-123): Likely used for cushioning or sealing.
- Clear Seal (SP0LFCS): Essential for creating watertight seals.
- Wall Profile (LR8387C): The main profile that attaches to the wall and holds the fixed panel.
- Hinge Bracket (BSYS025C): Connects the moving panel to the fixed panel, allowing it to pivot.
The installation requires specific tools: a masonry drill bit (3mm and 6mm), a PH2 Phillips head screwdriver, and a spirit level. The screen is designed to accommodate variations in wall and bath levels, with adjustments possible during installation.
Usage Features:
- Two-Panel Design: Provides a balance between enclosure and accessibility.
- Pivoting Moving Panel: The moving panel can be installed to pivot either to the left or right, depending on user preference and bathroom layout. This flexibility is determined by the orientation of the top and bottom brackets (SP0LF01 and SP0LF02).
- Watertight Sealing: The installation process emphasizes thorough siliconing along the bath edge and the wall profile to ensure a watertight enclosure. Clear seals are also used to prevent leaks.
- Stability: The inclusion of a stabilising bar and robust brackets ensures the screen remains stable during use.
- Aesthetic Finish: Screw cover caps are provided to hide fasteners, contributing to a clean and modern look.
Maintenance Features:
- Sealing Maintenance: The manual highlights the importance of proper siliconing during installation. Regular inspection of these seals for wear or damage is crucial to prevent leaks.
- Cleaning: While not explicitly detailed, glass shower screens typically require regular cleaning to prevent limescale buildup and maintain clarity. The use of neutral cure anti-bacterial silicone is recommended, which can contribute to hygiene.
- Hardware Inspection: Periodically checking the tightness of screws and the condition of brackets and hinges can help ensure the longevity and safe operation of the screen.
- Leak Prevention: The instructions strongly advise against drilling into hollow or 'void partition' walls without proper reinforcement, as this can compromise the stability and sealing of the screen, leading to leaks. Using a hardware supplier for the correct type of fixings is recommended.
Important Installation Notes:
- Safety First: Always wear protective eyewear and clothing during installation. Avoid direct contact with glass on hard surfaces and sharp edges.
- Wall Compatibility: Before drilling, ensure the wall is suitable for installation. Do not attempt to install the product unless you can tick all four boxes: "Check that you have the tools required," "Check that the installation site is compatible with the sizes of door supplied," "Check all the enclosure components are present," and "Check the installation kit is complete."
- Leveling: The installation process involves plumbing the wall profiles using a spirit level to ensure vertical alignment.
- Curing Time: After siliconing, it is essential to allow 24 hours for the silicone to cure completely before using the shower to ensure a strong, watertight seal.
- Silicone Application: Silicone should be applied to the bath edge if not previously siliconed, and along the wall profile and the top to bottom on the inside and outside of the screen. A 50mm up-where seal is recommended for the hinge upright and fixed panel glass over lap.
- Fixed Panel Installation: The fixed panel B is inserted into the wall profile but not immediately fixed to it, allowing for adjustments.
- Moving Panel Installation: The moving panel A is attached to the fixed panel using hinge brackets and secured with screws and cover caps. The stabilising bar is then installed to provide additional support.
This comprehensive guide ensures that the MB3B Two Panel Bath Screen is installed correctly, providing a functional, stable, and aesthetically pleasing shower enclosure for your bathtub.