Do you have a question about the MERLYN 6 Series and is the answer not in the manual?
Verify tools, site compatibility, components, and installation kit before commencing fitting.
Notes on wall plug usage, tiling methods, and mandatory safety eyewear during drilling.
Details of all necessary tools and components included in the fixing kit for installation.
Ensuring the shower tray is level, walls are sealed, and tiles are correctly positioned relative to the tray.
Step-by-step instructions for fitting the wall profile, ensuring it is plumb and correctly positioned relative to the tray.
Steps for attaching glass panels, upright profiles, and fitting wall profiles to the assembled frame.
Instructions for assembling top rollers and bottom rollers for the moving door panel.
Guide for hanging the moving panel, ensuring the top rail is level, and adjusting rollers for proper operation.
Instructions for applying silicone sealant internally and externally, and the required curing time.
Diagnosing and resolving door misalignment by checking tray level, wall profiles, and roller settings.
Addressing door leaks by verifying roller gap, upright seal fit, and overall sealing effectiveness.
This document outlines the installation and maintenance of a 2-door quadrant shower enclosure from the Merlyn 6 Series. It serves as a comprehensive guide for users, ensuring a smooth fitting process and proper long-term care of the product.
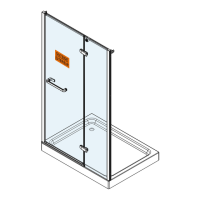
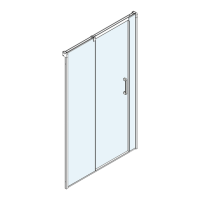
The Merlyn 6 Series 2-door quadrant shower enclosure is designed to create a functional and aesthetically pleasing showering space within a bathroom. Its primary function is to contain water during showering, preventing splashes and leaks, and to provide a private and enclosed area for bathing. The quadrant shape is ideal for corner installations, maximizing space efficiency in smaller bathrooms while offering a generous showering area. The two-door design allows for easy access, with the doors typically sliding to open and close, which is a space-saving feature compared to hinged doors. The enclosure is constructed with glass panels and a metal frame, ensuring durability and a modern appearance. The inclusion of seals and rollers is crucial for its functionality, enabling smooth door operation and watertight integrity.
The shower enclosure is designed for daily use, offering several features that enhance its usability and longevity.
Proper maintenance is crucial for preserving the appearance and functionality of the shower enclosure. The design incorporates features and recommendations to facilitate easy cleaning and upkeep.
| Glass Thickness | 6 mm |
|---|---|
| Style | Modern |
| Warranty | Lifetime |
| Finish | Chrome |
| Type | Shower Enclosure |
| Material | Glass, Aluminium |
| Installation Type | Wall Mounted |