PAGE 27
1. While looking at the Rear of the amplifier and watching the power tubes (you may need to move the Tube
Cage by unhooking the nylon clips and moving it out of the way or removing it altogether), flip the STANDBY
to ON.
2. If a power tube(s) is arcing or shorting, you will likely see it flashing brightly rather quickly or perhaps glow-
ing red in the tube’s center metal parts more than the rest of the set. Sometimes an arcing or shorting tube
can pull its paired counterpart out of bias and cause it to “run away” as well. Regardless, flip the STANDBY
to OFF.
3. Get an “OV-Glove” or similar method of hand protection (leather gloves, a Rag, etc.) to grab the hot tube
with! Do NOT use your bare skin, as the tubes will be very HOT!
4. Push up the spring steel Tube Clamp(s) and gently rock the faulty tube back and forth slightly while pulling
it down and out of its socket. Notice the orientation of the tube guide (raised bump) on the plastic piece
in the center of the tube’s base.
5. Gently and slowly and making sure the Tube Guide is aligned with the slot in the socket, install a new tube of
the same type and color rating (preferably matched MESA Tubes) as the one(s) removed if possible. Again,
make sure to line up the plastic guide bump with the slot in the tube socket’s center hole. Make sure the
tube is seated completely in the tube socket and that the tube filaments light up. If they are not lit up and
glowing orange, check the tube’s orientation and that it is seated firmly and completely into the socket.
6. Flip the POWER switch to ON and wait at least 30 seconds.
7. While watching the rear of the amplifier - and specifically the power tubes again - flip the STANDBY switch
to ON.
8. If you do not see any unusual flashes or brightly glowing (red hot) metal in the center of any of the tubes,
you have remedied the issues and are ready to enjoy your amplifier again.
9. If you see a flash or the center of the tube glowing bright red in the center of the metal inside the glass,
repeat the steps in this troubleshooting section again using another/dierent (hopefully known good) power
tube(s).
That’s about it for the Front Panel Channels, Modes, controls, and features. Hopefully, this information will
prove valuable as you explore to find your dream Tones. Now that you better understand your amplifier and
what you can do to shape the sounds you hear and need, let’s turn it around and go over the Rear Panel and
its controls and features.
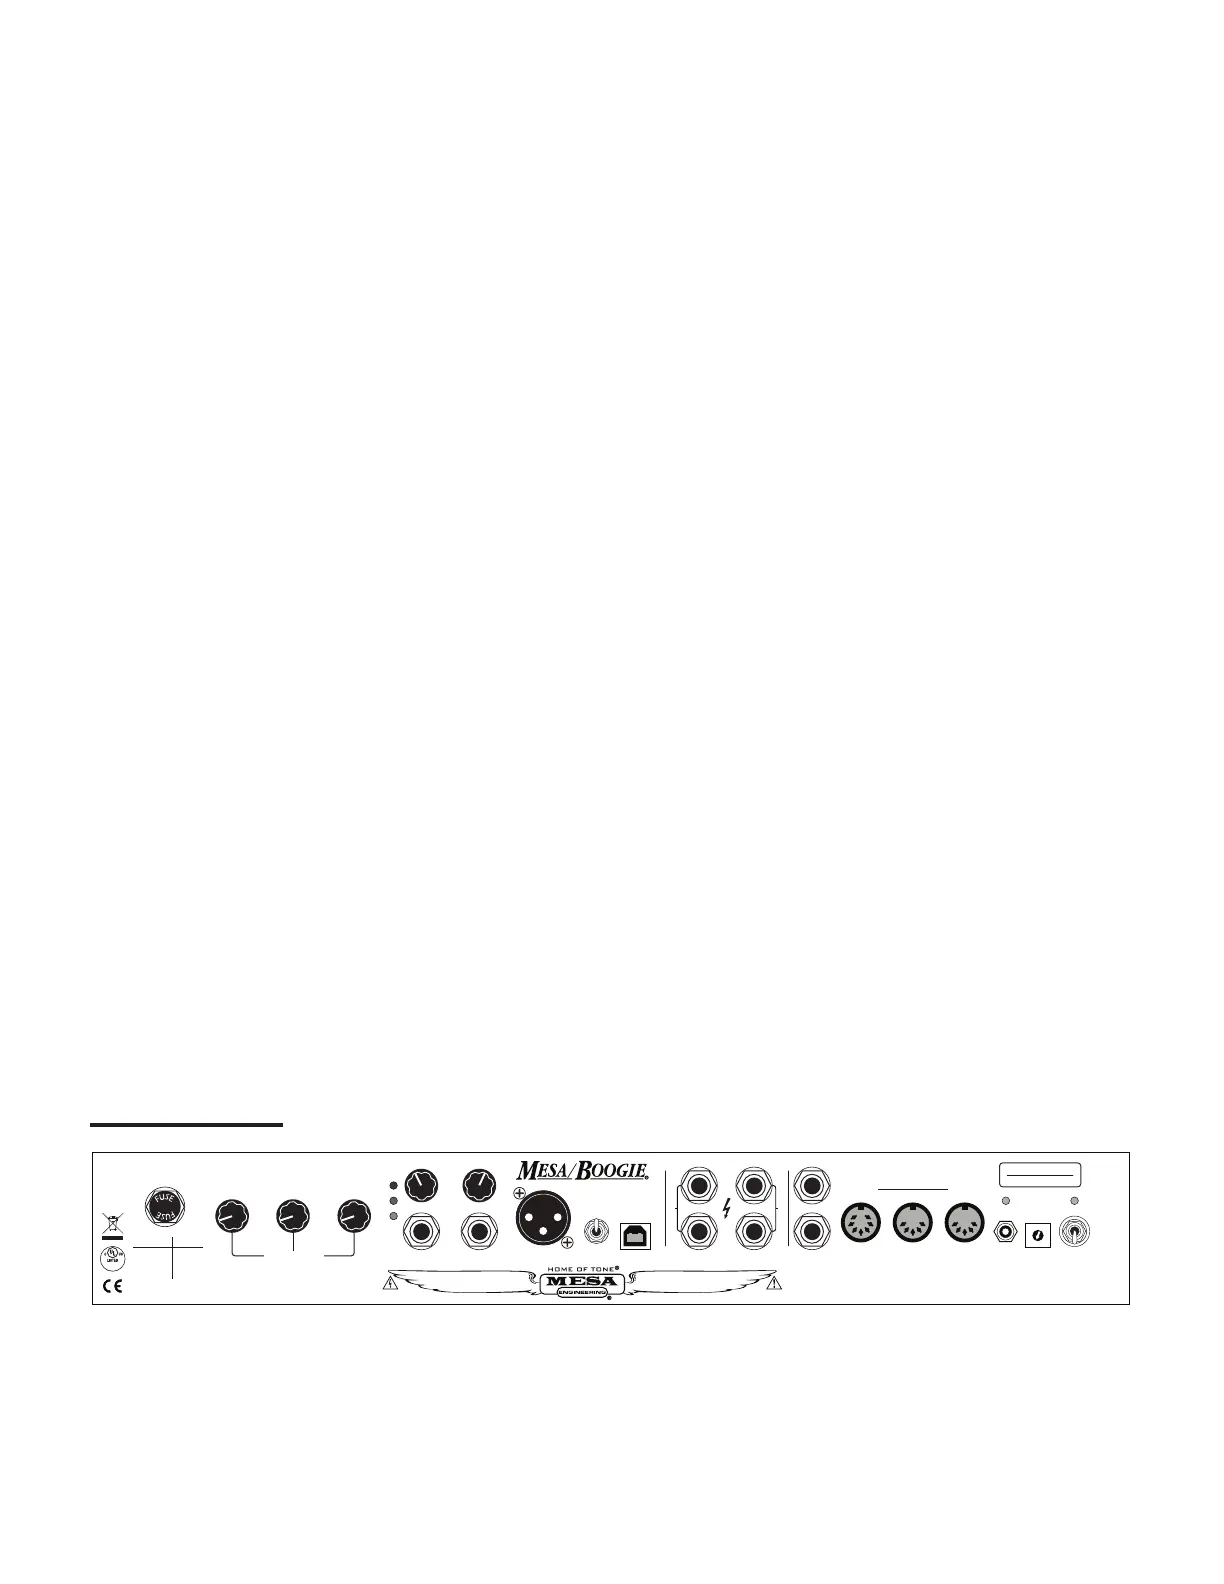
REAR PANEL
The MARK VII’s Rear Panel is where all interfacing connections will be made except that of your instrument to
the amplifier’s INPUT. Your speaker outputs, Direct outputs, both cabinet-simulated impulse response types
for recording and/or live Front of House applications, as well as the unprocessed Line output for triggering
external impulse responses, all will be made here.
FX LOOP
SPEAKERS
8 OHM 4 OHM
8 OHM 4 OHM
USE WITH TWO 16Ω CABS
USE WITH TWO 8Ω CABS
CH1
C
H
1
C
H
2
C
H
3
CH3
FX
0/FS
REV
0/FS
CH2
FS
REVERB
REVERB
80Hz 240 750 2200 6600
GAIN MASTER PRESENCE
TREBLE MID BASS
EQ
ON
FX
ON
REV
ON
CLIP
CLEAN
CRUNCH
0/FS
90W
4
5
F
A
T
25W
EQ
GAIN MASTER PRESENCE
TREBLE MID BASS
FAT
MKVII
0/FS
90W
4
5
C
R
U
N
C
H
25W
EQ
GAIN MASTER PRESENCE
TREBLE MID BASS
MKIIB
MKIV
0/FS
90W
4
5
IIC
25W
EQ
120 V~
60 Hz
4 A
AMPLIFIER
44YV
MESA
FT SW
MIDI
THRU/OUT
MIDI
IN
MIDI
CHAN
STORE
BIAS
EL34
6L6
LIFT
GND
USBDIRECT OUTHEADPHONELINE OUT
(DRY)
INPUT OUTPUT
CH3
FUSE
FUSE
4 A
SLO
BLO
POWER
CH2 CH1
WARNING:
Replace fuse with same type/rating only.
Do not expose to rain or moisture.
CAUTION:
Risk of Electric Shock. Do Not Open.
No user serviceable parts inside.
MARK SEVEN
™
VACUUM TUBE AMPLIFIER
SIMUL-CLASS
™
POWER
SIMUL-SEVEN
™
PATENTED 7,602,927 AND 9,917,560
HAND-WIRED IN PETALUMA, CALIFORNIA, USA
8
2
1
3
4 5
6
7
8
2
1
3
4 5
6
7
8
2
1
3
4 5
6
7
CAB SELECT
SEND
RETURN
CABCLONE
™
IR
TUBE GUIDE
5 x 12AX7
4 x 6L6
INTERNAL LOAD ACTIVE WHEN SPEAKER DISCONNECTED
CAUTION:
Bias setting must
match tubes in use
WARNING:
Unplug power
before replacing
fuse or removing
bolts mounting
chassis
0
1
2
3
4
5
6
7
8
9
A
B
C
D
E
F