3. Follow the previously mentioned instructions to set the day, hours and minutes.
4. Once you have set the minutes and pressed the START/I0 button 7), the date and time are set and the time is
displayed.
If no button is pressed for 20 seconds, the device automatically switches to ready for measuring10.
Cancel time setup: Press the START/IO button 7 during time setup. The LCD will show Date/Time icons
with «–:–». After that press the START/IO button 7 to start the measurement. If no further action is taken within 30
seconds, the device will automatically turn off.
Change current date and time: Press and hold the MODE button 6 for approx. 8 seconds until the year
number starts to flash 25. Now you can enter the new values as described above.
Setting the beeper
1. Press and hold the MODE button 6 for 3 seconds to set the beeper 26.
2. Press the M-button 5 to either turn the beeper on or off. The beeper is activated when the beeper icon 26 is
shown without a cross.
When the beeper setting has been chosen, press the START/IO button 7 to enter the «ready for
measuring» mode; otherwise the device automatically switches to ready for measuring after 10 seconds 10.
Changing between Body and Object Mode
1. Press the START/IO button 7. The display 4 is activated to show all segments for 1 second.
2. The default mode is body mode 12. Press the MODE button 6 to switch to object mode 13. For switching back
to body mode, press the MODE button again.
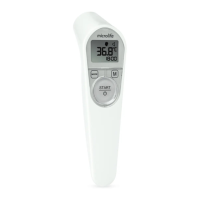
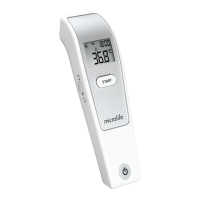
Directions for Use
Measuring in body mode with auto measurement and distance control
1. Press the START/IO button 7. Display 4 is activated to show all segments for 1 second.
2. A flashing «°C»/«°F» icon, the blinking blue tracking light 2 and a beep indicate that the device is ready for
measurement 10.
3. Remove any hair, sweat or dirt from the forehead before measuring to ensure the accuracy of the readings.
4. Aim the thermometer at the center of the forehead with a istance of no more than 5 cm.
5. The device will start the measurement automatically when the measuring sensor 1 detects the distance
is appropriate within 5 cm. The display will show a countdown (3, 2, 1); after 3 seconds a long beep will verify
the completion of measurement.
6. Self-measurement: The green self-indicator light 3 will help to distinguish the start of the measurement. Keep
the thermometer pointed towards the forehead until the light switches off.
7. Read the recorded temperature from the LCD display.
8. For the next measurement remove the thermometer from the forehead and wait until the «°C»/«°F» icon is
flashing. Follow steps 4-5 above.
9. Press and hold the START/IO button 7 for 3 seconds to turn off the device; otherwise the device will
automatically switch offafter approx. 60 seconds.
Measuring in object mode without auto measurement
1. Press the START/IO button 7. The display 4 is activated to show all segments for 1 second.
2. Press the MODE button 6 to switch to object mode.
3. A flashing «°C»/«°F» icon, the blinking blue tracking light 2 and a beep indicate that the device is ready for
measurement AT.
4. Aim the thermometer at the center of the object you want to measure with a distance of no more than 5 cm.
Press the
START/IO button 7. After 3 seconds a long beep will verify the completion of measurement.
5. Read the recorded temperature from the LCD display.
6. For the next measurement wait until the «°C»/«°F» icon is flashing and follow steps 4-5 above.
7. Press and hold the START/IO button 7 for 3 seconds to turn off the device; otherwise the device will