Since 1965
MicroMetl
ACCESSORIES LIST - The Economizer system has several
field-installed accessories available to optimize performance. Refer
to Table 6 for authorized parts and power exhaust descriptions.
Table 6 —Economizer Field-Installed
Accessories
Compressor
Access Panel
Outdoor-Air Opening and
Indoor Coil Access Panel
Filter Access Panel
INST
ALLATION
Step 1:
Turn off power supply(s) and install lockout tag.
Step
2:
Remove
the
existing
unit
filter
access
panel.
Raise
the
panel
and
swing
the
bottom
outward.
The
panel
is
now
disengaged
from
the
track
and
can
be
removed.
See Figure
1
Set
the filter door aside for re-installation later.
Step 3: Remove the indoor coil access panel and discard. See
Figure 1.
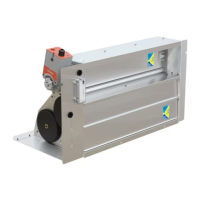
Step 4: Slide the economizer assembly into the rooftop unit.
See Figure 2.
Note: Be sure to engage the rear economizer flange under the
tabs on the unit base in the return air chamber. See Figure 3.
DESCRIPTION PART NUMBER
208/230v 1PH Prop Power Exhaust for Large
Cabinet
PPD-SRT34CA-D-1V
460v 3PH Prop Power Exhaust for Large
Cabinet
PPD-SRT34CA-D-4V
208/230v 1PH Prop Power Exhaust for Extra
Large Cabinet
PPD-SRT05CA-D-1V
460v 3PH Prop Power Exhaust for Extra Large
Cabinet
PPD-SRT05CA-D-4V
Enthalpy Sensor (OA)
9901-2022
Differential Dry Bulb/Enthalpy Sensor
Economizer Angle Seal Kit for use on unit's
with Hinged Filter Door - for Large Cabinet
0640-0200-HDANGL
Economizer Angle Seal Kit for use on unit's
with Hinged Filter Door - for Extra Large
Cabinet
0640-0300-HDANGL
Economizer Angle Seal Kit for use on unit's
with Hinged Filter Door - for Small Cabinet
0640-0100-HDANGL
208/230v 1PH Prop Power Exhaust for Small
Cabinet
PPD-SRT12CA-D-1V
460v 3PH Prop Power Exhaust for Small
Cabinet
PPD-SRT12CA-D-4V
Fig. 2
- Economizer Installed on HVAC Unit
Fig. 3 - Rear Economizer Flange Installation
Step 5: Ensure economizer is square (tolerance +/- 1/32").
Screw the economizer to the unit along both side flanges and
bottom flange. See
Figure 2.
Step 6: Remove the red tape securing the relief dampers
for shipping purposes.
Unit Filter
Rack
Economizer
Hold Down Tab
Unit Base
Economizer
Economizer Rear Flange
PL6 Wiring
Harness
Economizer
HVAC Unit Filters
Insert Screw in
Economizer
Flanges
Compliance — Economizers meet California Energy
Commission Title 24 prescriptive section 140.4 (damper leakage
etc.), and mandatory section 120.2.i for Fault Detection and
Diagnostic controls.
Economizers meet ASHRAE 90.1 damper leakage requirements
and Fault Detection and Diagnostic requirements.
Economizers meet IECC damper leakage and Fault Detection
and Diagnostic requirements.
Note: IECC requires differential return air sensor, which must be
ordered separately.
See accessory 9901-2022-DIFF JC2.
Outside air, return air, and relief dampers are AMCA rated.
Fig. 1 - Typical Access Panel Locations
9901-2022-DIFF JC2