Quick Start Guide
Commissioning the
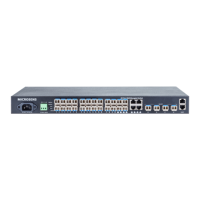
28-Port 10G Multi Fiber L2/L3 Switch 19"
5 MICROSENS GmbH & Co. KG, Kueferstr. 16, 59067 Hamm, Germany
Position the device the way that connected cables will not cause mechanical tension on the device or its
attachment.
3.2 Desktop Installation
Please follow the steps below:
1. Carefully put the device upside down, clean the grooves on the chassis backplane with soft cloth to make
sure there is no oil or dust in it.
2. Remove the stickers on the foot pad, paste the foot pad on the four corners of the bottom of the switch.
3. Carefully put the device upright on the workbench.
4 Connecting the Power Supply
Note:
Ground the switch housing with the grounding screw on the side of the housing (s.
Fig. 1, )! Always make the ground connection first and disconnect it at the end.
Use one end of PGND cable to connect the M4 grounding connector of the switch, the other end to a ground point.
The PGND of the switch is shorted to the copper protection ground bar provided by the user. The PGND cable used
should be an alternating yellow and green plastic insulating one with copper core, with cross-sectional area
greater than 2.5mm².
The figure below takes rack-mounted installation as example.
 Loading...