Do you have a question about the MikroTik L009UiGS-2HaxD-IN and is the answer not in the manual?
Be aware of electrical circuit hazards and follow standard practices. Handle disposal according to national laws and regulations.
Connect ISP cable, power adapter, and computer. Access configuration via web browser or WinBox.
Check for and install the latest RouterOS version for optimal performance, stability, and security.
Set up country regulations, wireless network password, and router password.
Connect the device to a POE adapter using Ethernet cables for data and power.
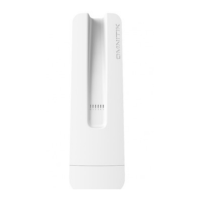
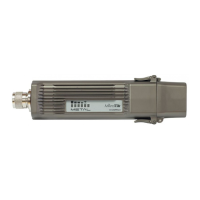
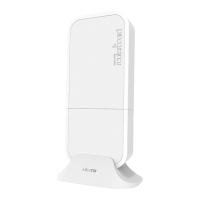
The device is designed for indoor use and can be mounted on a wall or placed on a desktop.
Additional brackets can be purchased separately for rackmount placement.
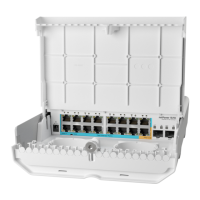
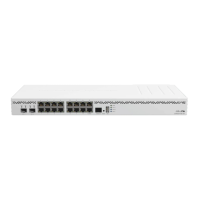
Details product code, CPU, RAM, storage, Ethernet and SFP ports, USB, PoE, and operating temperature.
Describes functions for resetting configuration to defaults or booting into bootp mode for reinstallation.
Explains the meaning of various LEDs including USER, DC Power, SFP, Ethernet link, and PoE status.
Lists the items included in the device package, such as power supply and fastening set.
Confirms support for RouterOS software version 7; other OS versions have not been tested.
This document provides a comprehensive guide for the L009UiGS-2HaxD-IN device, covering its safety warnings, setup procedures, powering options, configuration, mounting instructions, and button functionalities. It emphasizes safe and proper handling, installation, and maintenance to ensure optimal performance and longevity of the device.
The L009UiGS-2HaxD-IN is a versatile networking device designed for indoor use, capable of functioning as a router and providing wireless connectivity. It is equipped with multiple Ethernet ports and SFP ports, offering flexible connectivity options for various network setups. The device supports Power over Ethernet (PoE) for simplified power delivery and features a robust operating system, RouterOS, which provides extensive configuration capabilities for network management. Its primary function is to establish and manage network connections, both wired and wireless, and to facilitate data transfer within a local area network (LAN) and to the internet. The device is designed to be professionally installed and configured to meet specific local regulations and network requirements.
The L009UiGS-2HaxD-IN offers a user-friendly setup process, starting with connecting to an Internet service provider (ISP) and then to a computer via its wireless network. Initial configuration can be performed through a web browser or a mobile app, with an option to use the WinBox configuration tool for more advanced settings. The device supports automatic IP address assignment from the ISP, simplifying the initial network setup.
For power, the device can be supplied via a direct-input DC power jack or through the first Ethernet port using Power over Ethernet (PoE) 802.3af/at, offering flexibility in deployment. It also includes a 2-pin terminal for additional power input. When using PoE, the manual details a clear connection process involving a PoE adapter, ensuring correct data and power flow.
The RouterOS software, which powers the device, provides a wide array of configuration options. Users are encouraged to update the software to the latest version to ensure optimal performance, stability, and security. For wireless models, selecting the correct country is crucial for compliance with local regulations. The device's configuration can be accessed via a web browser at a default IP address, or through WinBox using the device's MAC address if an IP connection is unavailable.
The device is designed for indoor placement and can be mounted on a wall or placed on a desktop. Mounting holes are provided for secure wall installation, and users are advised to use appropriate screws and dowels based on the wall material. For rackmount installations, additional brackets can be purchased separately.
The device features a reset button with multiple functions, allowing users to reset the RouterOS configuration to defaults or to boot the device in bootp mode for reinstallation using Netinstall. This functionality is crucial for recovery purposes and troubleshooting. Various LEDs on the device provide visual feedback on its status, including power, SFP port link and activity, Ethernet port link and activity, PoE-in status, and 100Mbps connection status for specific Ethernet ports.
Maintaining the L009UiGS-2HaxD-IN involves several key practices to ensure its continued performance and safety. Regular software updates are paramount; the manual strongly recommends clicking the "Check for updates" button in the QuickSet menu or manually downloading packages from the MikroTik website and uploading them to the device. Keeping RouterOS updated to the latest version ensures the best performance, stability, and security, addressing potential vulnerabilities and improving overall functionality.
The device is designed for indoor use and requires placement in a dry and ventilated environment, as it lacks protection from water contamination. This environmental control is a critical maintenance aspect to prevent damage and ensure longevity. Using Cat6 cables for connections is also recommended for optimal performance.
In the event of device failure, immediate disconnection from power is advised by unplugging the power plug from the outlet. This quick action helps prevent further damage and ensures safety. The reset button serves as a vital maintenance tool, allowing users to restore default configurations or initiate a Netinstall for reinstallation, which can resolve software-related issues. The ability to load a backup RouterBOOT loader by pressing the button before applying power is useful for debugging and recovery, providing a fallback mechanism for critical situations.
The manual also emphasizes that the installation and configuration of the device should be performed by a qualified person. This professional involvement ensures that all local country regulations, including frequency channels, output power, cabling, and Dynamic Frequency Selection (DFS) requirements, are met, thereby preventing improper use that could lead to accidents or damage. Users are also reminded to use only the power supply and accessories approved by the manufacturer, which are found in the original packaging, to avoid compatibility issues and potential hazards. Proper disposal of the device, separating it from household waste and utilizing designated waste disposal sites, is highlighted as an environmental maintenance responsibility.
| Ethernet WAN | - |
|---|---|
| Wi-Fi band | Single-band (2.4 GHz) |
| Wi-Fi standards | 802.11a, 802.11b, 802.11g, Wi-Fi 4 (802.11n), Wi-Fi 6E (802.11ax) |
| Channels quantity | 2 channels |
| Top Wi-Fi standard | Wi-Fi 6 (802.11ax) |
| WLAN data transfer rate (max) | 574 Mbit/s |
| Ethernet LAN | Yes |
| Ethernet LAN data rates | 10, 100, 1000 Mbit/s |
| Ethernet LAN interface type | Gigabit Ethernet |
| Ethernet LAN (RJ-45) ports | 8 |
| USB 3.2 Gen 1 (3.1 Gen 1) Type-A ports quantity | 1 |
| Product type | Tabletop router |
| Product color | Red |
| Antenna gain level (max) | 4 dBi |
| Flash memory | 128 MB |
| Internal memory | 512 MB |
| Processor cores | 2 |
| Processor frequency | 800 MHz |
| Power source type | DC, PoE |
| Storage temperature (T-T) | -40 - 70 °C |