EasyManua.ls Logo

Milagrow Seagull - User Manual

Milagrow Seagull
13 pages
Print Icon
To Next Page IconTo Next Page
Loading...
Seagull
the robot
MULTI-FUNCTION ROBOTIC VACUUM CLEANER

Other manuals for Milagrow Seagull

Question and Answer IconNeed help?

Do you have a question about the Milagrow Seagull and is the answer not in the manual?

Summary

Safety Instructions

General Safety Warnings

Details general safety warnings regarding product operation, electrical hazards, and material handling.

Usage Precautions

Provides important precautions for battery care, charging, storage, and use with children or in specific environments.

Structure of the Robot

Robot Components Overview

Illustrates and labels the components of the robot's top and bottom units, including buttons, sensors, and wheels.

Cleaner and Accessories

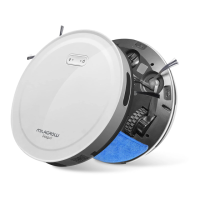
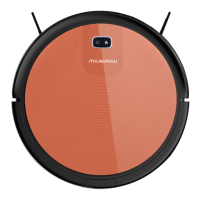
Presents visual representations of the robotic cleaner, power adapter, charging dock, dustbin, HEPA filter, side brush, and mop.

Dustbin Structure

Explains the internal structure of the dustbin, identifying the fan motor, filter, dustbin conductive pole, and dustbin button.

Charging Dock Structure

Details the components of the charging dock, including IR signal emission window and recharging poles.

Robot Operation

Charging Preparation

Provides step-by-step instructions for connecting the power adapter and positioning the charging dock for optimal robot charging.

Turning On and Starting Cleaning

Explains how to turn on the robot and initiate cleaning, including initial gyroscope initialization.

Charging Status Indicators

Describes the meaning of different indicator light colors and patterns during the robot's charging process.

Charging Dock Usage

Details the setup and function of the charging dock, including placement guidelines and automatic return-to-dock behavior.

Product Features

Automatic Cleaning Mode

Explains how to activate and deactivate the automatic cleaning mode using the APP or robot buttons.

Spot Cleaning

Details how to initiate spot cleaning mode for concentrated cleaning of specific areas.

Wall Follow Cleaning

Explains how to engage the wall follow cleaning mode for edge and wall cleaning.

Appointment Mode

Guides on setting up, scheduling, and canceling cleaning appointments using the mobile application.

Cleaning of the Robot

Dustbin Removal and Cleaning

Provides instructions for removing and emptying the dustbin, including cleaning the HEPA filter.

Side Brush Removal and Cleaning

Details the process for removing, cleaning, and replacing the robot's side brushes.

Common Failures and Troubleshooting

Troubleshooting Guide

A table listing common causes of robot malfunction, associated warning sounds, indicator lights, and recommended troubleshooting steps.

Dimensions and Parameters

Cleaner Technical Specifications

Details the technical specifications of the robotic cleaner, including model, power, dimensions, battery, and dustbin capacity.

Recharging Bay Technical Specifications

Outlines the technical specifications for the charging bay, covering applicable model, dimensions, and operating parameters.

Wifi Manual

App Download and Setup

Guides users to download the 'smart life' APP, register an account, and add the robot vacuum device.

Robot Pairing with APP

Explains the process of turning on the robot and pairing it with the mobile app via Bluetooth and Wi-Fi.

Wi-Fi Connection

Details selecting the 2.4GHz network, entering the password, and confirming the connection status.

APP Operation Interface

Overview of the mobile app's operation interface for controlling the robot, including accessing settings and scheduling.

Overview

This document describes the Milagrow Seagull Multi-Function Robotic Vacuum Cleaner, a device designed for automated floor cleaning.

Function Description

The Milagrow Seagull is a robotic vacuum cleaner capable of performing various cleaning tasks automatically. It supports multiple cleaning modes, including automatic cleaning, spot cleaning, and wall follow cleaning, making it versatile for different cleaning needs. The robot can be controlled manually via buttons on the device or remotely through a mobile application (Tuya WIFI APP - "smart life"). It is designed to return to its charging dock automatically when cleaning is complete or when its battery is low.

Important Technical Specifications

For the Cleaner:

  • Model: Milagrow Seagull
  • Rated Voltage: DC 14V
  • Rated Power: 30 W
  • Operating Temperature Range: -10℃ to 45℃
  • Input Voltage/Current: 14V/0.5A
  • Infrared Remote Control: 38KHZ
  • Dimensions: 310*68mm
  • Weight: 2 KG
  • Battery: Lithium-ion 2600mAh
  • Dustbin Capacity: 650 ml

For the Recharging Bay:

  • Applicable Model: Milagrow Seagull
  • Dimensions (LWH): 19415105mm
  • Input Voltage/Current: 14V/0.5A
  • Operating Temperature Range: -10°C to 45°C
  • Operating Humidity Range: 85RH

Usage Features

Robot Structure: The robot features a "Unit top" with a touch button, a panel, a DC recharging port, a power switch, and a dustbin. The "Unit bottom" includes downview sensors, a universal wheel, recharging pole pieces, a battery box cover, left and right wheels, a mop, a suction inlet, and side brushes.

Accessories: The package includes the cleaner unit, a power adapter, a charging dock station, a dustbin, a HEPA filter, side brushes, and a mop.

Dustbin Structure: The dustbin comprises a fan motor, a filter, a dustbin conductive pole, and a dustbin button.

Charging Dock Structure: The charging dock has an IR signal emission window, a negative recharging pole, a power adapter jack, and a positive recharging pole.

Charging Preparation:

  1. Connect the power adapter to the charging dock's jack.
  2. Plug the power adapter into an electrical outlet.
  3. Place the charging dock flat on the ground against a wall, ensuring no obstructions within two meters in front and one meter to the left, right, and above. Direct sunlight should be avoided.

Turning on the Robot:

  1. Press and hold the robot's left button for 5 seconds until the indicator light flashes blue.
  2. Wait for the gyroscope to initialize successfully (indicator light becomes stable).
  3. Press the power button to start cleaning.
  4. After cleaning, it's recommended to keep the power on and let the robot auto-charge at the dock.

Charging Status Indicators:

  • Battery < 20%: Red light blinking.
  • Battery 20% – 50%: Pink light breathing.
  • Battery > 50%: Blue light breathing.
  • Fully Charged: Blue light stays on for a few minutes, then turns off.
  • The robot can also be charged directly by connecting the power adapter to its DC recharging port.

Charging Dock Introduction:

  1. Ensure the docking station is connected to power and adapter before use.
  2. Place the dock as described in "Charging Preparation."
  3. The robot automatically returns to the charging dock after planned cleaning.
  4. If power is too low during cleaning, the robot will go to the docking station for charging, stopping cleaning and alarming every 5 seconds.

Cleaning Modes:

  • Automatic Cleaning Mode: In standby, press the right button or "intelligent model" button on the APP to enter this mode. Pressing the left or right button or "intelligent model" again on the APP returns it to standby.
  • Spot Cleaning Mode: In standby/working mode, press "spot cleaning mode" in the APP for spiral fixed-point cleaning. Pressing the left/right button or "spot cleaning mode" button on the APP returns it to standby; other cleaning modes can be selected. A buzzer sounds three times upon completion.
  • Wall Follow Cleaning Mode: In standby, press the "wall mode" button on the APP for edge cleaning. Pressing the left/right button or other cleaning mode buttons on the APP returns it to standby or other cleaning states.

Appointment Mode:

  1. Setting Time and Date: After connecting to the mobile APP, open the control interface, click "Settings," then "Timer," and "Add Timing." Click "Only once" to set the time from Monday to Sunday, then go back and click "Save."
  2. Canceling Appointment: In the APP control interface, click "Settings," then "Timer." Long-press the reserved time to delete it.

Wifi Manual (Tuya WIFI APP - "smart life"):

  1. Scan the QR code provided in the manual to download the Tuya WIFI APP.
  2. Open the APP, register an account using a phone number or email.
  3. Enter the "Add device" screen.
  4. Enter "Add Manually," click "Smart Home Appliance," then choose "Robot Vacuum."
  5. To connect the robot:
    • Press and hold the right button for 5 seconds until two blue lights flash.
    • After 5 seconds, once the lights stop flashing and become stable, press the right and left buttons simultaneously until a "bee" sound is heard.
  6. Select the available 2.4GHz network, enter the WIFI password, and confirm.
  7. The APP will display "Connecting" progress.
  8. Upon successful connection, "Device added successfully" will appear.
  9. The operation interface allows control of the robot.
  10. Click "Settings" then "Timer" to add scheduled cleaning tasks.

Maintenance Features

Removal and Cleaning of the Dustbin:

  1. Press the dustbin button on the panel to remove the dustbin.
  2. Open the upper cover of the dustbin and empty the dirt.
  3. Carefully take out the HEPA filter for cleaning.

Removal and Cleaning of the Side Brushes:

  1. Gently pick up the robot and lay it with its wheels facing up.
  2. Use the mop to clean hair off the brush.
  3. Firmly grasp one of the plastic spokes containing the wire brushes and pull straight up to remove.
  4. Side brushes should only be replaced if damaged.

Troubleshooting (Common Failures): The manual provides a table for common failures, warning sounds, indicator lights, and troubleshooting steps:

  • Drive wheel failure (1 Beep, 3 times, red indicator light on): Check for tangles and remove obstacles.
  • Side brush failure (2 Beeps, 3 times, red indicator light on): Check for entanglement and clean the side brush.
  • Fan motor failure (3 Beeps, 3 times, red indicator light on): Clean garbage and the wind tunnel.
  • Ground detection failure (2 Beeps, 3 times, red indicator light flashing): Robot is lifted up; move it and clean the ground detective sensor.
  • Trouble shooting (3 Beeps, 3 times, red indicator light flashing): Move to an empty place.
  • Low power (4 Beeps, 3 times, red indicator light flashing): Voltage is too low; manual assistance needed to charge.
  • Adaptor failure (5 Beeps, 3 times, red indicator light flashing): Change to a 14V adaptor.
  • Charging failure (6 Beeps, 3 times, red indicator light flashing): Check if the robot is turned on or if the battery connection is correct.

Battery Life Prolongation:

  • Recharge for at least 16 hours after first use or before reuse after a long idle period. The battery reaches optimum performance after 2-3 complete recharging-discharging cycles.
  • Before long idle periods, fully recharge the battery, then store the robot in a cool, dry place, keeping the bottom dry.

Safety Precautions:

  • Only designated service technicians should disassemble, repair, or modify the product to avoid fire, electric shock, or injury.
  • Use only the accompanying recharger to prevent fire, electric shock, or high voltage.
  • Do not touch high-voltage power cables with wet hands.
  • Avoid clothes or body parts (head, fingers) getting involved in the brush or wheels to prevent personal injury.
  • Do not over-bend the power cord or place heavy objects on it to prevent fire or electric shock.
  • Keep away from cigarettes, lighters, matches, heat sources, and flammable materials (e.g., gasoline for cleaning).
  • Turn off power before transport or prolonged storage to prevent battery damage.
  • Ensure a reliable connection between the recharger and socket to prevent non-charging or fire.
  • Plug the power cord tightly to prevent electric shock, short circuit, smoke, or fire.
  • Prior to use, remove damage-prone objects (luminous objects, fabrics, glass bottles) to prevent damage or affect performance.
  • Do not stand or sit on the vacuum cleaner.
  • Use with caution around children.
  • Do not let the robot inhale water or other liquids.
  • Do not use in very confined spaces (small table, chair).
  • Outdoor use is prohibited.
  • Commercial use is prohibited to prevent excessive wear and damage.

Milagrow Seagull Specifications

General IconGeneral
BrandMilagrow
ModelSeagull
CategoryVacuum Cleaner
LanguageEnglish

Related product manuals