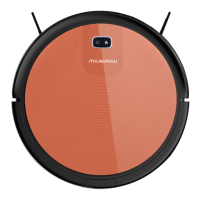
This document describes the Milagrow BlackCat 21/RedHawk 21 Robotic Vacuum Cleaner, a device designed for automated floor cleaning.
Function Description
The Milagrow BlackCat 21/RedHawk 21 is a robotic vacuum cleaner capable of both dry vacuuming and wet mopping. It is designed to operate indoors on various floor types, including wooden floors, ceramic tiles, and short-staple carpets. The robot can be controlled manually via its onboard keys or automatically through a dedicated mobile application (Tuya Smart). It features automatic cleaning, automatic recharging, and can be programmed to avoid specific "no-go zones" using magnetic boundary strips. The device is equipped with sensors to detect cliffs and obstacles, ensuring safe and efficient operation.
Important Technical Specifications
Functional parameters of the host machine:
- Operating voltage: 14.4 V
- Rated power: 24 W
- Battery: Lithium battery
- Battery capacity: 2600mAh
- Charging Time: 4-5 hours
- Operating hours: Approx. 120 minutes
- Working temperature range: 0°C ~ 50°C
- Operating humidity range: ≤ 80%RH
- Noise: ≤ 65dB
- Weight: 3.5kg
- Dimensions: Ø325*80mm
Functional parameters of accessories:
- Power adapter output voltage: 19V
- Power adapter output current: 600mA
- Charging dock input voltage: 19V
Harmful Substances (in accordance with SJ/T 11364):
The product generally complies with GB/T 26572 limits for hazardous substances in homogeneous materials. Exceptions (marked 'X') include Lead in metal parts, electrical components, and dry/rechargeable batteries, and Cadmium in electrical components. These exceptions are in conformity with the EU RoHS Directive or are due to technological limitations.
Service Life:
- Dry batteries: 3 years
- Rechargeable battery: 5 years
Usage Features
Product Installation:
The charging dock should be placed on a flat surface, perpendicular to a wall, with no obstacles within 3 meters in front and 1 meter on either side. It should be pressed firmly to the floor. The power adapter connects to the charging dock and then to the power supply, with the cable arranged to prevent entanglement. It is advisable to place the charging dock in a fixed position, preferably not on carpet, and avoid moving it during operation to ensure the robot can find it for recharging.
Operating Modes:
- Manual Mode: After ensuring the batteries are fully charged and the machine switch is on, the robot enters standby. Pressing the power key initiates automatic cleaning.
- Automatic Recharging: When the battery is low during operation, the blue light of the recharge key flashes, and the machine automatically enters recharge mode, seeking out the charging dock.
- Manual Recharging: From standby, pressing the recharge key initiates the recharge mode, with the recharge key flashing blue.
- APP Control (Tuya Smart): The robot can be connected to the Tuya Smart app. In standby mode, pressing and holding the dock button for at least 4 seconds makes the indicator flash (Blue/Red), indicating WIFI connection mode. Once connected, users can initiate charging via the app.
Key Indicators:
- Off: Light off. Long press power key for 3 seconds to turn on.
- On: Light on. Press power key to start.
- Clean: Blue light normally on. Press power key to start cleaning.
- Search for recharge: Blue light flashing. Press recharge key to start recharging.
- Charging: Blue breathing light.
- Full charge: Blue light normally on.
- Error report: Two red lights flashing. Indicates machine abnormality or fault.
- Sleep: Light off after five minutes in standby.
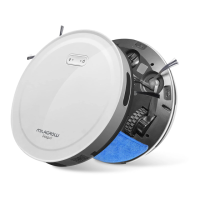
Wet Mop Assembly:
- Lift the water tank cap (indicated by an arrow), turn it left or right, add water, and replace the cap.
- Insert the front pocket of the wet mop into the buckle at the front of the water tank.
- Affix the mop flatly to the hook and loop fasteners on the water tank.
To install the water tank, turn the machine upside down, align the water tank buckle with the snap-on position, and secure it. After normal placement, the machine can sweep.
To clean the wet mop, remove the water tank from the machine's bottom, detach the mop from the hook and loop, flush both the mop and water tank, and dry them naturally in the shade for reuse.
Magnetic Boundary Strip:
Magnetic boundary strips can be used to create "no-go zones." These strips should be placed flat on the ground. They are useful for preventing the robot from entering areas with power cords, fragile objects, or spaces where it might get trapped (e.g., under low furniture). If a strip is too long, it can be cut, with a minimum length of 50cm to cover the perimeter. When blocking an object, place the strip 5cm in front of it to prevent bumping.
Maintenance Features
Regular maintenance is crucial for optimal performance.
Charging Pole Pieces:
- Turn off the power switch or unplug the power cord.
- Wipe the charging pole pieces with a dry cloth once a month.
- Do not scrub with oil.
Dust Box:
- Removal: Press the designated key on the dust box to eject and remove it.
- Cleaning: Open the dust box cover and empty the dust. For new machines, clean every three days initially, then weekly. Use a cleaning brush to remove dust. Remove the filter assembly and clean the filter screen with a brush.
- Washing: The inside of the dust box and filter screen can be flushed under running water. Ensure they are thoroughly dried before reinstalling them into the vacuum cleaner.
- Reinstallation: After cleaning, reinstall the filter screen, close the dust box cover, and then place the dust box back into the vacuum cleaner.
Middle Sweeper:
- Removal: Push the lock lever to the middle and lift it up. Grab the middle sweeping brush and lift it. Remove the middle sweeping scraper assembly and the middle sweeping brush.
- Cleaning: Regularly use a cleaning brush to clean the middle sweeping soft brush and rubber brush. Clean hair and other entanglements from the sweeping brush.
Side Brush:
- Removal: Use a screwdriver to remove the screws from the side brush.
- Cleaning: Remove the side brush and clear away hair and other rubbish. Clean entanglements from the slot of the side brush.
Wheels:
- Regularly clean the front, left, and right wheels with a cleaning brush.
- Promptly clean any hair, cloth strips, or other entanglements from the wheel shaft.
Sensor:
- After each cleaning, carefully wipe the light-transmitting plate of the sensor with a dry cotton cloth to prevent dust accumulation, which could affect product performance.
Troubleshooting:
The manual provides a detailed troubleshooting guide for various fault indications (red light flashes and beeps). Common issues include:
- Wheel faults: Left or right wheel not rotating due to overload or entanglement.
- Front wheel fault: Front wheel stuck or not rotating.
- Floor inspection/suspension fault: Cliff sensor dirty or machine off the floor.
- Low battery: Battery charge level below threshold.
- Front collision fault: Front shell collision switch not reset.
- Middle sweeper fault: Rolling brush stuck due to foreign object.
- Side sweeping fault: Side brush stuck due to foreign object.
- Wall inspection fault: Problem with wall inspection transparent window being blocked or interfered.
- Fan fault: Fan not rotating or high current.
- Charging fault: Battery damaged or cable not in contact.
For issues that cannot be resolved using the provided methods, users are advised to contact customer service.