Unit Inspection:
After installation is complete, a final inspection of the system is required. Using a hand punch, designate
the appropriate installation date and service/inspection dates using the spaces provided on the label.
ttach the label to the unit with the nylon tie provided. Attach the label to the unit where it cannot be
amaged and is easily accessible to anyone using the system. Record system identification information in
maintenance section of this manual. Do not remove the label from the unit.
1. Don a full body harness according to the manufacturer’s instructions.
tion and working distance requirements are understood and have been
satisfied, lower each of the brake jacks completely by rotating the brake jack handle clockwise
g. Warning: Be sure to lower each brake jack completely. Failing
the performance of the unit in the event of a fall and may cause
fall.
the
ver
zard by pulling the unit from the handles located on the vertical
boom or from the anchorage points while connected to the unit. NOTE: Care should be taken
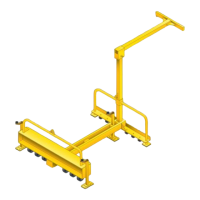
. Connect to the system by using one of the anchorage points located on the horizontal boom.
)
WARNI Do not connect to any part of the unit that is not marked for use as an approved
anchor
is the responsibility of the user to ensure that they read, understand and follow all instructions and are
e
nge of components within the system. Training must be conducted without exposing
pe ds.
nts (i.e., wheels, anchorage points, jacks) for physical damages, cracks, wear,
ability.
mages, cracks, looseness, wear, and corrosion.
3. Check to ensure that each push pin has been secured in place with a hitch pin and inspect for
A
d
the inspection and
GENERAL OPERATION
III. OPERATION:
2. Once the installa
until each stops rotatin
to do so could hinder
serious or fatal injury.
3. Install only Miller retractable lifelines and use personal fall protection according to the
manufacturer’s instructions supplied with that product. The personal fall protection used with
this device must limit the fall arresting forces to 900 lbs. (4 kN) or less and be rigged to limit
fall distance to within regulatory requirements and prevent the user from striking a lower
surface in the event of a
4. When the unit needs to be moved, disconnect each worker from the unit, raise each of
brake jacks completely by rotating the brake jack handle counter-clockwise. Move the unit by
using the Pushing handle located at the rear of the unit. Steering the unit is accomplished by
using the steering handles located on the vertical boom located at the front of the unit. Ne
expose a worker(s) to a fall ha
when moving the unit on sloped surfaces.
5. Once the unit has been successfully moved, lower each of the brake jacks completely by
rotating the brake jack handle clockwise until each stops rotating. Warning: Be sure to lower
each brake jack completely. Failing to do so could hinder the performance of the unit
in the event of a fall and may cause serious or fatal injury.
6
Connectors used within the system must be able to support a minimum of 5,000 lbs.(22 kN
Non-approved, non-compatible components may cause disengagement (roll-out). Only self-
locking, self-closing connectors are recommended by Dalloz Fall Protection.
NG:
age.
IV. TRAINING:
It
trained in the care and operation of this system. Training should be repeated periodically and any tim
there is a cha
rsonnel to any hazar
V. INSPECTION:
Before each use, visually inspect for the following:
1. Inspect all compone
corrosion and work
2. Check all bolts for da
damage, worn, bent or broken parts.
 Loading...