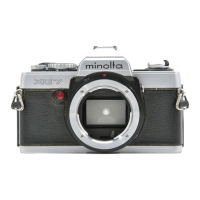
Figure 29
TAB ON
RESISTOR RING
SPRING ON
EXPOSURE-COMPENSATION
LEVER
Figure 31
Next seat the upper brass bushing. Fig.
25. Two tabs on the underside of the up
per brass bushing fit into the two slots of
the lower brass bushing. Fig. 29. Also,
the ends of the spring attached to the
exposure-compensation lever, Fig. 29,
must come against the outer circum
ference of the upper brass bushing.
Finally, seat the film-speed dial with its
slot over the tab on the film-speed brush.
Fig. 30. Replace the black plate (the plate
with the compensation calibrations) so
that the film-speed window is over the
film-speed calibrations. Then rotate the
black plate until you feel its tab drop into
one of the slots in the upper brass
bushing.
CHECKING THE FILM-SPEED
RESISTOR
With the top cover removed, you can
see the parts of the film-speed resistor.
Fig. 31. If you know you're going to
remove the front-plate/m irror-cage
assembly, lift out the film-speed lock, the
lower brass bushing, and the film-speed
brush. However, if you're trouble
shooting or adjusting the camera,
reassemble the film-speed dial.
Why? With the film-speed dial remov
ed, the film-speed brush doesn't make
firm contact with the resistor ring, Fig.
31. The camera then exhibits the symp
toms of an open film-speed resistor:
- only the overrange LED turns on
- the diaphragm always stops down
fully in the S mode
-the shutter delivers only the
mechanical speed (1/1000 second) in
either automatic mode.
Even with the film-speed dial reas
sembled, there's a trick to setting the film
speed. With the top cover removed,
neither the film-speed lock nor the
exposure-compensation lever keys to
anything. You must set both parts in their
proper positions before the film-speed
setting is valid.
A detent spring on the bottom of the
resistor ring provides the click stops for
the compensation settings. The detent
spring catches one of five detent slots in
the rewind-shaft support plate. Fig. 31.
First turn the exposure-compensation lever
until the detent spring seats in the center
slot; that's the "normal" position. The two
slots on each side of the "normal" position
provide the intentional overexposure and
underexposure settings.
Next rotate the film-speed lock to align
the "0 " compensation calibration with
the index on the compensation lever. As
long as the "0" calibration remains align-
 Loading...