Do you have a question about the Mocka Aspiring and is the answer not in the manual?
Take a moment to carefully read through the instructions for seamless assembly.
Create a pleasant atmosphere with music and refreshments before starting assembly.
Verify all parts and tools are present before starting assembly.
Share pictures of your transformed room and recycle packaging.
Attach left and right slides to panels [1] and [2] using screws [K].
Insert dowels [B] into panel [1] and attach panels [3-6] with bolts [C].
Slide panels [8], [9], and [10] into their designated positions.
Insert dowels [B] into panel [2] and attach to the frame with bolts [A].
Attach left rail [G] to panel [11] and right rail [J] to panel [12] with screws [K].
Attach panels [11] and [12] to panel [14] using bolts [C] and barrel nuts [D].
Slide panel [13] into its correct position.
Attach panel [15] to the assembled frame with bolts [C] and barrel nuts [D].
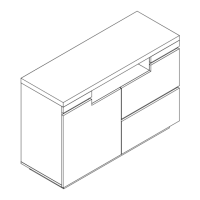
Slide the drawers into their respective slots within the unit.
Attach wall strap [P] to unit and secure to wall with anchor [O], washers [N], and screws [L, M].
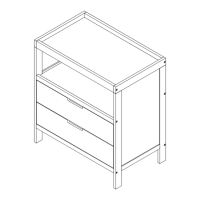
This document provides assembly instructions and user guidance for the Mocka Aspiring Change Table with Drawers.
The Mocka Aspiring Change Table with Drawers is a piece of furniture designed to provide a dedicated and functional space for changing babies, while also offering storage solutions through its integrated drawers. It is intended to help transform a home by providing a practical and aesthetically pleasing item for a nursery or child's room. The product is designed with a focus on creating "beautifully functional spaces" that allow users to "feel comfortably you."
The manual details the various components and hardware required for assembly, including:
The dimensions and specific materials of the assembled change table are not explicitly stated in the provided pages, but the hardware list indicates the types of fasteners used. The design emphasizes stability and safety, particularly with the inclusion of a wall strap for anti-tipping.
The Aspiring Change Table is designed for ease of use and functionality in a home environment. Its primary usage features include:
While specific maintenance instructions are not detailed, the manual implicitly suggests certain practices:
The manual provides a "Happy flat-packing!" section with tips to enhance the assembly experience:
The assembly process is broken down into 10 steps, each with clear diagrams and textual instructions:
The manual also recommends using a power drill on a low-speed setting for quicker assembly, particularly for Phillips & Flathead screwdrivers.
Mocka offers customer support via live chat, email, or phone, with details available on their website.
| Brand | Mocka |
|---|---|
| Model | Aspiring |
| Category | Indoor Furnishing |
| Language | English |