42
11. Commissioning the Receiver
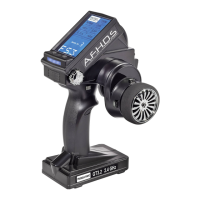
a) Connecting the Receiver
You can connect up to three servos with JR plug connectors and a rechargeable receiver battery to the receiver.
The outputs are assigned as follows (from top to bottom, see
Figure 5):
3 = AUX = channel 3 for additional function servo
2 = TH = channel 2 for the throttle servo or the drive control
1 = ST = channel 1 for the steering servo
B = BATT = connection for the switching cable or the rechargeable
receiver battery
When connecting servos and drive controls, always make sure to pay close attention to the correct polarity of the plug
connectors. The wrap connection for the positive lead (yellow, white or orange, depending on the manufacturer) must
be connected to the inner pin contact. The wrap connection for the negative lead (black or brown, depending on the
manufacturer) must be connected to the outer pin contact.
Depending on the model for which you use the remote control system, the connection as well as the power supply of
the receiver and the servos can be effected in different ways:
Figure 6
Receiver Combustion model (A) Electric car model Electric car model Ship model
Connection with mechanic with electronic with drive control (A/B)
drive control (A) drive control (B)
1 Steering servo Steering servo Steering servo Rudder servo
2 Gas servo Drive control servo Cruise Control Drive control (servo)
3 Additional servo* Additional servo* Additional servo* Additional servo*
BATT Battery box/rech. battery Batt. box/rech. batt. ** *** Batt. box/rech. batt. **/***
Figure 5
B
A
AKKU
7,2 V
SET
SPEED-
CONTROL
 Loading...