EasyManua.ls Logo

Moen 2200 Series User Manual

Moen 2200 Series
4 pages
To Next Page IconTo Next Page
Page #1 background imageLoading...
Page #1 background image
MT659C
MODELS 2200, 2400 & 72200 SERIES
INSTALLATION INSTRUCTIONS
THESE INSTRUCTIONS MUST BE
LEFT WITH HOMEOWNER
TUB AND SHOWER VALVES
All models have 4 port castings. Stops are optional on all models. All models are also available for 1/2 inch I.P.S. pipes
or 1/2 inch copper sweat connections to copper water tubing. The 2400 series include built in pushbutton diverter.
Measurements
CAUTION:
Always turn water off before disassembling the valve. Open valve handle to
alleviate water pressure to insure that complete water shut-off has been
accomplished.
Before turning water on during either rough-in or trim-out, make sure that cartridge retainer clip is in place. The
cartridge and retainer clip were properly installed and tested before leaving the factory. Although it is unlikely, it is
nevertheless possible that through the handling of the valve by any number of persons the retainer clip may not be
properly installed. This should be carefully checked at time of rough-in and trim-out. If the retainer clip is not properly
installed, water pressure could force the cartridge out of the casting. Personal injury or water damage to the
premises could result.
UP
These are shown in the drawings. The depth
measurement is critical. Use the front face of
the plaster ground as a reference point for the
finished wall position, including tile (2-1/16"
[51mm]). The center line of the supply and
discharge piping should be a maximum of 2-3/16"
(56mm) and a minimum of 1-7/16" (37mm) behind
the finished wall surface.
UP
HANDLE
COVER
O-RING
HANDLE
SCREW
HANDLE
KNOB
ESCUTCHEON
WASHER
PLASTER
GROUND
1-1/4"
(32mm)
2-1/16"
(52mm)
CAUTION:
USE 1/2" IRON
PIPE SIZE
MINIMUM. DO
NOT USE 1/2"
TUBING, EXCEPT
WHEN SLIP FIT
SPOUT IS USED.
COMBINATION
MODELS 32"
(813mm)
SHOWER
45"
(1143mm)
48"
(1219mm)
6'6"
(1981mm)
SUPPLY 1/2" I.P.S. OR
COPPER SWEAT
2400 MODEL SERIES
PUSH BUTTON DIVERTER
MODEL ILLUSTRATED
ALL DIMENSIONS NOMINAL
WALL LINE
FLOOR
UP
®
CLIP
EAR
IMPORTANT: SEE FLUSHING
INSTRUCTIONS PAGE 2
Question and Answer IconNeed help?

Do you have a question about the Moen 2200 Series and is the answer not in the manual?
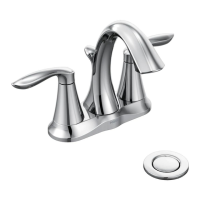
Moen 2200 Series Specifications

General IconGeneral
ADA CompliantYes
Number of Handles1
WaterSense CertifiedYes
Lifetime Limited WarrantyYes
Series2200
FinishChrome
InstallationSingle Hole

Summary

Measurements

Critical Depth and Piping Location

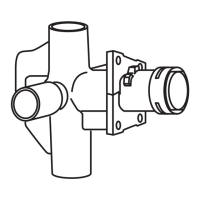
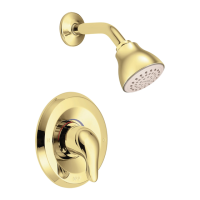
Specifies critical depth and piping placement relative to the finished wall surface for accurate installation.

Stop Operation

CC Type Operation

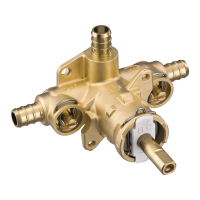
Explains integral casting operation actuated by screwdriver with a 90° turn.

IPS Type Operation

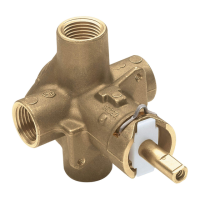
Describes added stop operation actuated by screwdriver, rotating for open/close.

To Rough-in Body Casting

Rough-in Procedure

Details installing the valve body casting, including pipe connections, plugging outlets, and securing pipes.

Flushing

Flushing Instructions

Crucial steps to flush debris before closing wall openings to prevent cartridge damage and leaks.

Disassembly and Reassembly

Disassembly Steps

Instructions for removing handle, cartridge, and stop tube from the valve body.

Reassembly Steps

Guidance on re-inserting the cartridge, retainer clip, stop tube, and handle parts correctly.

Stop Valve Service

Stop Valve Removal

Procedure for removing the stop valve using pliers and a retaining ring.

Stop Valve Installation

Steps for installing a new stop valve, including seating and retaining ring placement.

Trim Installation

Shower Components

Installing the shower arm, flange, and showerhead.

Spout Installation

Details for fitting both C.C. (Slip Fit) and IPS spouts to the tub lookout.

Escutcheon Plate

Mounting the escutcheon plate and handle for final trim, including a final check.

Installation Corrections

Correcting Reversed Connections

Steps to fix reversed hot and cold water positions in back-to-back installations.

Cleaning and Care

Special Finish Care

Recommendations for cleaning and preserving special faucet finishes using soft cloths and wax polish.

Related product manuals