EasyManua.ls Logo

Moen TS50100 - User Manual

Moen TS50100
12 pages
Print Icon
To Next Page IconTo Next Page
Loading...
INS10276 - 10/14
Installation Guide
Guía de Instalación
Guide d’installation
1/4" Hex
Llave hexagonal de 1/4"
Clé hex. de 1/4 po
5/16" Socket Driver Bit
Broca para llave de tubo de 5/16"
Mèche de tournevis à douille de 5/16 po
5" Hole Saw
Sierra perforadora de 5"
Scie à trous de 5 po
Please Contact Moen First
For Installation Help, Missing or
Replacement Parts
(USA)
1-800-BUY-MOEN (1-800-289-6636)
Mon - Fri 8:00 AM to 7:00 PM, Eastern
Sat. 9:00 AM to 3:00 PM Eastern
WWW.MOEN.COM
(Canada)
1-800-465-6130
Mon - Fri 7:30 AM to 7:00 PM, Eastern
WWW.MOEN.CA
Por favor, contáctese primero con Moen
Para obtener ayuda de instalación, piezas
faltantes o de recambio
01-800-718-4345
Lunes a viernes de 8:00 a 20:00 hs.
(Costa Este)
Sáb. 8:00 a 18:30 hs. (Costa Este)
WWW.MOEN.COM.MX
Veuillez d’abord contacter Moen
en cas de problèmes avec l’installation, ou pour
obtenir toute pièce manquante ou de rechange
1-800-465-6130
Du lundi au vendredi :
de 7 h 30 à 19 h, HE
WWW.MOEN.CA
INS10276 - 10/14
HELPFUL TOOLS
For safety and ease of faucet replacement, Moen recommends the use of these helpful tools.
HERRAMIENTAS ÚTILES
Para que el cambio de la llave sea fácil y seguro, Moen le recomienda usar estas útiles herramientas.
OUTILS UTILES
Par mesure de sécurité et pour faciliter l’installation, Moen suggère l’utilisation des outils suivants.
SINGLE RISER TUB FILLER ROUGH IN VALVE
Model TS50100
VÁLVULA EMPOTRADA PARA LLENADOR DE
TINA DE SUBIDA SIMPLE
Modelo TS50100
SOUPAPE DE PLOMBERIE BRUTE DE
REMPLISSEUR DE BAIGNOIRE À UNE COLONNE
Modèle TS50100
Question and Answer IconNeed help?

Do you have a question about the Moen TS50100 and is the answer not in the manual?

Overview

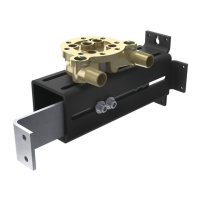
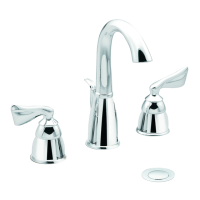
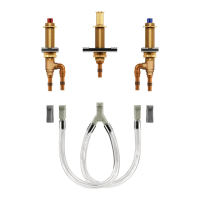
This document describes the installation and features of a Moen Single Riser Tub Filler Rough-In Valve, model TS50100. This device is designed to be installed either from above or below the floor, providing flexibility for various bathroom configurations.

The primary function of this device is to serve as the rough-in component for a tub filler, allowing for the connection of hot and cold water lines and providing a secure mounting point for the finished tub filler trim. It is designed for both standard joists and I-joists, accommodating different construction types.

Technical Specifications:

  • Model Number: TS50100
  • Minimum Installation Depth (from top of joist): 1-1/4 inches (31.75mm)
  • Maximum Installation Depth (from top of joist): 4-1/4 inches (107.95mm)
  • Rough-in Dimensions: The valve body itself has specific dimensions that need to be accommodated within the floor structure.
  • Joist Compatibility:
    • Standard Joists: Can be installed in joists that are less than or equal to 20 inches wide, or greater than 20 inches and up to 24 inches wide.
    • I-Joists: Requires a minimum 2-inch wide standard lumber to span the I-joist vertically, as shown in the diagrams. The lumber must be at least 6 inches deep.
  • Tub Height Chart (Screw Location "X" down from top of joist):
    • 28" to 29" tub height: 1-1/4" to 1-3/4" screw location
    • 26" to 27" tub height: 2-1/4" to 2-3/4" screw location
    • 24" to 25" tub height: 3-1/4" to 3-3/4" screw location
    • 23" or less tub height: 4-1/4" screw location
  • Required Tools (for installation):
    • 5/16" Hex Wrench (provided)
    • 5/16" Socket Driver Bit (for power tools)
    • Pliers
    • Safety glasses
    • Tape measure
    • Drill
    • Hole saw (for floor opening)
    • Wood screws (for mounting bracket, if needed)

Usage Features:

  • Flexible Installation: The manual provides detailed instructions for installation both from "above floor" and "below floor," catering to different construction stages and accessibility.
  • Manifold Assembly: The core component, the manifold assembly, is designed for easy integration with the mounting bracket.
  • Extension Arm Bolts: The design includes extension arm bolts that allow for adjustment and secure fastening within the mounting bracket.
  • Mounting Bracket Screws: The manifold mounting bracket is secured using specific screws, ensuring a stable installation.
  • Leveling Feature: The installation process emphasizes ensuring the manifold assembly is level for proper function and aesthetic alignment of the final trim.
  • Adjustable Rough-in: The system allows for precise adjustment of the rough-in depth to match the specific tub height, as indicated in the "Tub Height Chart."
  • Mud Cover: A mud cover is provided to protect the internal components during construction, which is installed after the rough-in is complete and removed before the final trim installation.
  • Water Stops: The manifold assembly includes integrated water stops, which are crucial for controlling water flow and facilitating maintenance. These should be in the "off" position during initial plumbing and secured.

Maintenance Features:

  • Moen Limited Lifetime Warranty: The product is backed by a limited lifetime warranty against leaks, drips, and finish defects for the original consumer purchaser. This warranty covers parts and finishes for residential use. For commercial, industrial, or business use, the warranty period is five years.
  • Replaceable Parts: The warranty covers the replacement of all defective parts and finishes, indicating that components are designed to be serviceable.
  • Customer Service: Moen provides customer service contact information (phone numbers for USA, Canada, and Costa Rica) for assistance with parts, warranty claims, or installation issues.
  • Accessibility for Repairs: The design, particularly the rough-in nature, implies that the internal working components of the tub filler are accessible for future repairs or replacements without significant demolition, assuming the rough-in itself is correctly installed.
  • Water Shut-off: The integrated water stops allow for easy shut-off of water to the tub filler for maintenance or repair without affecting the entire household water supply.

Installation Steps (Summarized):

  1. Determine Hole Placement: Based on tub height and joist type, determine the precise location for the floor opening.
  2. Install Mounting Bracket: Secure the manifold mounting bracket to the joists, ensuring it is level.
  3. Hang Manifold Assembly: Attach the manifold assembly to the mounting bracket, sliding it into the key slot and securing it with screws.
  4. Tighten Bolts: Tighten all bolts on the manifold mounting bracket with the hex wrench.
  5. Connect Plumbing: Attach the manifold assembly to the supply lines and ensure all connections are secure and leak-free.
  6. Install Mud Cover: Place the mud cover over the manifold assembly to protect it during subsequent construction phases.
  7. Check Water Stops: Ensure the water stops are in the "off" position until the final trim is installed and plumbing is verified.

The manual emphasizes the importance of following all instructions carefully, using the correct tools, and ensuring all connections are secure to prevent leaks and ensure proper operation of the tub filler. It also highlights the importance of checking local plumbing codes before installation.

Moen TS50100 Specifications

General IconGeneral
BrandMoen
ModelTS50100
CategoryKitchen & Bath Fixtures
LanguageEnglish

Related product manuals