8
English
5 Setting the Receiver
intoOperation
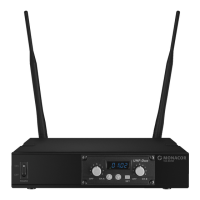
1) Place the receiving antennas (5) in a vertical po-
sition.
2) To connect the receiver to the subsequent audio
unit, e. g. mixer or amplifier, use one of the two
audio outputs:
– either connect the XLR output (6) to a balanced
microphone input
– or connect the unbalanced 6.3 mm jack (7) to
a line input; depending on the sensitivity of the
line input, set the switch (8) next to the output
to “LOW” (low output level) or “HIGH” (high
output level).
3)
For power supply, connect the power supply
unit provided to the low-voltage jack (9) and to
a mains socket (230 V / 50 Hz).
Note: The power supply unit has a low power con-
sumption even when the receiver is switched off;
therefore, disconnect the power supply unit from the
mains socket when the receiver is not operated for a
longer period of time.
6 Operating the Receiver
To switch on the receiver, set the POWER switch (1)
to “ON”. To switch off the receiver, set the POWER
switch to “OFF”.
Each receiver unit (A and B) provides a control (2)
to switch it on and off and to adjust the volume.
Toswitch a receiver unit on, turn the control clock-
wise from the position “OFF”. The left half of the
display (3) applies to receiver unitA, the right half of
the display applies to receiver unitB. When a receiver
unit has been switched on, the corresponding half
of the display will indicate the transmission channel.
Note: To briefly indicate the radio frequency for a re-
ceiver unit, briefly press the button (for unit A) or
(for unit B).
6.1 Establishing
wirelesstransmissionpaths
The distance between the transmitter and the re-
ceiver should be at least 2 m; the distance between
the individual transmitters should be at least 0.5 m.
1)
Set the transmission channels for the receiver
units A and B via channel scan or manually
(
☞
chapter 6.1.1 or 6.1.2). Do not switch on
the two corresponding transmitters for the time
being. If one or more segments of a reception
indicator light up on the display, interference
signals or signals from other transmitters are
being received. Inthiscase, select a different
channel for the respective receiver unit.
2) Switch on the transmitters and set them to the
channel of receiver unitA and receiver unitB
respectively. The segment bars A and B on the
display will indicate the strength of the radio sig-
nals received.
Use the controls to adjust the volume for each
receiver unit.
If no reception is indicated or if the reception is
poor, check if:
– the (rechargeable) batteries of the transmitter are
discharged
– the reception is disturbed by metal objects or other
high-frequency sources
– the distance (transmitter — receiver) is too long
– the reception can be improved by turning the
receiving antennas (5)
– the squelch value is too high (
☞
chapter 6.1.3)
Note concerning multichannel operation:
The number of channels to be used in parallel depends on
the conditions at the place of application (e. g. on inter-
ference due to other wireless systems or high-frequency
sources such as fluorescent lamps). In ideal conditions,
up to four channels can be operated at the same time
without mutual interference. Two examples of a suitable
channel selection for four wireless transmission paths:
Example 1:
channel 01 – channel 03 – channel 06 – channel 12
Example 2:
channel 06 – channel 09 – channel 15 – channel 16
6.1.1 Channel scan
Keep the buttons and simultaneously pressed
for approx. 1 second until appears on the
display. The scan will start: The receiver units A
andB will be set to free channels without mutual
interference. If no free channels are found, the set
channels will be kept.
Note: It is also possible to perform a channel scan for just
one receiver unit: Keep the appropriate arrow key ( for
unit A, for unit B) pressed for approx. 1 second until
appears on the display.
Operation with two receivers TXA-802SR:
When two receivers TXA-802SR are simultaneously
operated and the four transmission channels are to
be set via channel scan, change the group setting
of both receivers:
1) Switch off the receiver units A and B. Then keep
the button SET pressed, while switching on a re-
ceiver unit. The display will indicate the current
group setting (with the digit flashing).
2) Use the button or to switch to .