- 72 -
5. Installation d’un module auxiliaire
a) Affectation modules
Si vous devez installer un nouveau module sur votre
contrôleur de semis, suivre les indications suivantes :
- Eteindre la console.
- Connecter le module, les différents faisceaux et le bouchon
Can (voir diagramme de branchement pages 22 et 23).
- Mettre la console sous tension et l’allumer.
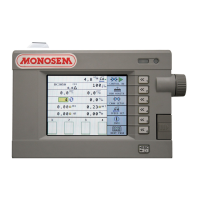
- Attendre que la page Alarme nouveau module s’affiche à
l’écran (Fig.1).
- Appuyer sur la touche
Configuration module
(Fig.1).
- Entrer l’affectation A du module (Fig.2), (si la console ne
l’a pas composée automatiquement), il est conseillé
d’affecter les modules par ordre croissant.
Ex : Module principale : 1
Module auxiliaire : 2
Module de coupures : 3
- Appuyer sur la touche
Configuration auto.
Dans le cas du module cellules supplémentaire :
- Appuyer sur la touche Configuration semoir.
- Entrer le nombre de rangs B associés à chaque module
(Fig.3).
- Appuyer sur la touche Détection cellules.
Une fois le module installé, sortir en appuyant sur la touche
correspondant à l’icône .
5. Mounting an auxiliary module
a) Allocating of modules
If you have to mount a new module on your sowing
controller, please follow the instructions as below:
- Switch off the console
- Connect the module, the different harnesses and the plug
Can (see connection diagram on pages 22 and 23).
- Power on the console and switch it on.
- Wait until the page New module alarm is displayed on the
screen (Fig.1).
- Press the key Module configuration (Fig.1).
- Input the allocating A of the module (Fig.2), (if the
console has not performed it automatically), it is
recommended to allocate the modules in the increasing
order.
Ex: Main module: 1
Auxiliary module: 2
Cut-off module: 3
- Press the key Auto configuration.
In the case of the additional cell module:
- Press the key Seeder configuration.
- Input the number of rows B associated to each module
(Fig.3).
- Press the key Cell detection.
Once the module is mounted, exit by pressing the key
corresponding to the icon .
Mode installation
Fig. 1
Fig. 2
A
B
Fig. 3
 Loading...