MOONEY INTERNATIONAL CORPORATION
M20V SERVICE AND MAINTENANCE MANUAL
Date
MAR 2017
Rev Date
Page
7
52-10-01 - CABIN DOOR(S) REMOVAL
NEW DOORS - A new door will require proper posi-
tioning and trimming to obtain proper sealing. A new
door bulb seal will need to be installed to help door
’nest’ properly into door frame, during fitting and trim-
ming of the new door. The old door latching mechanism
and acrylic glass is to be reused if possible.
-NOTE-
DO NOT USE CHEMICAL OR SOLVENTS. Dam-
age may result if drops of solvents come in con-
tact with either exterior paint, composite shell,
interior trim or acrylic surfaces. It is permissible
to use isopropyl alcohol.
A. Remove the Interior handle.
B. Remove interior door panel screws.
C. Remove inner door panel(s) by gently pulling it
away from the door, allowing hook and loop fasteners
to separate.
D. Remove hold open arm at lower door. Remove
cotter pin and washers from hold open arm shaft, see
Figure 52-1.
E. Remove (4) screws (per side) from exterior door
hinge. Keep hardware for re-assembly.
F. Remove old door and transfer latching mechanism
to new door as required.
52-10-02 - CABIN DOOR SEAL(S)
A. Clean composite door seal mating area with isop-
ropyl alcohol. The composite door mating area is
slightly contoured and allows door bulb seal P/N
X315NT to nest properly.
B. Apply a bead of 3M #08011 black weatherstrip ad-
hesive around mating area. Follow manufacturer’s in-
structions for application and cure time.
C. Starting at the center of the lower door frame,
place one end of the seal into position, press seal firmly
around the door frame making sure that the ends of the
seal butt together.
D. After door seal adhesive is dry, clean door seals
with a clean cloth dampened with isopropyl alcohol.
52-10-03 - CABIN DOOR(S) INSTALLATION AND
TRIMMING
A. When door seal P/N X315NT has been in-
stalled, attach hinge(s), using (4) screws (each door).
Door shell has been made oversize and will need to be
trimmed for proper sealing.
B. Mark/Trim outer edges of door shell carefully
while door is test fitted in place (opening and closing). It
may take several trimmings to establish the door fit-
ment. Door should have even spacing and flush fit,
around door and door frame area.
C. Adjust and secure door hinges as required.
52-10-04 - CABIN DOOR(S) LATCHING
MECHANISM
REMOVAL:
A. With interior panels removed, find upper door link
and remove cotter pins, washers and clevis pins, on
both sides of link assembly, keep hardware for re-as-
sembly.
B. Find lower door link and remove cotter pin, washer
and clevis pin, on link assembly, slide out carefully,
keeping door latching pin and spring together, keep
hardware for re-assembly.
C. Disconnect the upper door latch control cable
yoke ends by removing cotter keys, washers and clevis
pins, keep hardware for re-assembly.
D. Remove the retaining (2) screws on each mount-
ing brackets holding the upper door latch control cable,
keep hardware for re-assembly. Control cable should
be free to remove from old door assembly, reference
the orientation as removed (Upper and Lower).
E. Remove upper door latch, by removing (2) retain-
ing bolts and anchor plate(s), keep latch and hardware
for re-assembly.
F. Remove cabin door handle cover plate, by remov-
ing (3) screws and washers, keep cover plate and hard-
ware for re-assembly.
G. When cabin door handle cover plate has been re-
moved, remove (1) large flanged bushing, (1) washer,
(1) bellcrank and (1) smaller flanged bushing, keep re-
moved items and note orientation for re-assembly.
H. Locate outer cabin door handle, drill and remove
(3) rivets, holding handle to door shell. Carefully re-
move handle by heating and using putty knife to pry
away from door panel.
I. Remove or chip away any adhesive from door
handle, clean with isopropyl alcohol as necessary for
re-assembly.
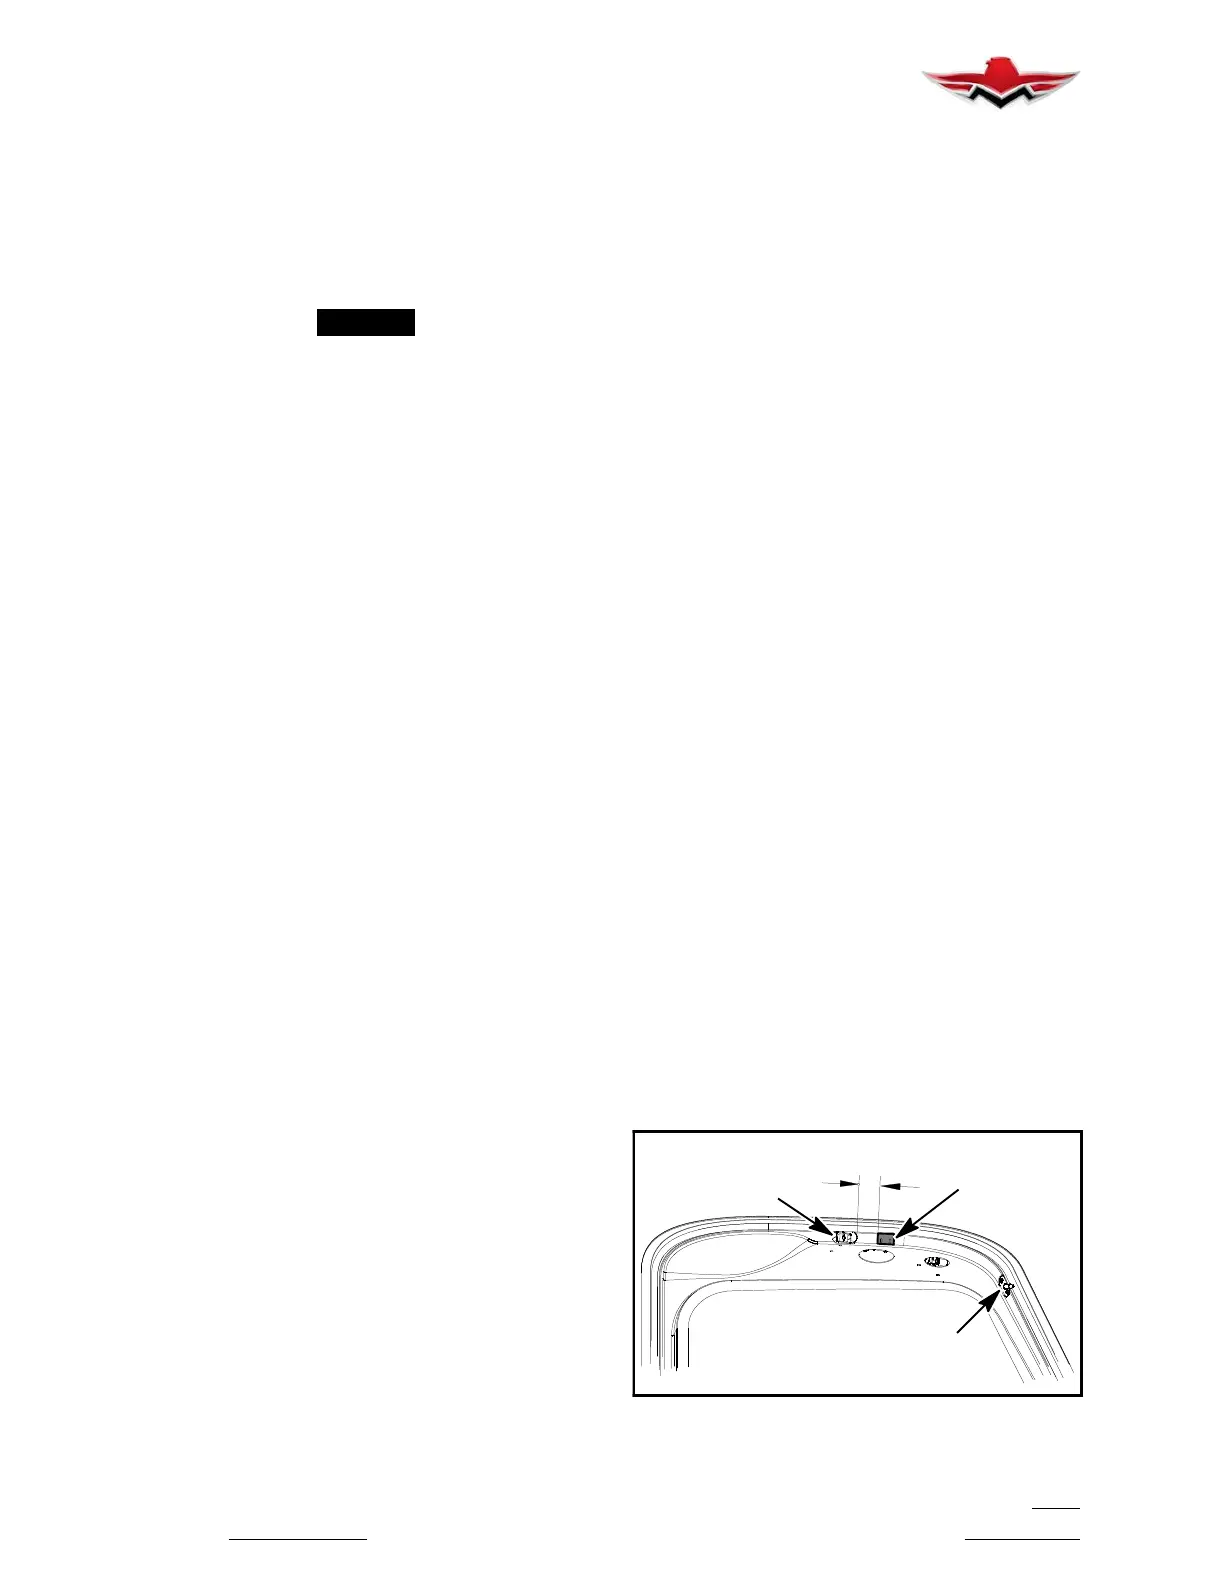
J. Find and remove upper guide pin from door shell,
by removing (2) screws, keep items for re-assembly.
J. Find and carefully remove actuator magnet (chip-
ping) from door shell, remove all adhesive residue and
clean with isopropyl alcohol. Keep magnet for re-as-
sembly (replace magnet if damaged).
1.5 .5
UPPER DOOR
LATCH OPENING
ACTUATOR
MAGNET
REF: UPPER DOOR
UPPER
GUIDE PIN
ACTUATOR MAGNET
FIGURE 52- 3
52-10-01
 Loading...


