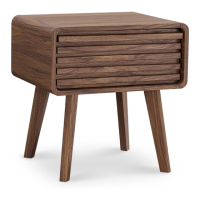
The provided manual describes the Ensley Side Table by Mopio, an item of furniture designed for home use.
Function Description:
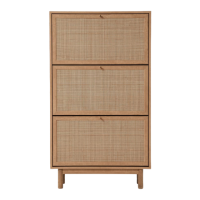
The Ensley Side Table is a piece of furniture designed to be assembled by the user. It features a tabletop, a drawer with a slatted front, and four legs, suggesting its use as a compact storage and display surface next to a sofa, bed, or other furniture. The drawer provides enclosed storage, while the tabletop offers a flat surface for items. The design appears to be modern and minimalist, suitable for various interior styles.
Important Technical Specifications:
- Weight Limit: The recommended weight limit for the tabletop is 20 lbs, and for the drawer, it is 10 lbs. This indicates that the table is designed for light items and should not be overloaded.
- Warranty: Mopio offers a one-year warranty for manufacturing defects, starting from the date of purchase. Warranty registration is required at www.mopio.com/warranty/register.
- Return Policy: A 30-day return policy is offered upon product receipt, with specific conditions regarding original packaging and item condition.
- Assembly Time: The estimated assembly time is 45 minutes, requiring one person for some steps and potentially two for others.
- Hardware Components: The table uses various hardware, including:
- Cambolts (Ø 6 x 35 mm): 14 pieces
- Camlock Big (Ø 15 mm): 8 pieces
- Camlock Small (Ø 12 mm): 6 pieces
- Allen Key (L4): 1 piece
- Screws (M 7 x 50 mm): 4 pieces
- Screws (M 6 x 10.5 mm): 4 pieces
- Screws (M 3.5 x 13 mm): 6 pieces
- Screws (M 8 x 39 mm): 4 pieces
- Rail: 1 piece
- Dowel Big (Ø 8 x 30 mm): 12 pieces
- Dowel Small (Ø 6 x 30 mm): 6 pieces
- Floor Protectors: 4 pieces
- Table Components: The table consists of 11 distinct parts:
- Part 1: 1 piece
- Part 2: 1 piece
- Part 3: 1 piece
- Part 4: 1 piece
- Part 5 (Legs): 4 pieces
- Part 6: 1 piece
- Part 7: 1 piece
- Part 8: 1 piece
- Part 9: 1 piece
- Part 10: 1 piece
- Part 11: 1 piece
Usage Features:
- Assembly Required: The product is flat-packed and requires self-assembly following detailed instructions. Users are advised to ensure all cartons are received, clear enough space, protect the floor, and lay out hardware for easy identification.
- Careful Assembly: Instructions emphasize not overtightening screws or using a drill to avoid damage. Components should be carefully identified (left/right) and installed step-by-step without skipping ahead.
- Two-Person Assembly Recommended: For certain steps (e.g., Step 3, Step 4, Step 5, Step 6), an "extra pair of hands" is recommended, indicating that some parts of the assembly might be easier or safer with two people.
- Drawer Functionality: The table includes a drawer that slides in and out. Proper engagement of sliding pins and rails is crucial for smooth operation.
- Floor Protection: Floor protectors (Part L) are provided and should be attached to the leg ends to prevent scratches to the floor.
- Stability: After assembly, users should ensure all legs are fully tightened and the table is not shaky. The product should be used on a level surface with an equal distribution of weight.
Maintenance Features:
- Cleaning: The product should be cleaned regularly with a dry, soft cloth. Abrasive or liquid cleansers should be avoided.
- Sunlight Exposure: Direct sunlight should be avoided, or curtains/blinds should be used to limit sun exposure to the product, which can help maintain its longevity.
- Weight Distribution: Uneven weight distribution should be avoided over long periods to prevent damage to the product's shape.
- Hardware Checks: Camlocks and screws should be checked and tightened periodically, as they may loosen over time.
- Hot Objects: Hot objects should not be placed directly onto the tabletop surface.
- Spills: Spillages should be cleaned immediately with a dry cloth to prevent surface damage.
- Surface Protection: Placemats or coasters are recommended underneath glasses, cups, bowls, or plates to prevent scratches on the table surface.
- Moving the Table: When moving the Mopio product, it should be lifted carefully by two people to its preferred location.
The manual also provides contact information for customer support (help@mopio.com) for missing parts, assembly assistance, warranty claims, and general inquiries, as well as links to installation demo videos for visual guidance.