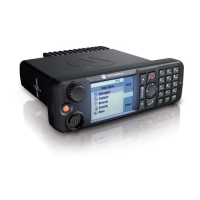
INSTALLATION MTM800 Enhanced Mobile Terminal Installation Manual 73
Data Expansion Head Enhanced Radio-to-Fist Microphone
The GMKN4072 Connecting Cable replaces the existing coiled cord cable of the fist microphone
(Motorola P/N: GMMN4063).
Operation
The crimped wires of the cable have to be connected into the 16-pin Accessory Connector
(delivered with speaker GMSN4066) and than plugged into the 20-pin connector on the rear side of
the radio. The other end has a connector which fits into the fist microphone’s housing.
Making Connections
First connect the exposed four wires to the 16-pin Accessory Connector as shown in Figure 1 and
then plug the connector block into the 20-pin accessory socket on the rear side of the radio. The
connector block plugs into the center of the 20-pin accessory connector (four outside pins do not
connect).
Removing the Existing Coiled Cord Cable
1. Rotate the locking collar at the base of the microphone in a counterclockwise direction until it
stops.
2. Pull the cord out and away from the base of the of the microphone.
Install the new coiled cord GMKN4072 in a reverse order of removal.
Part Number: GMKN4072
Length: 65 cm (2.2 feet)
Figure 35 Pin Assignment of Cable from Accessory Connector to Microphone Housing
1
3
5 7 9 1 1 1 3
1 5
2 4
6
8 1 0 1 2 1 4
1 6
8
7
6 5
4 3
2
1
6 5 c m ( 2 . 2 f e e t )
1nc
2 MIC_AUDIO (blue)
3 PTT (white)
4nc
5nc
6nc
7 GND (black)
8nc
9nc
10 nc
11 nc
12 nc
13 nc
14 HOOK (red)
15 nc
16 nc
1nc
2nc
3 PTT (white)
4 MIC_AUDIO (blue)
5 GND (black)
6 HOOK (red)
7nc
8nc
to Accessory
Connector
to Microphone
Housing

 Loading...