THANK YOU for your purchase of the Pro Feeder. Please read this
sheet before assembling the unit. If you should have any questions
about this product or any other Moultrie product, please contact us
using the information on the back of this sheet. To help us to better
serve you, please complete and mail the enclosed Registration Card.
ASSEMBLING UNIT
Instructions for Pro Feeder
LEGS: With Feeder lying on side, position Leg at
desired height and align holes in Leg with holes in
Bottom as shown. Attach Leg using three provided
1/4” x 3/4” bolts. Repeat for all four Legs - carefully
rotating enclosure. Stand-up Feeder after all Legs are
attached.
HANDLE: Slide provided #8 x 1/2” screws through
four holes in Handle and into Lid as shown. Place
provided four Rubber O-rings onto bottom of screws
followed by Nylon Nuts. Tighten nuts until Handle is
secure.
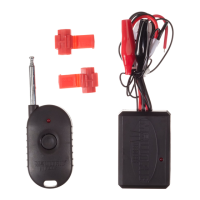
CONTROL BOX: Place the Control Box inside the
Feeder and align four threaded sleeves with holes in side
wall of Feeder as shown. Secure Control Box to the
Feeder Wall using four provided #8 x 1/2” Screws.
Peel the adhesive backing from the Wire Straps and
secure the wire against the side wall of the Feeder as
shown.
Route the thin black Remote Control Antenna Wire
through the rubber grommet to the outside of the Feeder
Wall. Roll the Antenna Wire into an approximate 6”
diameter loop and wire-tie it close to the rubber grommet
as shown.
The additional connector on the Control Box is provided
for the Moultrie Solar Panel upgrade (MFH-DSP). The
Solar Panel will greatly extend battery life and may be
purchased at a Moultrie Distributor or by calling Moultrie
using the telephone number on the back side of this sheet.
The Pro Feeder may be used for distributing fish food or corn. The Pro Feeder is shipped with the
Bottom Section inside the Top Section. Carefully remove the bolt packs, Control Box, Battery,
Charger, and Legs from inside the unit and place them on the ground. Slide the Bottom Section out of
the Top Section using the attached zip-tie handles . Cut-off zip-ties when complete.
METAL ENCLOSURE: Place Top Section on ground with the Flange up. Remove the backing
from the provided Gaskets. Align the holes in the Gaskets with the holes in the flange in the Top
Section. Orient Top Section onto Bottom Section with Viewing Window (Top) on opposite side
from Feed Door (Bottom) as shown. Attach Top Section to Bottom Section using provided 1/4”
x 3/4” bolts.
Top section
has Viewing
Window
Bottom section
has vent holes
Feed Door (not shown)
on opposite side from
Viewing Window
Three screws
per leg
Leg may be
positioned to
desired height
Handle
Lid
Foam Gasket
Top Section -
Bottom View
Lid
Screw
Nylon Nut
Rubber O-Ring
Flange
Adhesive Backed
Wire Straps
(inside Feeder)
Remote
Control
Antenna
Wire in
loop
#8 x 1/2”
Screws (4)
Control Box
(inside Feeder)