EN © 2021 MOEVI. All rights reserved. 3-axis gimbal
17
5. Operation of the device
Before and after work, check each component for signs of damage. Damaged components must
not be used, as this may result in serious damage to the unit or the user's body.
Carry out all the steps gently so as not to damage the components of the unit.
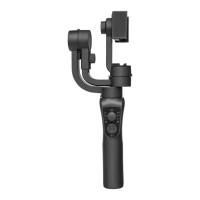
The design of the device allows you to mount smartphones with screen sizes up to
6". The use of phones with larger screens may lead to malfunctions.
Using GoPro sports cameras with a gimbal requires a special adapter that is not included
in the set.
5.1 Charging the battery
Use the supplied USB - microUSB cable to charge the battery before switching on the
device for the first time. If there are problems with the battery or if it needs to be replaced,
the device should be delivered to the manufacturer's service centre. Use only the cable supplied
Using incompatible cables can cause explosion of the battery or damage to your device. Incorrect
charger connection of the USB cable may cause damage to the device or the energy source. All
damages resulting from improper handling are not covered by the warranty.
The device can heat up during charging. It is a regular occurrence and should not affect
the stability or performance of the device. Do not leave the charged device unattended, as
this may result in fire or damage to equipment and other environmental hazards.
If the device does not charge correctly, deliver it with the charger to the manufacturer's
service centre.
To charge the device, you need to connect the USB plug of the supplied cable to a power
source, which guarantees 5 V ⎓ 1 A or higher current at its output, and the microUSB plug
to the microUSB connector on the device. (14). When charging begins, the charge status
LEDs (7) will light up sequentially. When the battery is charged, all charging LEDs will be
on continuously. Once charged disconnect power cable from the device and from the
power source.
The device can be used during charging. This allows you to recharge the device's battery
with a powerbank (not included).
5.2 Switching the device on and off
Before switching on the unit, place the recorder in the holder (1) so that it touches the
components of the TILT axis mechanism (T). Gently swing the adjustable gimbal arm (4) in
the ROLL (R) axis and use the balance screw (3) located in the arm to adjust it so that the
arm with the recording device assumes a horizontal position. Otherwise, you may not be
able to use the gimbal. In addition, inaccurate leveling of the recording device embedded
in the product may overload the motors moving its arm, resulting in higher power
consumption and degradation of the motors' rotational characteristics.
To turn the device on press and hold the ON/OFF button (10) for approximately 3
seconds. Tracking mode LEDs (8) will light up sequentially. Once all three LEDs are lit, they
will flash briefly and then the default tracking (AF) mode will engage and the gimbal arm
will assume its initial position. The built in battery charge level indicator lights (7) will light
up.
To turn on the gimbal hold the ON/OFF button for approximately 3 seconds.
5.3 Powerbank function
The device can be used as a powerbank. To use this function, connect the USB end of the