or adjusted using methods not outlined in this manual. Warranty
also does not cover products that have been misused or products
that have missing/altered serial numbers. The product is not
warrantied against damage in the appearance of the product or for
modifications not outlined in this manual. This warranty does not
cover breakage, bending, or damage that may result from crashes,
falls, or abuse. Normal wear and tear items such as; seals, wipers,
bushings, stanchion coating, stanchions, piston bands, foam rings,
bottom out and top out bumpers, or damage caused by lack of
proper maintenance as outlined in this manual is not covered by this
warranty.
What to do if you need warranty inspection or service:
1. Go to MRPbike.com and locate the warranty contact form in
the support section of the site. Alternatively, call or e-mail MRP
about the troubles you are having and to set up a RA# (Return
Authorization Number).
2. Carefully pack and ship your product, be sure to insure the
package in case it is lost or damaged in transit. (Only the return
shipping to the customer is covered under warranty)
3. Wait for an e-mail confirming MRP has received your shipment.
DISCLAIMER
BECAUSE MRP SUSPENSION PRODUCTS ARE DESIGNED FOR USE IN RACING AND
EXTREME RIDING CONDITIONS, MRP SUSPENSION CANNOT GUARANTEE ANY OF
ITS SUSPENSION PRODUCTS, OTHER THAN FROM MANUFACTURING DEFECTS,
BECAUSE WE HAVE NO CONTROL OVER HOW THE PRODUCTS ARE USED AFTER
INSTALLATION. IN ADDITION, THE PURCHASER ASSUMES FULL RESPONSIBILITY
TO THE EXTENT LEGALLY PERMITTED FOR THE RISKS OF PERSONAL INJURY AND/
OR DAMAGE TO THE PURCHASER’S BIKE OR TO ANY THIRD PARTY THAT MAY BE
INVOLVED IN AN INCIDENT WITH THE PURCHASER.
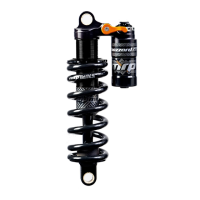
MOUNTING HARDWARE
MRP uses 1/2” (12.7mm) DU bushings on both ends, which
is compatible with the original mounting hardware found on many
recent mountain bikes. Ordering new hardware with your shock is
recommended as this will ensure you have the proper hardware for
your shock and bike. If you contact MRP or your local MRP dealer, we
can verify if you can use the original mounting hardware that came
with your bike.
Before installing your mounting hardware check the direction
the piggy back should face on your frame. This is important so as
setting gets too firm, the shock absorber will
not be able to absorb low-velocity impacts
and weight transfers, thus making the ride
harsher. When the low-speed setting gets
too soft, the shock absorber will be too
active, wallowing more under pedaling and
more prone to bottoming out.
To increase low-speed compression
damping, thus making the suspension stier, turn the black low-
speed compression adjuster knob clockwise (screw in). There are
approximately 30 clicks of low-speed compression adjustment.
To reduce the low-speed compression damping, thus making
the suspension softer, turn the low-speed compression adjuster
counterclockwise (unscrew).
HIGH-SPEED COMPRESSION
The Hazzard’s high-speed compression circuit is an adjustable
blow-o valve that momentarily relieves the pressure building up
inside the shock upon a harsh impact, instantly providing additional
plushness then increasing resistance as needed. The adjustment
controls the level of force (threshold) required to open the blow-o
valve upon fast movements of the shock’s shaft (high velocity) which
can be caused by square-edged impacts, roots, rocks, potholes,
vibrations or brake bumps. When set properly, the high-speed
compression circuit allows the wheel to eectively absorb all impacts
without bottoming out or using too much travel.
Start with the adjustment in the fully open position (completely
turned counterclockwise) and take a test ride. If you tend to bottom
out often or use too much travel upon impacts or repetitive bumps
(but your sag is set appropritely), add more resistance by turning the
adjuster one click (approximately 1/8th of a turn) at a time until you
bottom out only once in a while upon major impacts.
To increase the high-speed compression threshold, thus
increasing the level of force to activate
the blow-o valve, turn the silver
high-speed compression adjuster
knob clockwise (screw in). There are
appoximately 14 clicks (two complete
rotations) of high-speed compression
adjustment. When the high-speed setting
gets too firm, the shock will not be able to
 Loading...