6
Attaching the Deck Skirts
42-inch Decks
The following instructions are for the installation of the mulch kit on tractor’s equipped with a 42-inch deck only. If
your tractor is equipped with a 38-inch deck, disregard these instructions and refer to the previous instructions on
page 4 under the heading 38-inch Decks.
WARNING: Before attempting to install the mulch kit, move the machine to flat, level ground, disengage
PTO, shift to neutral, set parking brake, stop engine and remove key to prevent unintended starting.
WARNING: Always wear safety glasses before performing the following instructions.
NOTE: On tractor’s with pre-drilled holes along the cutting deck’s front lip, it is easier, but NOT necessary, to
remove the cutting deck from the tractor in order to complete the following steps.
1. Remove the cutting deck as instructed in your tractor’s Operator’s Manual.
2. Carefully flip the cutting deck over to expose its underside.
3. Clean all debris from the underside of the deck, specifically the area near the front edge.
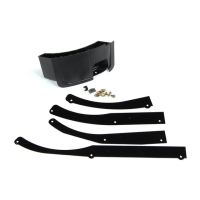
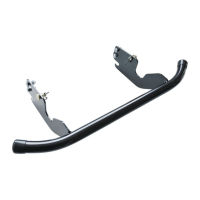
4. Position the deck skirt segments over the front edge of the cutting deck as illustrated in Figure 6. Use locking
pliers or C-clamps to secure the skirt segments in place.
NOTE: On newer-style tractor decks (manufactured in 2001 or later), holes are drilled into the deck at the factory
that will align with the holes found in the deck skirt segments.
IMPORTANT:
The numeral “42” is stamped into the TOP of each deck skirt segment (when viewed in its operating
position). Be certain that the stamped side is facing away from you when positioning the skirt segments over the
front edge of the cutting deck, with the deck flipped upside down.
5. On tractor’s without pre-drilled holes, use a hammer and center punch (or large nail) to mark the six locations
where it will be necessary to drill holes into the cutting deck.
6. Using a 1/8” bit, carefully drill pilot holes into the cutting deck where the six center-punch marks were made in
the step 5.
7. Using a 7/32” bit, carefully drill out the pilot holes just made.
8. Fasten the LH skirt segment in place over the front edge of the cutting deck with three self-tapping screws.
IMPORTANT:
Be certain to fasten the deck skirt so that the heads of the screws are on the underside of the cutting
deck when it’s in its operating position.
9. Fasten the RH skirt segment in place over the front edge of the cutting deck with the two remaining self-tapping
screws.
10. Release the clamping pliers or C-clamps from the cutting deck and set them aside.
11. Secure both skirt segments by tightening all six screws with a 3/8-inch wrench.
 Loading...