This document is an Operator's Manual for the Twin Rear Bagger Kit designed for FastAttach Garden Tractors with a 46-inch deck, specifically for Models OEM-190-182. It provides comprehensive instructions for assembly, operation, and maintenance of the grass collection system.
Function Description:
The Twin Rear Bagger Kit is a grass collection system designed to attach to compatible lawn tractors. Its primary function is to collect grass clippings during mowing operations, depositing them into two grass bags located at the rear of the tractor. This system helps maintain a clean lawn by preventing cut grass from being left on the surface, which can lead to thatch buildup or an untidy appearance. The collected clippings can then be easily disposed of or used for composting. The "FastAttach" designation implies a design intended for quick and easy installation and removal from the tractor.
Important Technical Specifications:
- Compatibility: Designed for all MTD 46-inch cut FastAttach compatible lawn tractors, with the exception of 2001 MTD/Yard-Man Revolution models.
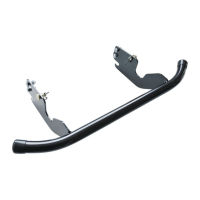
- Components: The kit includes a chute tube, discharge chute assembly, two grass bag assemblies, a support tube, a grass catcher cover assembly, a mounting bracket, and three blades.
- Hardware: A hardware pack is included, containing various nuts, bolts, washers, screws, clevis pins, and hairpin clips necessary for installation. Specific hardware varies slightly depending on the tractor model series (e.g., Series 820-849 vs. 650-699).
- Blades: The kit comes with three new blades: one smaller blade (Part No. 742-0645) for the center spindle and two larger, interchangeable blades (Part No. 742-0644) for the outer spindles.
- Blade Tightening Torque: Blade spindle hex flange nuts should be tightened to between 70 and 90 foot-pounds.
Usage Features:
- Model Identification: The manual emphasizes the importance of identifying the specific model series of the rider (e.g., 600-619, 650-699, 800-819, 820-849) to follow the correct assembly instructions. The model number is typically found on a plate under the seat of the rider.
- Assembly Process: The assembly is divided into sections:
- Attaching the Bracket Assembly: Instructions vary based on the tractor model series. For Model Series 600-619 and 800-819, it involves removing a hairpin clip and clevis pin, positioning the bracket assembly over shoulder bolts, and reinserting the clevis pin. For Model Series 650-699, it involves removing self-tapping screws, placing support brackets, securing them, and then attaching the main bracket assembly.
- Assembling Support Brackets: For Model Series 650-699, this involves removing existing nuts and bolts, rotating the hitch plate 180 degrees, re-inserting bolts, and securing with nuts. For Model Series 820-849, it involves attaching grass catcher support brackets using self-tapping screws and then inserting shoulder bolts.
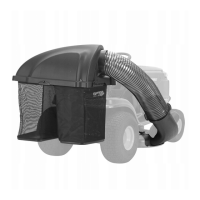
- Attaching Grass Bags & Grass Bag Cover: This involves placing the support tube, hooking the grass bags onto the bracket, placing the grass bag cover, inserting clevis pins through hinges, and securing with belleville washers and hairpin clips. The manual specifically notes to insert clevis pins from the outside in.
- Attaching The Blades: This requires removing the cutting deck, flipping it over, using a block of wood to stabilize blades, removing hex flange nuts, installing the new blades (smaller blade on the center spindle), and tightening to the specified torque.
- Attaching Discharge Chute: This involves raising the deck, raising the chute deflector, positioning the discharge chute over the opening, pushing it down to fit, and locking it with the retainer strap. For older models, it may require removing an existing clip and installing a grass catcher pin. The position of the retainer strap on the discharge chute may need to be adjusted based on the grass catcher pin location on the deck.
- Bagger Usage:
- Emptying Bags: When bags are full, the operator must disengage the PTO, turn off the engine, set the parking brake, flip up the seat, lift the grass bag cover (without removing the chute tube assembly), remove the grass bags, empty clippings using the handle at the bottom of each bag, and then replace the bags, close the lid, flip down the seat, and restart the tractor.
- Safety Precautions: Throughout the manual, "IMPORTANT" and "NOTE" sections highlight critical safety steps and specific instructions. Before any assembly or maintenance, the tractor must be on a firm, level surface, the PTO disengaged, the engine off, and the parking brake set.
Maintenance Features:
- Blade Replacement: The manual details the process for replacing the mower blades, including specific torque requirements for tightening the hex flange nuts. It also specifies which blade goes on the center spindle.
- General Maintenance: The warranty section mentions routine maintenance items such as lubricants, filters, blade sharpening, tune-ups, brake adjustments, clutch adjustments, deck adjustments, and normal deterioration of the exterior finish due to use or exposure. These are generally not covered under warranty.
- Troubleshooting: While not explicitly detailed as a troubleshooting section, the manual provides contact information for Customer Support (phone numbers and website) for assistance with assembly, controls, operation, or maintenance.
- Warranty: A limited warranty is provided for two years against defects in material and workmanship, provided the product is operated and maintained according to the manual and not subjected to misuse or abuse. Normal wear parts have a 30-day warranty. The warranty excludes engine components (which may have a separate manufacturer's warranty), log splitter pumps/valves/cylinders, routine maintenance, service by unauthorized dealers, non-genuine MTD parts, transportation charges, and service calls. It emphasizes that altering safety features voids the warranty.
Overall: The manual is structured to guide the user through the entire lifecycle of the product, from initial model identification and assembly to regular usage and understanding warranty terms. It uses clear illustrations and step-by-step instructions to facilitate the process.