This document is an operator's manual for a Triple Rear Bagger designed for FastAttach™ Garden Tractors with 50-inch cutting decks. It provides instructions for assembly, operation, and maintenance of the grass collector, emphasizing safety and proper usage.
Function Description
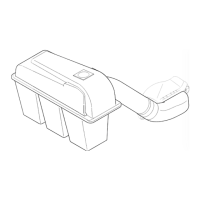
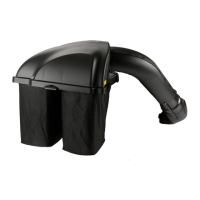
The Triple Rear Bagger is an attachment designed to collect grass clippings from a garden tractor's 50-inch cutting deck. It consists of a cover assembly, a discharge chute, three grass bag assemblies, and various brackets and hardware for mounting to the tractor. The primary function is to efficiently bag cut grass, preventing it from being left on the lawn. It replaces the standard cutting blades with specialized 2-in-1 (Discharge/Bag) blades for optimal bagging performance. The system is designed for easy attachment and removal, allowing the tractor to be used for other purposes when the bagger is not needed.
Important Technical Specifications
- Compatibility: Specifically designed for FastAttach™ compatible garden tractors equipped with 50-inch cutting decks only. It will NOT mount or operate safely on other tractor types or deck sizes.
- Blade Type: Includes three 2-in-1 (Discharge/Bag) blades with a star mounting hole. For Cub Cadet kits, blades with a round mounting hole are included for select Cub Cadet mowers. These blades are intended to replace the existing 3-in-1 (Discharge/Bag/Mulch) blades on the deck for better bagging performance.
- Blade Tightening Torque: Hex flange nuts securing the blades should be tightened between 70 to 90 foot-pounds using a torque wrench.
- Components: The kit includes:
- One Chute Tube
- One Discharge Chute Assembly
- Three Grass Bag Assemblies
- One Support Tube
- One Grass Catcher Cover Assembly
- One Mounting Bracket (Shown Assembled)
- Three Blades (Star Hole Center)
- Three Blades (Round Hole Center)† (included with Model 190-190-100 & OCC-190-192)
- Tube Extension
- Chute Stop Bracket
- Deck Deflector
- Model Numbers: Models 190 & 192 (for 50-inch decks).
- Part Numbers (Partial List):
- 17200A: Catcher Support Bracket
- 742-04056C: Blade, 17.90Lg. Star Mnt, Bag.
- 742-04067C: Blade, 17.90Lg. Rnd. Mnt, Bag.†
- 631-0221A: Elbow Chute Assembly
- 664-04018: Grass Catcher Cover Assembly
- 683-0617A: Chute Stop Bracket Assembly
- 689-00002: Grass Catcher Support Assembly
- 703-05783: Deflector, 50" Deck
- 764-0251: Grassbag Assembly
- 712-04064: Hex Flange Lock Nut, 1/4-20
- 712-04065: Hex Flange Lock Nut, 3/8-16
- 710-3168: Carriage Bolt, 3/8-16: 1.00
- 711-0309A: Clevis Pin
- 714-0117: Internal Cotter Pin, .148 x 3
Usage Features
- Assembly Process:
- Preparation: Place the tractor on a firm, level surface, disengage the PTO, stop the engine, and set the parking brake. Pivot the seat forward for convenience.
- Mounting Bracket Assembly: The bracket assembly attaches to the tractor's hitch plate using a clevis pin and hairpin clip. The hairpin clip must be inserted into the upper hole of the clevis pin for proper security.
- Attaching Grass Catcher Cover and Grass Bags: The support tube of the cover assembly slides into the mounting bracket. Grass bags attach to slots in the cover.
- Attaching Blades: The cutting deck must be removed from the tractor (refer to the tractor's operator's manual). A wood block is used to stabilize the blade during removal/installation. The hex flange nut has a right-handed thread pattern; forcing it in the wrong direction can cause damage and safety hazards. New blades are installed with the part number facing the ground.
- Install Deck Baffle: The front deck baffle is installed on the front right side of the deck using hex nuts, belleville washers, and hex bolts.
- Attaching Chute Stop Bracket: The old chute stop bracket is replaced with a new one from the bagger kit, using the existing hardware or new hardware supplied. This bracket can remain on the unit even when the bagger is not in use.
- Attaching Discharge Chute: The deck is raised to its highest position. The chute deflector is raised, and the discharge chute's hinge pin is inserted into the tube on the chute stop bracket. The chute's front edge fits snugly into the deck opening, and the deflector is slowly lowered. A long retainer strap secures the chute to the deck.
- Connecting Chute Tube: The curved end of the chute tube inserts into the hole in the grass bag cover. The lower end of the chute tube fits over the discharge chute, aligning two notches. Two short retainer straps secure the chute tube to the discharge chute.
- Bagger Usage:
- Emptying Grass Bags: When bags are full, place the tractor on a firm, level surface, disengage the PTO, turn off the engine, and set the parking brake.
- Flip the seat up and open the grass bag cover (without removing the chute tube assembly).
- Remove bags by lifting them up and away from the support tube.
- Empty clippings at a proper disposal site using the handle at the bottom of each bag.
- Replace bags, close the lid, flip down the seat, restart the tractor, and resume mowing.
- Safety: The manual emphasizes reading all WARNING and CAUTION statements for the protection of the installer and user, and to ensure prolonged service life. It specifically warns to always protect hands when servicing blades by wearing heavy work gloves or using heavy rags.
Maintenance Features
- Blade Replacement: The manual instructs to save the three original blades removed from the deck. These can be used as replacements or reinstalled when the bagger kit is not in use.
- Grass Bag Care: Under normal usage, grass bags are subject to wear and tear. They should be checked periodically and washed with water when dirty. Allow them to air-dry; do not apply heat.
- Customer Support: Users are advised not to return the unit to the retailer without first contacting customer support. Support options include visiting www.mtdproducts.com for suggestions, FAQs, and service links, or calling 1-800-800-7310 (or 1-330-220-4683 for parts/accessories). The manual also provides a space to record the model and serial numbers for future reference when contacting support.