This document describes a 42-inch snow thrower attachment designed for 600-series lawn tractors, specifically models manufactured in 1996 or later. It is not compatible with FastAttach™ compatible tractors or any 800-series garden tractors. The manual provides comprehensive instructions for assembly, operation, maintenance, and safety practices to ensure optimal performance and longevity of the snow thrower.
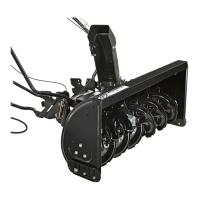
The snow thrower attachment is a two-stage unit, meaning it uses both an auger and an impeller to clear snow. The auger collects snow and feeds it into the impeller, which then discharges it through a chute. This two-stage design is effective for handling various snow conditions, from light and fluffy to wet and heavy.
Function Description
The primary function of this device is to clear snow from surfaces such as driveways, sidewalks, and other open areas. It attaches to the front of a compatible lawn tractor, utilizing the tractor's engine to power its auger and impeller.
- Snow Collection and Discharge: The auger housing, equipped with a spiral auger, collects snow from the ground. The collected snow is then fed into an impeller, which rapidly rotates to propel the snow out through a discharge chute.
- Directional Control: The discharge chute features a directional control assembly, including a chute tilt lever and a chute crank. The chute tilt lever adjusts the vertical angle of the discharged snow, controlling the distance it is thrown. The chute crank rotates the chute horizontally, allowing the operator to direct the snow to the left or right, away from roads, bystanders, or obstacles.
- Lift Mechanism: The attachment incorporates a lift handle and an adjustable lift link that connect to the tractor's lift lever. This system allows the operator to raise and lower the snow thrower attachment from the ground. Raising the attachment disengages the augers and impeller, while lowering it engages them for snow clearing. A lift latch mechanism on the lift handle locks the snow thrower in a raised position for transport or storage.
- Power Engagement: Power to the augers and impeller is engaged by lowering the tractor's lift lever into its lowest notch. The tractor's throttle lever should be in the FAST position for efficient operation. The safety interlock system of the tractor prevents engagement of the snow thrower when the tractor is in reverse.
- Skid Shoe Adjustment: The snow thrower is equipped with adjustable skid shoes on either side of the auger housing. These shoes control the space between the shave plate (the bottom edge of the auger housing) and the ground. This adjustment is crucial for different surface types; a low position is used for close snow removal on even surfaces, while a middle or high position is recommended for uneven terrain or gravel surfaces to prevent picking up and throwing loose stones.
Usage Features
The manual emphasizes safe and efficient operation, providing guidelines for preparing the equipment and the operating area.
- Pre-Operation Inspection: Before use, the operator must thoroughly inspect the area to be cleared, removing any foreign objects that could be thrown by the auger/impeller. It is also important to ensure all safety devices are in place and working, and that all nuts, bolts, and hardware are securely fastened.
- Personal Protective Equipment: Operators are advised to wear safety glasses or eye shields during operation and maintenance. Appropriate winter outer garments, footwear for slippery surfaces, and avoidance of loose clothing or jewelry are also recommended.
- Tractor Preparation: The tractor's cutting deck and PTO belt must be removed before mounting the snow thrower. The tractor's front tires should be elevated slightly during assembly to provide clearance for positioning the support carriage.
- Fuel Handling Safety: Extreme care is advised when handling gasoline due to its flammability. Fueling should be done outdoors, away from ignition sources, and only after the engine has cooled. The fuel tank should not be overfilled.
- Operating Speed: The snow thrower should be operated with the tractor's engine at maximum RPM (full throttle) and at a slow ground speed. Slower speeds allow the attachment to displace snow more effectively, especially in wet or heavy snow conditions.
- Snow Throwing Pattern: Operators should plan their snow throwing pattern to avoid discharging material toward roads, bystanders, or property. Overlapping previously cleared paths is recommended for deep snow to prevent overloading the auger housing.
- Avoiding Overload: The machine should not be overloaded by attempting to clear snow too fast or by driving into snow banks, as this can damage the lift linkage or drive system.
- Visibility and Lighting: Operation should only occur with good visibility and adequate light.
- Emergency Procedures: If the machine vibrates abnormally, the engine should be stopped, power disengaged, and the attachment inspected for damage. If augers become jammed, the tractor's lift lever must be moved to the disengaged position, the engine turned off, and the ignition key removed before inspecting or clearing the jam. A clearing tool should always be used to unclog the discharge opening, never hands or feet.
- Attachments and Accessories: Only manufacturer-approved attachments and accessories, such as wheel weights, tire chains, and cabs, should be used. Tire chains and rear wheel weights are recommended for extra traction. Drift cutters can aid in displacing deep, drifted snow.
Maintenance Features
Regular maintenance is crucial for the safe and efficient operation of the snow thrower attachment.
- Hardware Tightness: Bolts and screws should be checked frequently for proper tightness to keep the machine in safe working condition.
- Component Inspection: Regular visual inspection for any damage is recommended. Snow thrower shave plates and skid shoes are subject to wear and damage and should be replaced with original equipment manufacturer's (OEM) parts only.
- Engine Governor: The engine governor setting should not be changed, nor should the engine be over-sped, as the governor controls the maximum safe operating speed.
- Clutch Controls: Clutch controls should be checked periodically to verify proper engagement and disengagement, and adjusted if necessary.
- Safety Labels: Safety and instruction labels should be maintained and replaced as needed.
- Environmental Responsibility: Proper disposal laws and regulations for gas, oil, and other fluids should be observed to protect the environment.
- Pre-Storage Preparation: Before storing, the machine should be run for a few minutes to clear any remaining snow from the auger/impeller to prevent freeze-up.
- Storage Location: The machine or fuel container should never be stored indoors near an open flame, spark, or pilot light (e.g., furnace, water heater). The machine should be allowed to cool for at least 5 minutes before storing.
- Auger Shaft Lubrication: At least once a season, the shear bolts on the auger shaft should be removed. Oil or spray lubricant should be applied inside and on the plastic bearings on the shaft, and near the shear bolt holes, before reattaching the shear bolts.
- Chute Directional Control Lubrication: The spiral on the end of the lower chute crank, the base of the discharge chute, and the joint blocks connecting the lower and upper chute cranks should be lubricated with multi-purpose automotive grease once a season.
- Shear Bolt Replacement: The augers are secured by shear bolts designed to break if a hard object is struck, protecting the gearbox. Replacement shear bolts and hex lock nuts are provided, and only these specific parts should be used; standard hex bolts should never be substituted.
- Lift Adjustment: If the lift index rod does not latch securely or the pivot release has too much slack, the lift cable length can be adjusted by loosening and tightening hex nuts on the threaded portion of the cable.
- Skid Shoe Reversibility: When one side of the skid shoes wears out, they are reversible, extending their lifespan.
- Engagement/Disengagement Adjustment: If the snow thrower fails to engage or disengage properly, adjustments can be made to the control rod and ferrule on the undercarriage assembly to ensure correct operation.