tint-REMOTE CONTROL
36
INSTRUCTION MANUAL
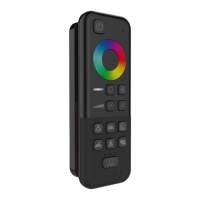
14 Reset button
15 Battery compartment
for 2 batteries LR03 (AAA)
Setup
Inserting the batteries
1. Open the battery compartment at the rear of the tint
remote control.
2. Insert 2 LR03 (AAA) / 1.5v batteries as shown on the
bottom of the battery compartment. Ensure the correct
polarity of the batteries (+/-).
3. Close the battery compartment cover again.
Using the wall bracket (optional)
You can use the wall bracket (supplied) to store the tint remote control safely. A
magnet in the bracket will hold the tint remote control safely in the bracket.
The bracket can be mounted on a surface of your choice with adhesive strips or
screws and wall plugs if required.
The bracket will still attract metal objects, even without any adhesive or screws.
Mounting the wall bracket
1. Remove the protective film from both sticky pads.
2. Press the bracket with some force against a clean, dry and dust-free surface.
 Loading...